10 Roomba 5 Charging Error Fixes
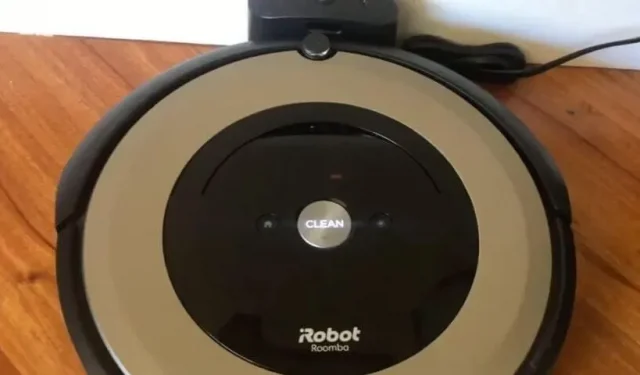
The iRobot Roomba usually charges without problems and keeps the floors clean. But in some cases, charging errors may occur. One of the common Roomba charging errors is error 5, which appears as Err5 on the Roomba display. Let’s find out why this is caused and how to fix it.
What does Err5 mean in Roomba?
Charging Error 5 or Err 5 means there is something wrong with Roomba’s charging system. In other words, Roomba is telling you that it has no idea what the problem is and you need to find out.
This could be an issue with the Home Base, the Roomba charging plates, the battery, or any other issue. But usually the problem can be solved by cleaning Roomba’s charging pads and docking station.
Causes of Charging Error 5 on Roomba
- Accumulation of carbon or dust on Roomba’s docking station, battery, and charging terminals.
- Roomba’s battery is dead or defective
- Yellow tab on battery not removed or removed incorrectly
- The power cord is damaged
- Charging dock is defective
- Roomba motherboard failed
- Software failure
How to fix Roomba 5 charging error?
- Clean Roomba’s Dock and Charging Terminals
- Remove the battery and clean the terminals
- Unplug your dock for a few minutes
- Connect the power cable directly to Roomba
- Raise the front of Roomba after docking
- Make sure the yellow battery tab is removed.
- Roomba should dock without anyone manually docking it
- Roomba Soft Reset
- Reset Roomba to factory settings.
- Contact iRobot support or contact a repair technician
1. Clean Roomba’s dock and charging ports.
Many users reported that after cleaning Roomba’s dock and charging plates, it started charging without any errors. You can use anything to clean Roomba and dock terminals, such as a microfiber cloth, melamine foam, or a toothbrush. You can also apply a cleaning solution, such as a few drops of alcohol or vinegar.
- Apply a small amount of vinegar or alcohol to a clean surface.
- Scrub your toothbrush or any other cleaning tool so that it soaks into it.
- Now gently clean the charging contacts on Roomba and the docking station. Don’t apply too much pressure. Hold it gently.
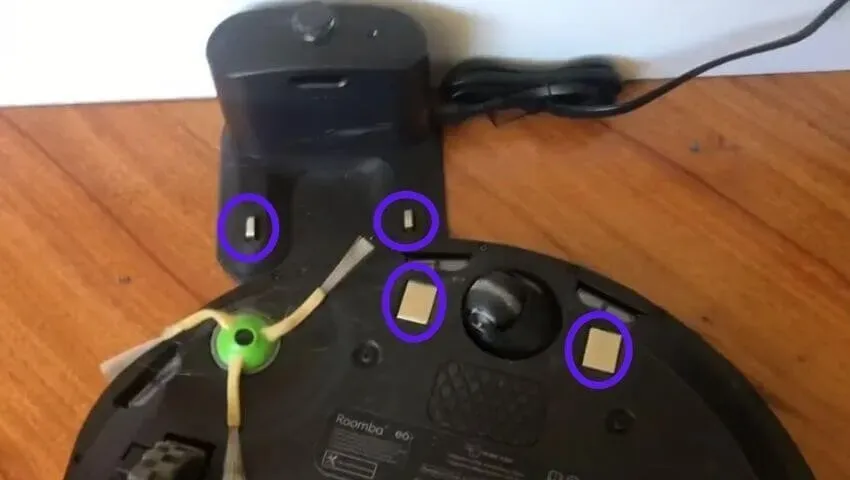
- After cleaning, wipe the terminals with a dry cloth.
2. Remove the battery and clean the terminals.
As with the Roomba docking station and charging plates, carbon and dust can build up on the battery contacts and terminal. This can result in Charging Error 5 on Roomba.
Also, it is possible that the battery is installed incorrectly, which is why the charging error is displayed. Follow these steps to clean the battery terminals and properly place the battery in the bay:
- Turn off Roomba completely.
- Lay it face down on the table.
- Remove the four screws on the four parts of the vacuum cleaner.
- Now remove the battery cover. You will be able to see the battery.
- Remove the battery.
- There will be charging plates on the front side of the battery. Scrub them gently with a toothbrush and vinegar and let them dry.
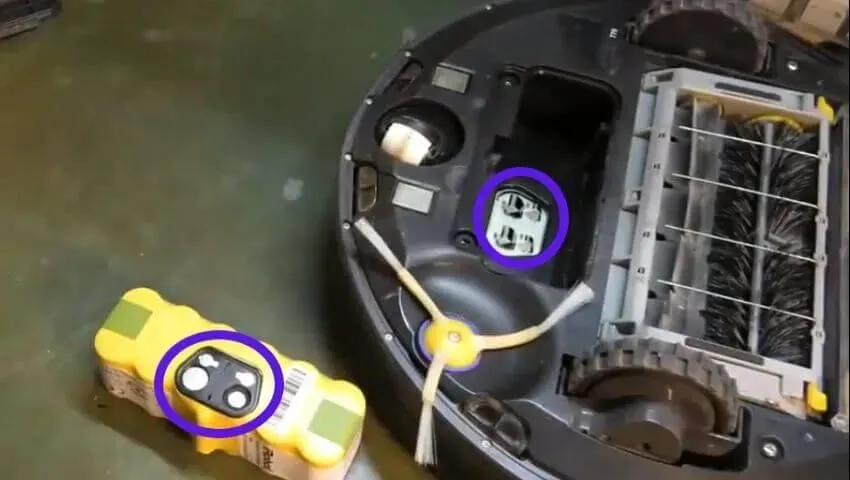
- Inside the battery compartment, you will see the battery terminal. Also clean it and let it dry for 5 minutes.
- After cleaning the battery and battery terminals, place the battery in the compartment.
- Replace the cover and put the screw back in as well.
- Make the Roomba dock again to charge.
3. Unplug your docking station for a few minutes.
There may be a power issue because the docking station can’t charge the device, so Roomba won’t charge. So, reset the dock’s power cycle.
- Disconnect the power cord from the docking station and the wall outlet.
- Leave it like that for a few minutes.
- Plug the power cable back into the wall outlet and dock.
- Connect Roomba to charge and see if it charges.
4. Connect the power cable directly to Roomba.
When Roomba is not charged, it will not work and your room or house will be a mess. Let’s say you see Roomba charging error 5 and you don’t have enough time to fix the problem.
In this case, you can insert the charging cable directly into the vacuum cleaner to charge and resume the cleaning process.
To do this, you only need to find a charging outlet on Roomba and then plug in the power cable to start charging.
5. Raise the front of Roomba after docking
Youtuber came up with this trick. If your Roomba connects to the charging dock but the charging process does not start or you see any error code including error 5, it may be because the Home Base and Roomba charging terminals are not touching each other.
This happens when some spring wears out and weakens the ability of the Roomba or docking station to fully connect its terminals. When these terminals are poorly connected, the charging process does not start.
The solution to this problem is quite simple:
- When Roomba is docked, lift it up at the front.
- You can also put a thin material like a pencil under it.
- As soon as Roomba is raised, the charging terminals will touch and the charging process will begin.
6. Make sure the yellow battery tab is removed.
If you just purchased a new Roomba or replaced the battery, there will be a yellow battery tab at the bottom. This is for battery safety. If this yellow cover is not removed, the battery will not charge.
- Locate the yellow cover on the bottom of the Roomba. It will come out of the battery compartment.

- Pull it all the way.
- Now connect Roomba to the docking station and start charging.
In some cases, the cover does not come off correctly. Instead of being completely removed, it tears, and the visible part comes out, but the removed part remains. The user will think that he removed the cover, but this will cause a charging error because part of it is still sticking to the battery.
So, if you removed the cover and Roomba won’t charge, open the battery compartment and check if the yellow cover is removed correctly.
- You will find four screws on the bottom of the Roomba. Unscrew them to remove the bottom cover.
- Once the cover is off, remove the battery and see if there are any parts of the yellow cover in there. If you find it, delete it.
- Return the battery correctly.
- Reinstall the cover with the screws and tighten the screws.
- Run a test by connecting Roomba to the docking station.
7. Roomba should dock without anyone manually docking it
Roomba robot vacuums are designed to charge only when docked. If someone manually docks them, they won’t charge. Therefore, if you try to charge it by placing it on the docking station, a charging error may appear.
- Lift Roomba off the dock and place it on the floor.
- Let it fit itself.
- The charging process may start.
If this doesn’t work, use the other methods mentioned in this guide.
8. Soft reset Roomba
A soft reset is useful when you want to reset Roomba but don’t want to delete your saved data and settings. In many cases, a soft reset fixes a crash or charging issue. Use these methods to reset Roomba.
8.1 Soft Reset Roomba S, I, and 900 Series Models
- Press and hold the Spot Clean, Home, and Clean buttons on Roomba at the same time.
- Keep the buttons pressed and wait a few seconds for the light around the Clear button to turn on.
- When you see a glowing ring around the clear button, release the buttons.
- The vacuum cleaner will restart after a soft reset.
8.2 Soft Reset Roomba 800 and 600 Series Models
- Press and hold the Home, Spot Clean, and Clean buttons at the same time.
- Keep them pressed until you hear a beep.
- Release the button when you hear a beep.
- Roomba will restart
9. Factory reset Roomba.
A factory reset removes everything from your Roomba and all settings return to their defaults. Perform a hard reset if you’ve tried all the fixes and the charging issue persists.
- Install the iRobot Home app on your Android or iPhone.

- Make sure your phone and Roomba are connected to the same Wi-Fi.
- Launch the iRobot Home app.
- Go to settings.
- Select Factory Reset.
- Roomba will be reset to factory settings.
10. Contact iRobot support or contact a repair technician
Charging error 5 does not specifically tell us what is causing the problem. So, if you’ve followed the methods above and your Roomba won’t charge, it could be an internal hardware issue.
If you are lucky it could be a battery issue and replacing the battery will fix the charging error. But in other cases, the problem may be due to a malfunctioning motherboard.
You can purchase a new battery and replace it yourself, but since we are not sure if this is the cause of the problem, you should inspect the cleaner before making any replacements.
If your Roomba is under warranty, please contact iRobot Support. For older vacuum cleaners, have a repair shop check it out.
Conclusion
Roomba 5 charging error is usually easy to fix, as you can clean Roomba’s charging terminals and dock to fix it. You can also reset Roomba to fix crashes. But in some cases, you may need the help of iRobot support or a repairman.
FAQ
How do I manually reset Roomba?
To manually reset Roomba, follow these steps:– Press and hold the Home, Spot Clean, and Clean buttons at the same time– Hold them down until you hear a beep or ring of light on the Clean button– Release the buttons
How to restart Roomba?
If your Roomba has Spot Clean and Dock buttons, restart Roomba by pressing and holding these two buttons for 10-15 seconds. On other models with a clear button, press and hold the clear button for 10-15 seconds to reboot Roomba.
How do I know if my Roomba battery needs to be replaced?
There is no clear way to tell if a Roomba battery needs to be replaced, but you can look for a few signs: – Roomba doesn’t hold a charge for long – Roomba needs to be charged more often than before – Your Roomba is too old – You see battery problems very often charging
What to do if Roomba won’t charge?
If your Roomba won’t charge, follow these steps:– Clean the charging terminals on Roomba and the docking station– Remove the battery and clean its contacts and terminals– Thoroughly clean Roomba– Connect the power cord directly to Roomba– Unplug the power cord from the docking station on a few minutes – hard reset Roomba
Leave a Reply