12 Fixes: Failed to Write Core Dump Issue on Windows
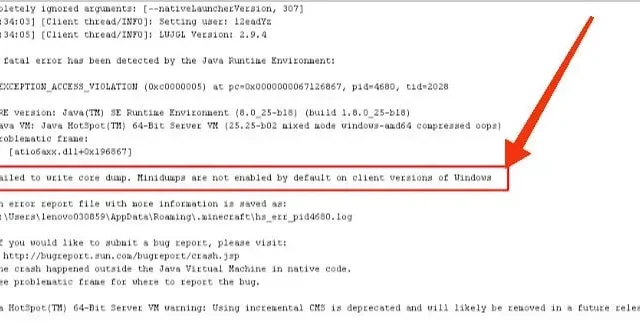
If you play Minecraft regularly, then you must have come across the “Failed to write memory dump” error message on your screen. Now you must be wondering about this problem and how to fix it.
First, you need to understand that in 99% of cases, the “Failed to write core dump” error is not caused by the game, but only by some problem on your system.
What causes the “Failed to write core dump”error in Minecraft?
Legacy Java
If your JAVA installed on your computer is out of date, this is one of the main causes of the problem on your screen. You need to check if JAVA is up to date on your system. And if not, then you need to update.
Outdated operating system
An outdated operating system can cause problems with your Minecraft and hence it won’t work properly. Hence, you need to follow the steps to update Windows on your system. These steps are mentioned below in the next section.
Memory errors
This is another possible and common cause of the problem. If your system is facing any kind of memory issues, it will result in the error of not being able to write core dump to your screen.
You must make sure that your system does not encounter such errors. And in case there is a memory error, fix it as soon as possible.
Methods to fix Minecraft error message “Failed to write memory dump”
- Restart your computer
- Install the latest Intel graphics driver
- Enable VSync and Triple Buffering from NVidia Control Panel
- Force Windows to create a dump file
- Reinstall AMD software or AMD Catalyst utility.
- Update your Windows version
- Update Java
- Restore previous version of JDK
- Override Minecraft File Manually
- Delete folder. metadata
- Run the game as administrator
- Reinstall the game
1. Restart your computer
This may seem like the simplest fix, but it has been proven to be the most effective for most problems on the system.
Therefore, you should also restart your computer and check if the configuration issues that occurred during startup are resolved or not.
2. Install the latest Intel graphics driver.
There is a possibility of a problem due to ig9icd64.dll. In this case, the error is corrected using the Intel Update Assistant to update the entire set of graphics drivers.
- Visit the official Intel website and click the “Get Started”button.
- Wait for the initial scanning process to complete.
- Click on the “Download All”button on the screen. And wait for the process to complete.
- Navigate to each setup executable and double click on them.
- Complete the driver installation process by following the prompts on the screen.
- Once all new updates are installed, restart your computer.
3. Enable VSync and Triple Buffering in NVidia Control Panel.
This issue is common in mid-range and high-end Nvidia GPUs. This is because while playing Minecraft, the graphics card settings do not enable VSync.
Below are the steps to enable Vsync and Triple Buffering using the Nvidia Control Panel from the Manage 3D Settings menu:
- Right click on your PC screen.
- Select Nvidia Control Panel from the context menu on the screen.
- Select “Manage 3D Settings”under “3D Settings”in the menu on the left.
- Select Program Settings from the menu on the right.
- Click Add.
- Click Browse.
- Find the location of your Java installation.
- Click on the java.exe file.
- Click Open.
- Find vertical sync and triple buffering in the list of program settings after downloading the executable.
- Enable the default settings for each of them using the drop-down menu.
- Make the changes permanent by clicking the Apply button.
4. Force Windows to create a dump file
Task Manager can be used to force Windows to create a dump file. And it can also solve the problem you are facing. Steps to create dump files:
- Open the Minecraft or Minecraft launcher.
- Right click on the taskbar.
- Select Task Manager. Or you can press the Ctrl + Shift + Esc keys and hold them together.
- Right-click Java™ Platform SE Binary. If this is not available on your screen, select the Minecraft launcher.
- Select the “Generate dump file”option.
- Wait for the process to complete.
- Restart your computer.
5. Reinstall the AMD software or AMD Catalyst utility.
AMD GPU may cause “Failed to write core dump”error. Due to a partially corrupted installation of AMD software, minidumps will not be enabled by default on client versions of Windows.
- Open the Run dialog box by pressing the Windows key + R key.
- Enter appwiz.cpl.
- Open the Programs and Features menu by pressing the Enter key.
- Click the OK button at the confirmation prompt.
- Complete the uninstallation process by following the on-screen instructions.
- Restart your computer.
- Wait a few minutes until the next startup is complete.
- Download the latest AMD catalyst.
- Open the setup executable after the download is complete.
- Complete the installation process by following the instructions on the screen.
- After installation is complete, restart your PC.
Check out Minecraft by joining or creating a Minecraft server.
6. Update your Windows version
Microsoft frequently releases security updates and bug fixes for the Windows operating system. Updating Windows is very important as otherwise it can lead to several errors.
- Go to the bottom left side of the taskbar.
- Launch the Windows Search dialog by selecting the magnifying glass icon.
- Enter Windows Update.
- Choose the first result.
- After launching the Update & Security window, go to the Windows Update tab on the left side.
- Click on the “Check for Updates”option in the right column. Wait for the system to find an updated version.
- Follow the instructions on the screen to complete the installation process.
7. Update Java
By now it should be obvious that if minidumps are not enabled on your system, then this failed to write core dump error will appear on your screen.
- Your desktop will have a “My Computer”and “This PC”icon; right click on any of them.
- In the additional menu, click “Properties”.
- The System Type section will display the OS architecture; write it down.
- Close windows.
- Go to the official Java website to install the latest version compatible with the OS architecture.
- Once the download process is complete, click to start it.
- Follow the instructions on the screen.
- Copy the latest version of Java from your root directory folder.
- Press the Windows + E keys together to open the Windows Explorer menu.
- Visit the root directory (“C:\\Program Files\\Java”for 32-bit architecture and “C:\\Program Files (x86)\\Java”for 64-bit architecture) of Java on your PC.
- Paste the folder you copied earlier.
- Select the “Replace All”option.
- Go to the Forge MOD Manager from the welcome screen after starting Minecraft.
- Click on the “Edit Profile”option.
- In the “Java Options (Advanced)”field, paste the correct path.
- Restart your computer.
8. Restore previous version of JDK
The latest version of Java had several memory dump issues. Therefore, restoring the previous version may fix the error. These steps are:
- Launch the search bar by pressing the Windows + S keys.
- In the search bar, type Apps & Features.
- Launch the settings option by selecting the first result.
- In the right pane, select Java.
- After clicking on the delete button, follow the instructions on the screen.
- After uninstalling Java, complete your visit to the official site to download the version of your choice.
- Start the installation process by clicking on the file. exe.
- After the process is complete, reboot your system.
9. Override Minecraft File Manually
If your Minecraft comes with minidumps disabled, you must override the Minecraft file manually. Do it,
- On the desktop, right-click the Minecraft icon.
- Select an option for the location of the open file.
- Navigate to the folder. minecraft after opening the root directory.
- Locate the options file.
- Open the settings file with Notepad.
- Look for the fboEnable parameter.
- Switch it to the false option.
- Restart the game after saving the file in an up-to-date format.
10. Delete the folder. metadata
- You need to go to C:\Users\(user)\Documents\workspace\.metadata folder.
- The folder should contain links to your project. Delete the folder from them. metadata.
- After removing it, import all current projects to the workplace.
- Check if the Minecraft error when writing a core dump is fixed.
11. Run the game as an administrator
- Find the launcher in your Minecraft installation folder.
- Right click on it.
- Click Properties.
- Check the “Run this program as an administrator”checkbox on the “Compatibility”tab.
- Click “Apply”
- Click OK.
12. Reinstall the game
- Launch the Run dialog box by pressing the Windows + R keys at the same time.
- Enter Appwiz.cpl in the box.
- Launch the application control window by pressing the Enter key.
- Right click Minecraft.
- Remove it by clicking Remove.
- Install the game again from their website.
Conclusion
Hence, the error message “failed to write core dump”on your screen will no longer bother you. You must know how to fix it; otherwise it can be hectic.
If none of the above fixes worked for you, you can use third-party apps to determine the cause. And once you’ve done that, you can try a specific solution to this problem.
Leave a Reply