12 Fixes: There was a problem starting LogiLDA.Dll error
No matter what features Windows provides to your desktop, it often runs into bugs. This may be due to several reasons.
But handling these errors can be quite tedious, especially for those who don’t have technical knowledge about it.
Among the most common Windows errors is the LogiLDA.dll error associated with the Logitech devices connected to your computer.
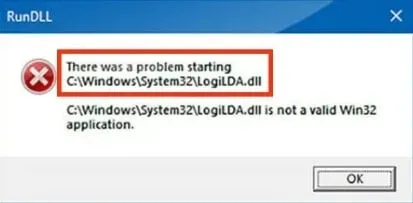
If you keep getting the error “There was a problem starting C:\Windows\System32\LogiLDA.dll”, don’t worry. We got your back.
Read on like in this article; we have compiled all the information related to the LogiLDA.dll file, the error mentioned above and its quick fixes. But before we get to the fixes, let’s discuss this file first.
What is LogiLDA.dll?
LogiLDA.dll is a dynamic link library file that is a software component of the Logitech Download Assistant that contains data resources and program code.
This file is located in the C:\Windows\System32 folder.
Whenever you connect any Logitech device, such as a mouse or keyboard, to your computer, it automatically loads this LogiLDA.dll file. And any problems in this file lead to other errors.
What are the causes of LogiLDA.dll error in Windows 10/11?
While there can be many causes for the LogiLDA.dll file error, Windows users report the most common ones.
- Either you have an incompatible version of Windows or a file, or you didn’t fully install the necessary files during the installation of your Logitech device.
- The file corruption has occurred in the LogiLDA.dll file or its location.
- Some kind of software conflict has occurred on your PC.
- The program might be looking for the file in the wrong directory; this could be due to recent windows updates.
Among them, the main cause is a corrupted LogiLDA.dll file. With that said, let’s now move on to 12 important fixes you can try.
How To Fix Windows 10 LogiLDA.dll Error? Top 12 Solutions
This section contains the top 12 fixes to fix the LogiLDA.dll error.
- Restart Windows 10
- Update Windows 10
- Disable LogiLDA on Windows startup using Task Manager
- Use a third party app
- Erase the Logitech Download Assistant key from the registry
- Uninstall the Logitech SetPoint software.
- Reinstall the Logitech Driver
- Reinstall your mouse drivers
- Download Logitech Gaming Software
- Perform an SFC scan
- Perform a System Restore
- Remove LogiLDA.dll from System32
Let’s discuss each of these solutions in detail below.
1. Restart Windows 10
Whenever you encounter any error on your Windows PC, a quick restart is the best hack that works 90% of the time.
Therefore, you should also try rebooting your system, which will require the following steps.
- Go to the start menu search bar. Or press the Windows button on your keyboard.
- Click on the “Power”option on the left sidebar.
- Select the Restart option.
After a few seconds, your device will restart and you can check for the LogiLDA.dll error again.
2. Update Windows 10
In some cases, errors are caused by outdated or older versions of Windows on your device. Therefore, updating Windows 10 to the latest version can resolve this error.
Now there are two ways to update Windows. First, you can follow the manual procedure; secondly, it is recommended to schedule an update in case you forget to manually update it.
Steps to update Windows manually:
- In the lower left corner of the screen, click the Start or Windows button.
- Click on the gear icon to open the device settings.
- Select the Update & Security option.
- In the left sidebar of the screen, click the Windows Update tab.
- Click on the Check for Updates option.
If there is any update available, it will be installed after you click the Update button. But if there are no updates available, you will receive a notification that your hardware is incompatible.
After installing the update, restart your device to complete the process.
Steps to update Windows on a schedule:
- In the lower left corner of the screen, click the Start or Windows button.
- Click on the gear icon to open settings.
- Select the Update & Security option.
- Select the Schedule restart option.
- Click the slide next to the Schedule Timer button to turn it on.
- Now set the timer by selecting the date and time of your choice using the ticker and date dropdown.
Check now if the LogiLDA.dll error still appears. If yes, try the following solutions.
3. Disable LogiLDA at Windows startup using Task Manager.
Following are the steps to disable LogiLDA.dll on Windows startup using Task Manager.
- Press the Windows + R keys to open the Run dialog box.
- Write taskmgr in the text field.
- Click OK.
- In the Task Manager window, go to the Startup tab.
- Select LogiLDA from the list of launch buttons, and then click the Disabled button.
- If there are any other LogiLDA items, disable them from Windows startup.
At the very least, LogiLDA must be disabled in order to fix the error on your device.
4. Use a third party app
It is possible that some problematic files are causing the LogiLDA.dll error on your device, which you need to resolve.
Any third party recovery app can solve this problem in one go. After recognizing a potential threat, such applications usually scan your device for corrupted files, viruses, malware, and data. It will then either delete or restore it.
Restoro is one such app that we recommend you install on your device. It has an online library with functional replacement DLLs and a built-in automated system. It restores all corrupted data or files on your device with just one click.
Once Restoro is installed, launch the app on your device and follow the onscreen instructions to start the process. The app will take care of the rest.
To move forward, follow these steps.
- Install the Restoro app after downloading it.
- Launch the software.
- Wait while the application scans for potentially corrupted files or data.
- Click the Restore button.
- Restart your computer for all changes to be applied to your device.
Once this is completed, the LogiLDA.dll error will be fixed and your system will run like new.
5. Delete the Logitech Download Assistant key from the registry.
Below are the steps to remove the Logitech Download Assistant key from the registry in order to resolve the above error.
- Press the Windows + R keys to open the Run command window.
- Type Regedit in the input box and click OK.
- In the Registry Editor path text box, type the following command:
- ComputerHKEY_LOCAL_MACHINESOFTWAREMicrosoftWindowsCurrentVersionRun
- Select the Uninstall option by right-clicking the Logitech Download Assistant key.
Also, clear the Logitech registry key to make sure the process completed successfully.
Alternatively, you can use a batch file to remove the Logitech registry key. Here’s how to do it.
- Open Notepad.
- Copy the batch file using the Ctrl + C keys.
- Press the Ctrl + V keys to paste the batch file into Notepad.
- Click on the “File”option.
- Click the Save As button to open the window.
- Select the All Files option.
- The name of the batch file includes Logitech.bat.
- Save the file to your desktop and click the SAVE button.
- On your desktop, right-click the Logitech.bat file.
- Select the “Run as administrator”option.
6. Uninstall the Logitech SetPoint software.
If you are still unable to resolve your LogiLDA.dll problem, we recommend uninstalling Logitech SetPoint Software. To do this, follow these steps.
- In the Run box, type appwiz.cpl and click OK. He will immediately open the window.
- In the search field, enter the keyword – Logitech SetPoint.
- Click the “Uninstall”button once you have selected all the listed SetPoint software.
- Restart your Windows operating system.
- Install the latest SetPoint software.
- To add software to the window, open the software.
This should fix your LogiLDA.dll error, but if it doesn’t, you can also try reinstalling the software with the latest version. In most cases, uninstalling the software helped a few users.
7. Reinstall the Logitech driver.
To reinstall the Logitech driver, follow these steps:
- Type devmgmt.msz in the Run box and click OK.
- Expand the list of devices by double-clicking it.
- Select the Uninstall Device option by right-clicking Logitech HID Mouse.
The default driver will be reinstalled after this for the mouse after the device is rebooted.
8. Reinstall your mouse drivers
Reinstalling mouse drivers also works if you’re using a Logitech mouse. For this, the following steps are performed.
- Press Windows + X keys.
- Select the “Device Manager”option.
- Expand the lists of other pointing devices and mice.
- Select the Uninstall Device option by right-clicking Logitech HID Mouse.
- Restart your computer along with disabling the mouse.
- Then reinstall the drivers after connecting the mouse.
Now check for the LogiLDA.dll error. If it continues to appear, try another solution.
9. Download the Logitech gaming software.
A new app called Logitech Gaming Software has been introduced to keep your hardware up to date.
Hence, you should get a LogiLDA.dll error if you haven’t downloaded the software yet. To download, follow these steps.
- Uninstall Logitech Download Assistant.
- Download the latest software from the official Logitech website.
- Follow the on-screen instructions to set up the software on your device.
Check for the LogiLDA.dll error if it is fixed.
10. Perform an SFC scan
Performing a System File Scan (SFC) will also fix the problematic issue that is causing the LogiLDA.dll error. To do this, follow these steps.
- Right-click the Start button.
- Click the Windows PowerShell (Admin) option.
- Run this command – SFC /scannow and press the Enter key.
Wait while the tool scans your Windows OS. It can take some time. After that, he will either fix the problems or fix them.
11. Perform a System Restore
If the SFC scan was unsuccessful, we recommend that you perform a system restore. This will take you back to when you didn’t have this problem.
And it’s best if you don’t want to perform a system restore that can delete your important files.
To perform a system restore, follow these steps.
- Open the Run window by pressing Windows + R.
- Enter the systemysdm.cpl command and click OK.
- Click the System Protection tab in the System Properties window.
- Click on the System Restore option.
- Click “Recommended Recovery”.
- Select the “Next”button.
Follow the instructions on the screen to complete the process.
12. Remove LogiLDA.dll from System32.
As a last resort, deleting LogilDA.dll from System32 can help you. To do this, follow these steps.
- Open File Explorer by pressing Windows Key + E.
- In the location, navigate to the LogilDA.dll option.
- Select the Delete option by right-clicking the Logitech.dll file.
Reboot your system and check for the LogiLDA.dll error.
Conclusion
Here you go. We hope this guide has been helpful to you. We’ve tried everything from the LogiLDA.dll file to what caused the “There was a problem starting C:\Windows\System32\LogiLDA.dll”message.
Finally, we are done with 12 essential fixes to resolve this common LogiLDA.dll error. And guess what? You don’t need professional help.
And this is important because, ultimately, you will be using your device; therefore, this background knowledge is necessary.
Leave a Reply