2 Best Ways to Set Up Windows 10 Without a Microsoft Account
Many users have reported that they cannot find any option to create a local account when setting up Windows 10. Usually, during the installation of Windows 10, you are asked to enter a Microsoft account or create one in order to continue.
Some versions of Windows offer the option to select an offline account (local account), while others do not. During the installation of Windows 10, it becomes difficult to create a local account. So, how to set up Windows 10 without a Microsoft account when setting up Windows 10? Let’s teach!
What is the difference between a local account and a Microsoft account?
- Local account
- Microsoft account
1. Local account
A local account is the traditional method of creating an account in the Windows 10 operating system. It is not associated with anything on the Internet. You can create it without internet connection and name it whatever you like.
This is a local account when you create an account on Windows without a Microsoft email address. The first local account you create in Windows automatically becomes an administrator account.
Local accounts are independent and more secure because they are not connected to the Internet. In addition, you can choose any password for the account, while in the case of a Microsoft account, you need to use the password that you have set for your Microsoft email address.
2. Microsoft account
On the other hand, a Microsoft account means signing into Windows 10 with your Microsoft email address. This may end up in Outlook, Live or something similar.
Signing in with a Microsoft account in Windows 10 is the same as signing in to an iPhone with an Apple ID or signing in to an Android phone with a Google account (Gmail address).
You are automatically authorized in many provider services. If you use a Microsoft account on Windows 10, you also connect to your Microsoft services like Skype, Outlook, OneDrive, Microsoft Store, Office 365, and more.
The main benefit of using a Microsoft Account for Windows is keeping your data in sync. Many changes on your Windows PC apply to your Microsoft devices. You can sync your network profiles, Microsoft Store app settings, and more.
However, the downside of using a Microsoft account is less privacy. When your email is connected to your Windows 10, it’s easier for Microsoft to track your activities.
Ways to set up Windows 10 without a Microsoft account
- Set up Windows 10 Home without a Microsoft account
- Setting up Windows 10 Professional without a Microsoft account
1. Set up Windows 10 Home without a Microsoft account
- Use the back button when the installer asks for a Microsoft account
- Disconnect your computer from the Internet when setting up Windows 10 (the best way)
- Create a new dummy account during installation and then delete it later
1. Use the back button when the installer asks for a Microsoft account.
In previous versions of Windows 10 Home, the “Sign in with Microsoft”screen had an “Offline account”option. It was removed to encourage users to use a Microsoft account to set up Windows 10. But you can use the back button to go back and create a local account instead. Follow these steps:
- When Windows starts after installation, you will see the installation screen.
- Select your region and click Yes.
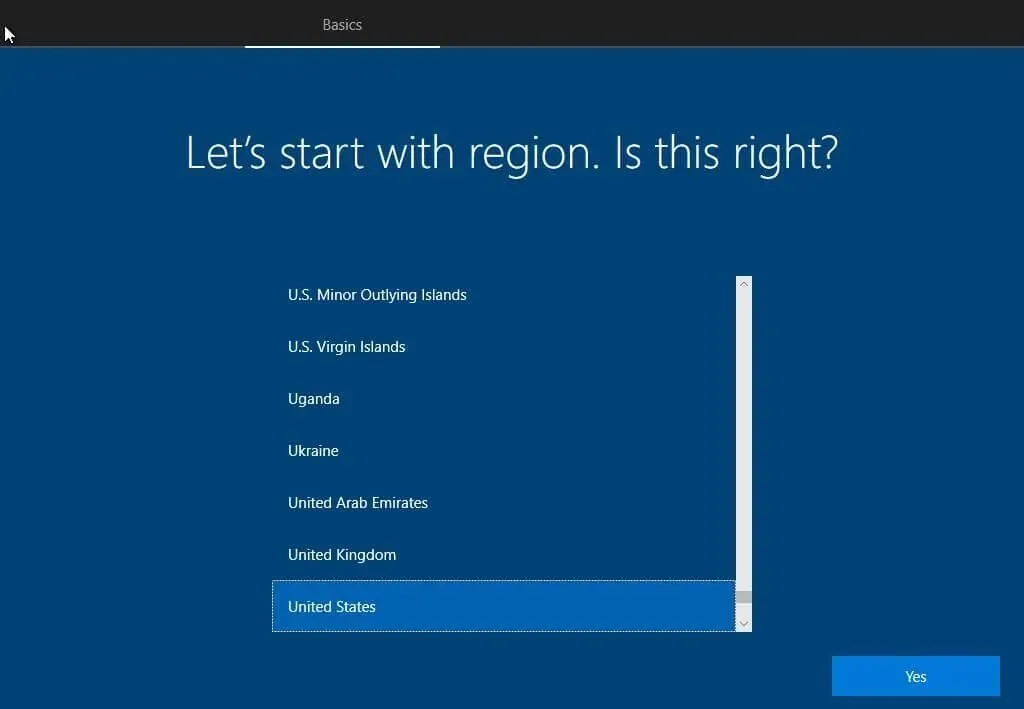
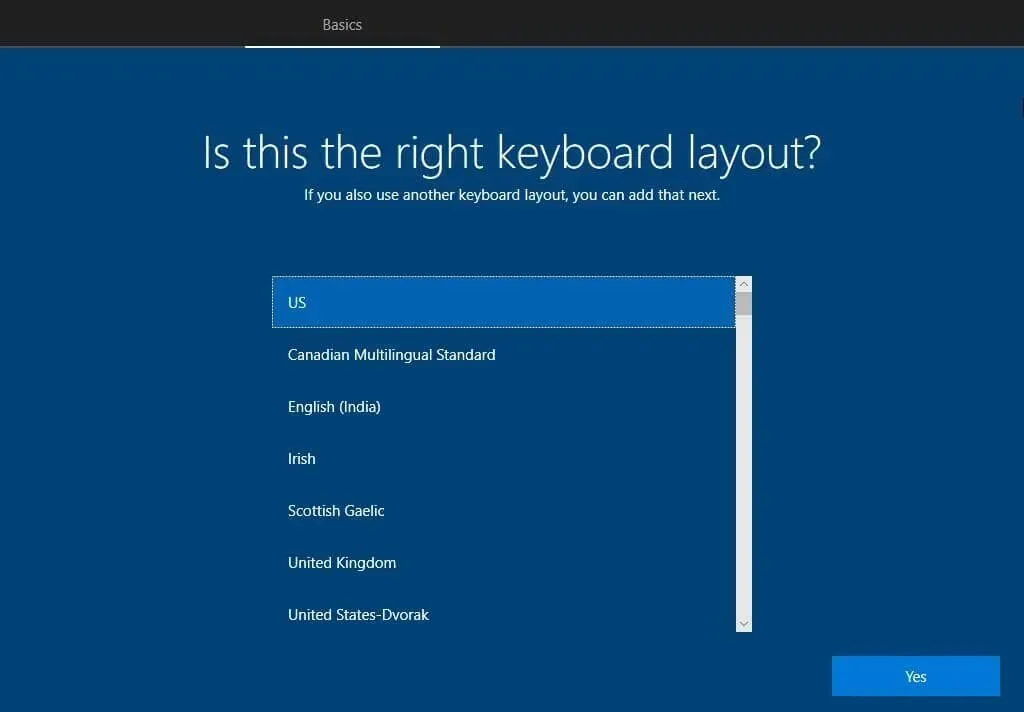
- Then choose your keyboard layout.
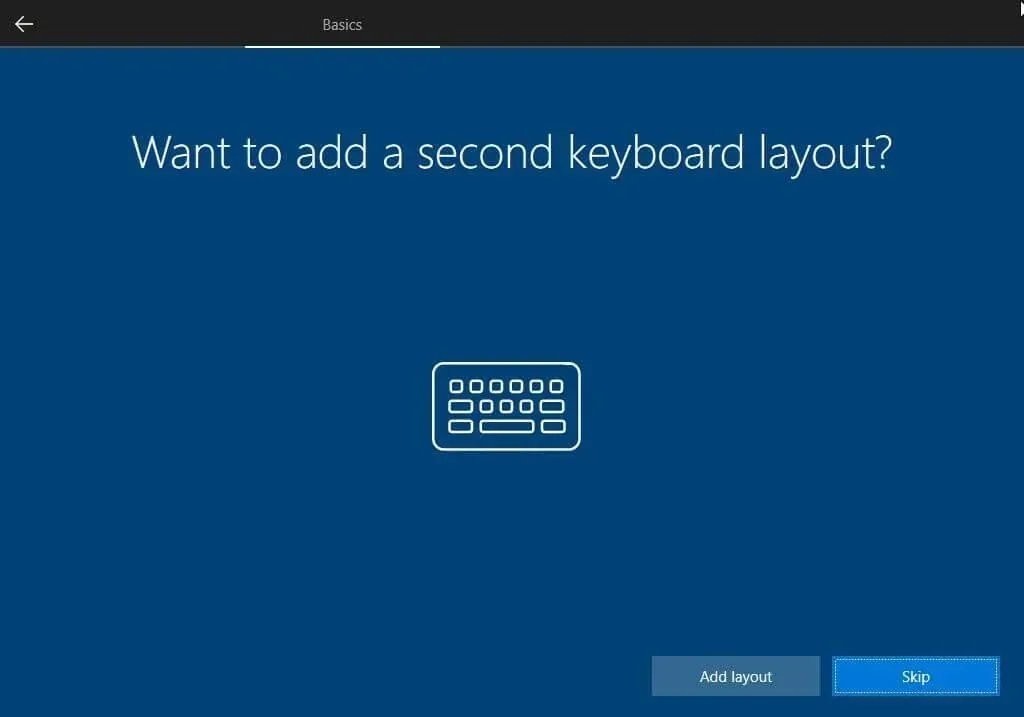
- On the next screen, you will be prompted to add a second keyboard layout. Add it or skip it as per your requirements.
- The installer will now ask you to connect to Wi-Fi. If you are using a wired connection, you will already be connected and will proceed to the next screen.
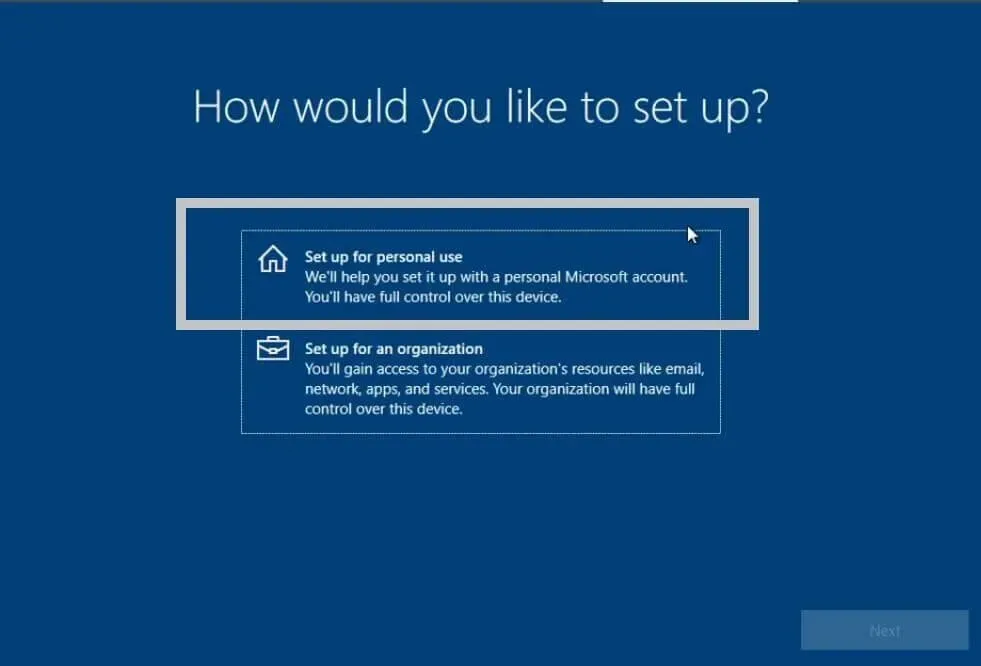
- On the How would you like to set up screen, select Set up for personal use.
- You will see the “Sign in with Microsoft”screen or the “Let’s add your account”screen. Both mean the same thing: you need to sign in with a Microsoft account.
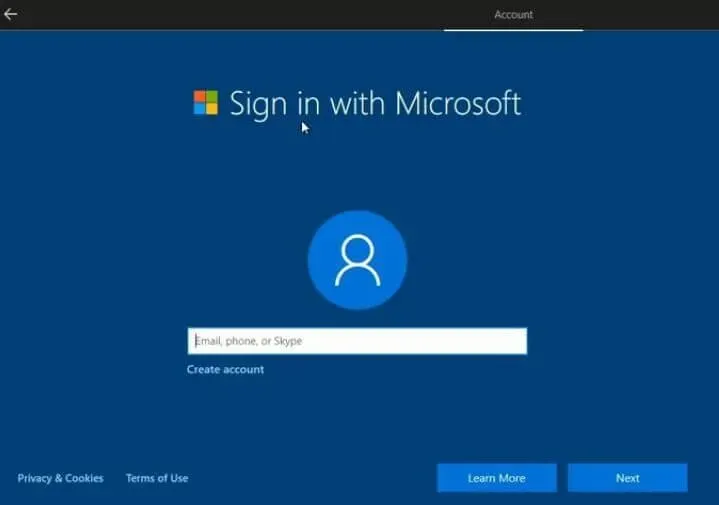
- Turn off your internet.
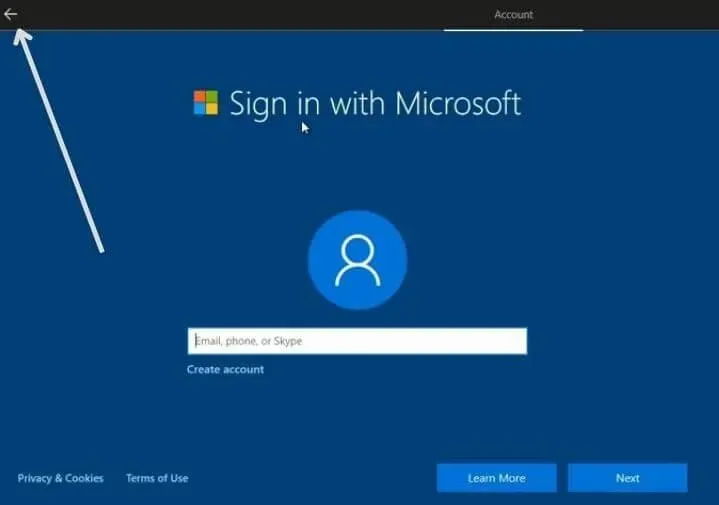
- Find the back arrow button in the upper left corner of the screen and click it.
- The next screen will say: “Something went wrong, click the “Retry”button.
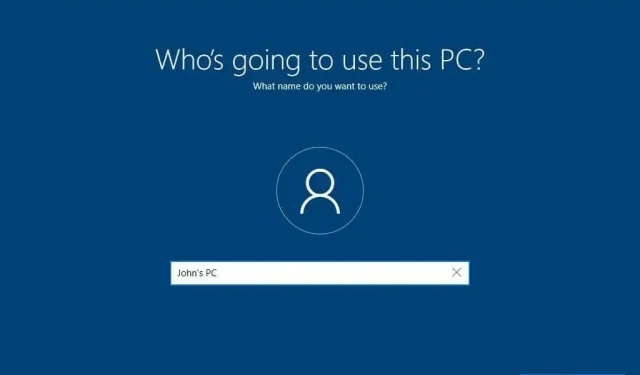
- You will be taken to the “Who will use this PC”screen, where you can create a local account.
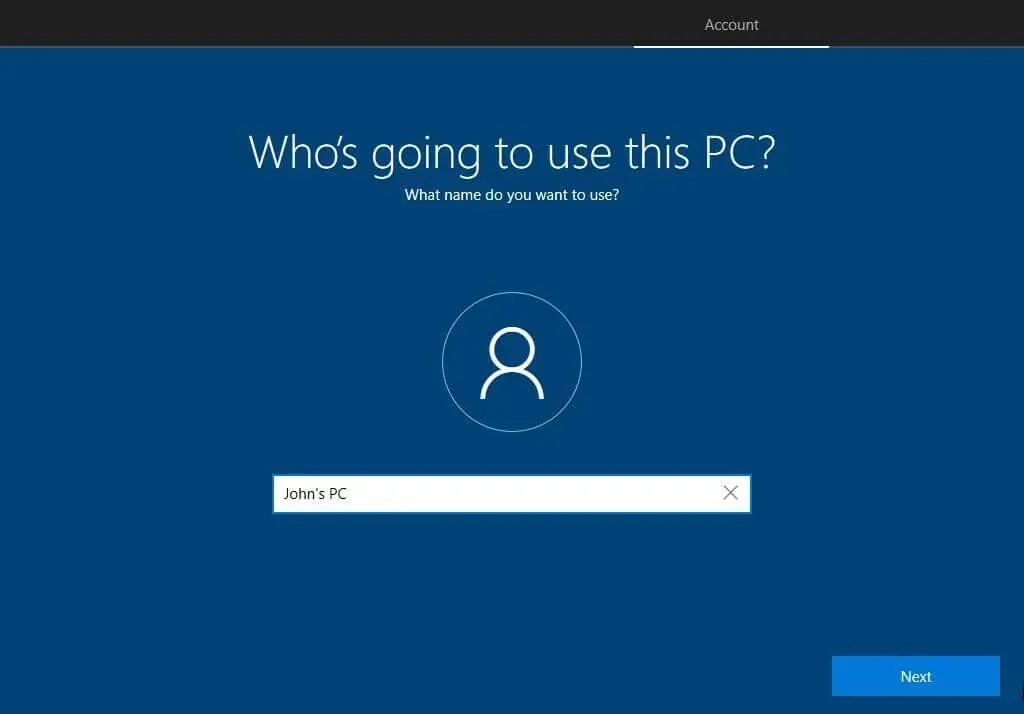
- On the next screen, create a password for your account and then confirm the password. If you don’t want to create a password, leave it blank and click Next.
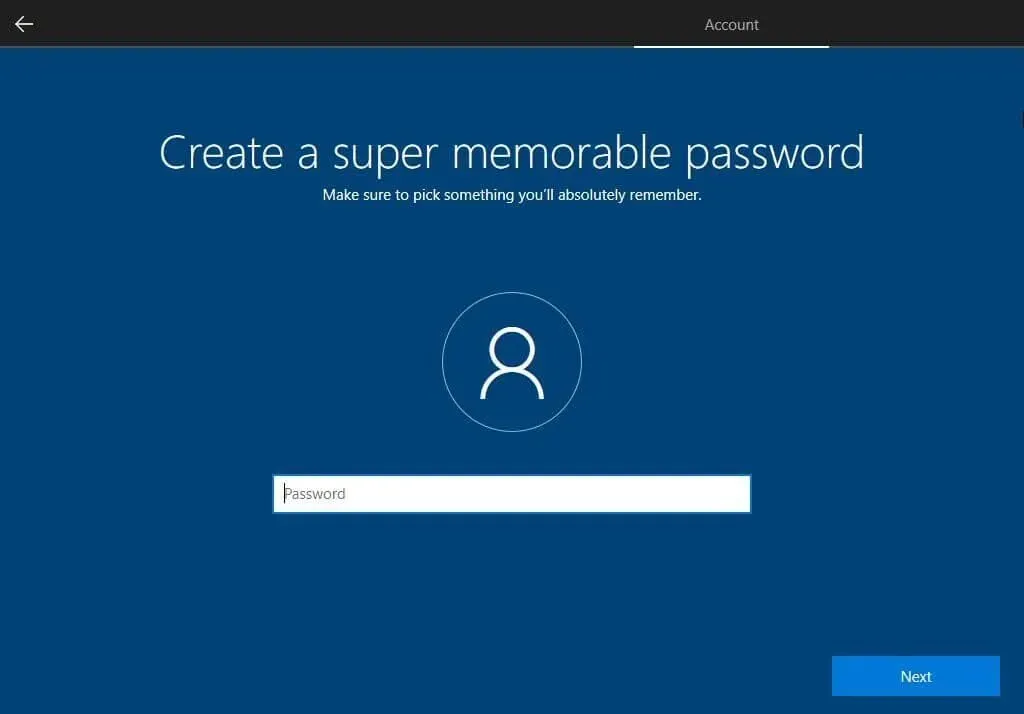
- Select security questions and write answers to keep your local account safe.
- You will then be asked if you want to enable Activity History, which sends your activity to Microsoft to improve your experience. Select “No”to deny access, and “Yes”to accept it.
- You can then choose to accept or opt out of using Cortana, Microsoft’s digital assistant.
- On the next screen, enable or disable various privacy settings.
- Windows 10 will start.
Use the following method if you don’t see the back button or if the back button doesn’t take you to the local account creation screen.
2. Disconnect your computer from the Internet when setting up Windows 10 (the best way)
This is considered the easiest way to set up Windows 10 without signing into a Microsoft account. Windows 10 Setup requires the Internet to display sign-in options. Thus, if you are not connected to the Internet, it will be forced to allow you to create a local account. This method works for any version of Windows 10.
When Windows 10 is installed and you see the installation blue screen, follow these steps: (Some options may vary depending on your version of Windows and region.)
- Disconnect your computer or laptop from the Internet. Disconnect the Ethernet cable or do not connect to Wi-Fi when the installer prompts.
- Select your region and click the “Yes”button.
- The installer will ask for a keyboard layout; choose the right one for you.
- It will then ask if you want to add a second keyboard layout. Click “Add Layout”and choose a different layout, or click “Skip”to go to the next step.
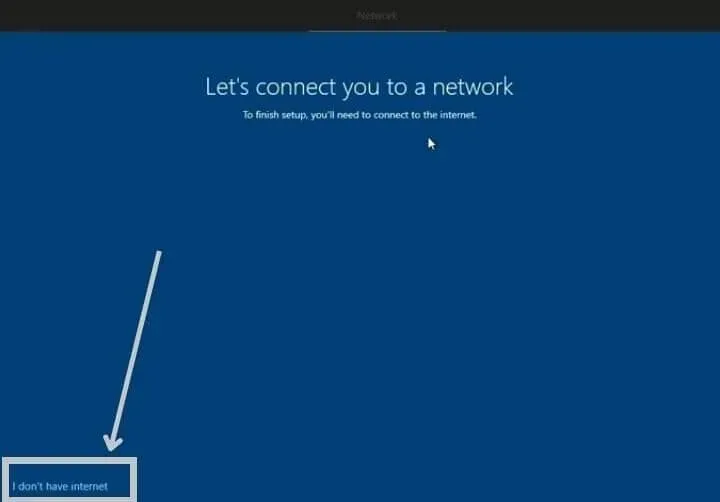
- You will now see the Connect You to the Network screen. (Before this step, make sure the Ethernet cable is unplugged if you’re using a wired connection.)
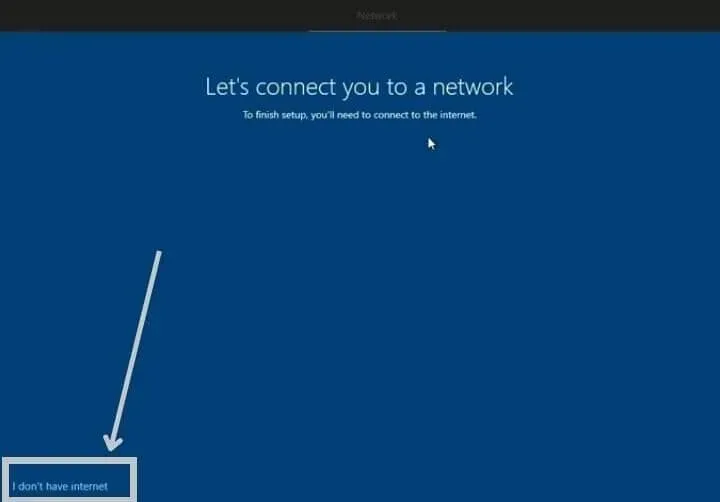
- Click “I don’t have internet”in the lower left corner of the screen.
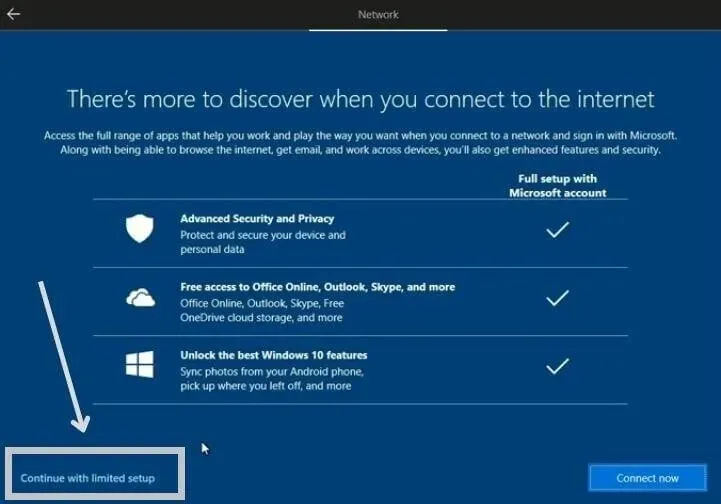
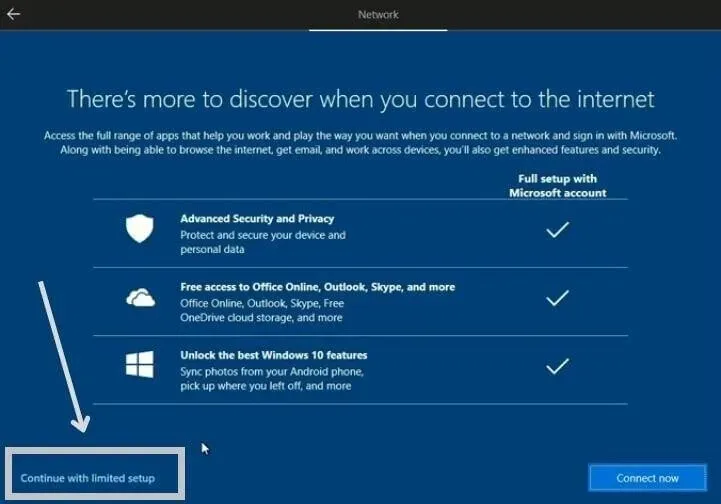
- On the next screen, Microsoft will show you the benefits of using the Internet to set up Windows and ask you again if you want to continue without the Internet. Select “Continue with limited customization”in the lower left corner of the screen.
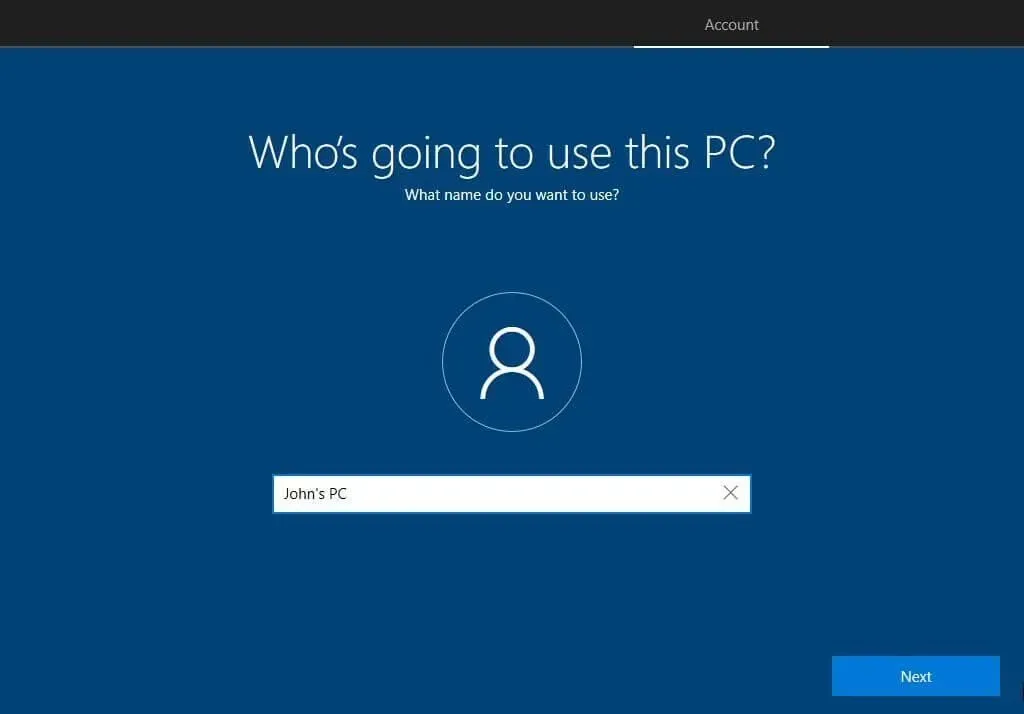
- Finally, you will see the “Who will use this computer”screen. This means that you can enter a local account to set up Windows. Enter any name and click Next.
- Create a password, or leave it black if you don’t need a password for a local account.
- Follow the onscreen instructions to complete the setup.
3. Create a new dummy account during installation and then delete it later.
You can use this smart method if the above two methods don’t work. Create a new dummy account to complete setup and then remove that account from settings.
When you’re on the “Sign in with Microsoft”or “Let’s add your account”screen during Windows 10 setup, follow these steps:
- Select “Create an account”
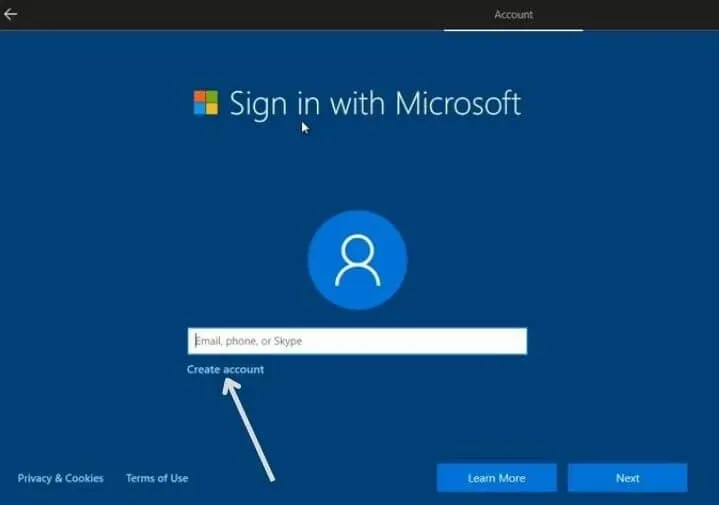
- Enter your details to create a new account and finish setting up Windows 10.
- On your desktop, open the Start menu and go to Settings.
- Select “Accounts”.
- In your account settings, click “Sign in with a local account”.
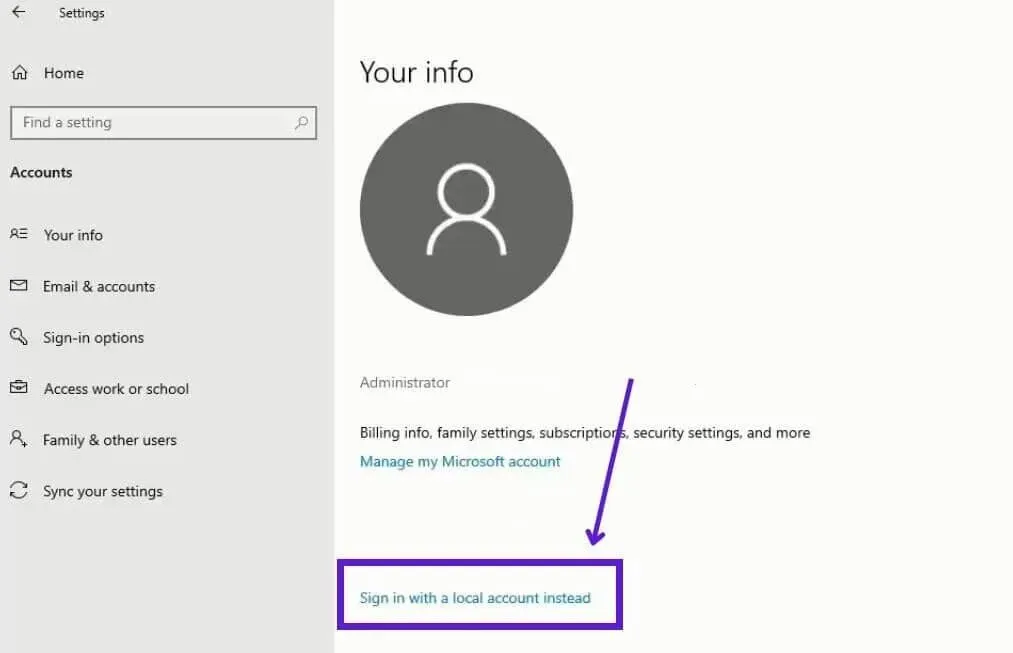
- A blue screen will open to confirm your action. Select Next.
- Enter your password or PIN.
- Now you can create a local account. Enter any name and set a password if you wish.
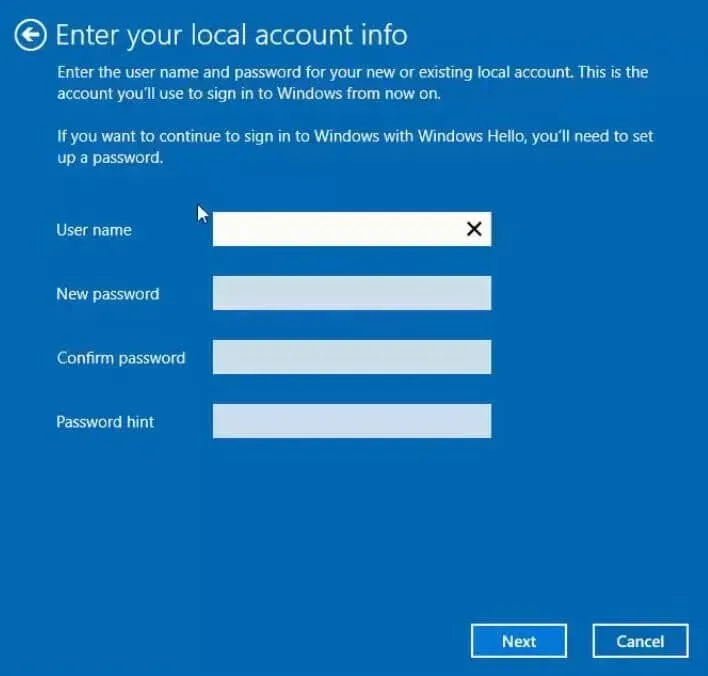
- When finished, click Next.
- Finally, select Exit and Finish.
This will log you out of your dummy account and use your newly created local account.
2. Set up Windows 10 Professional without a Microsoft account.
- Select the offline account option during installation
- Make sure you are not connected to the internet to create a local account (the best way)
- Set up Windows 10 with a new Microsoft account and remove it later
1. Select the offline account option during installation
At the time of this writing, Windows 10 Pro users may find the option to continue setup with a local account. But this option is not very visible, so users may have difficulty finding it. Use these steps:
- On the “Sign in with Microsoft”or “Let’s add your account”screen, look in the lower left corner of the screen.
- Some users will find “Account Offline”while others will see “Join Domain”. Click here.
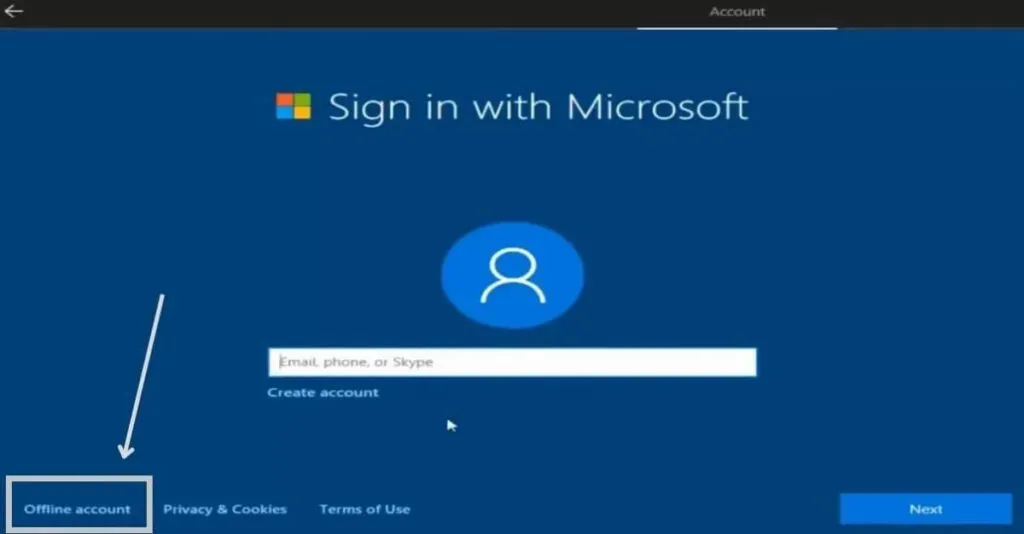
- Microsoft will ask again on the next screen if you want to sign in with a Microsoft account. Choose “No”instead.
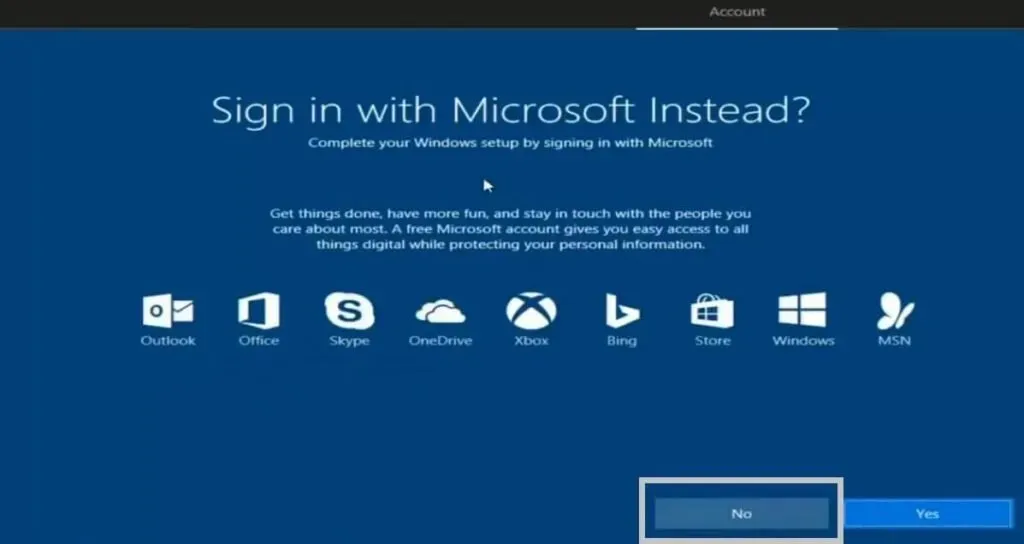
- This will take you to the screen for creating a local user account.
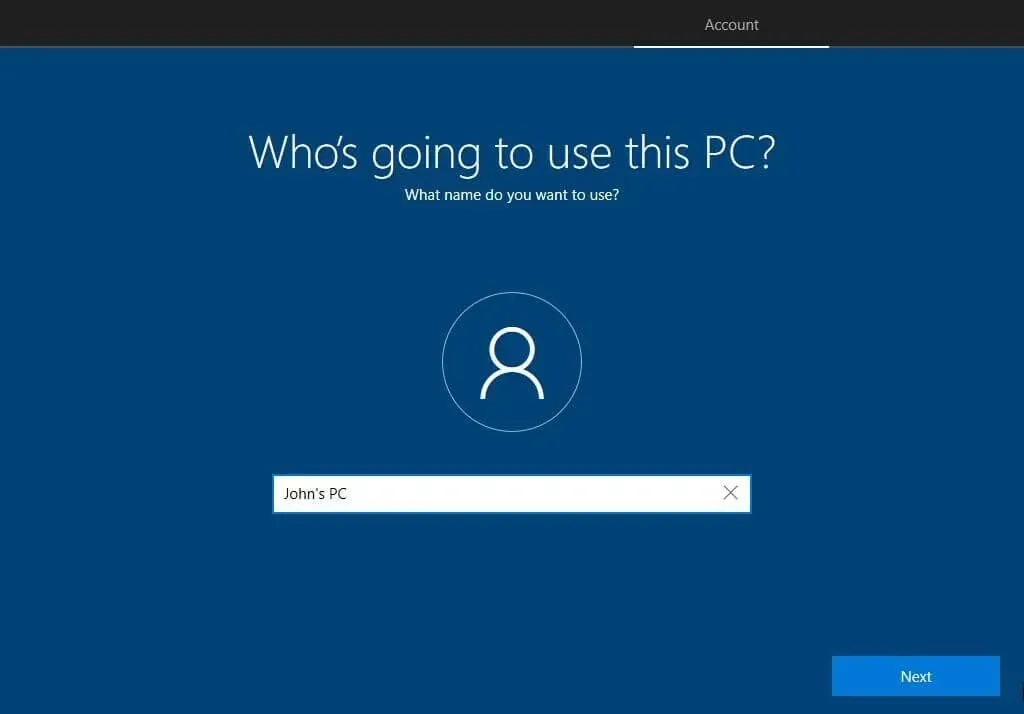
- Create a local user account and set a password.
- Follow the on-screen instructions to complete the installation of Windows 10.
2. Make sure you are not connected to the internet to create a local account (the best way)
Windows 10 installation requires an active internet connection so that users can sign in with a Microsoft account. Thus, if there is no Internet connection, the installer will automatically use the local account creation setting.
Repeat these steps to set up Windows 10 without signing in to a Microsoft account:
- After installing Windows 10, wait until the installation blue screen appears.
- Disconnect the Ethernet (internet) cable from your PC. In case of Wi-Fi connection, do not connect Wi-Fi when the installer asks.
- Select your region and then your keyboard layout.
- When the installer prompts you to use an Internet connection, select “I don’t have access to the Internet”in the lower left corner of the screen.
- The next screen will ask you to confirm, showing the benefits of continuing with the online setup. Select “Continue with limited customization”in the bottom left corner.
- You will now see the “Who will use this PC”screen where you can create a local account for Windows 10. Enter any name and continue.
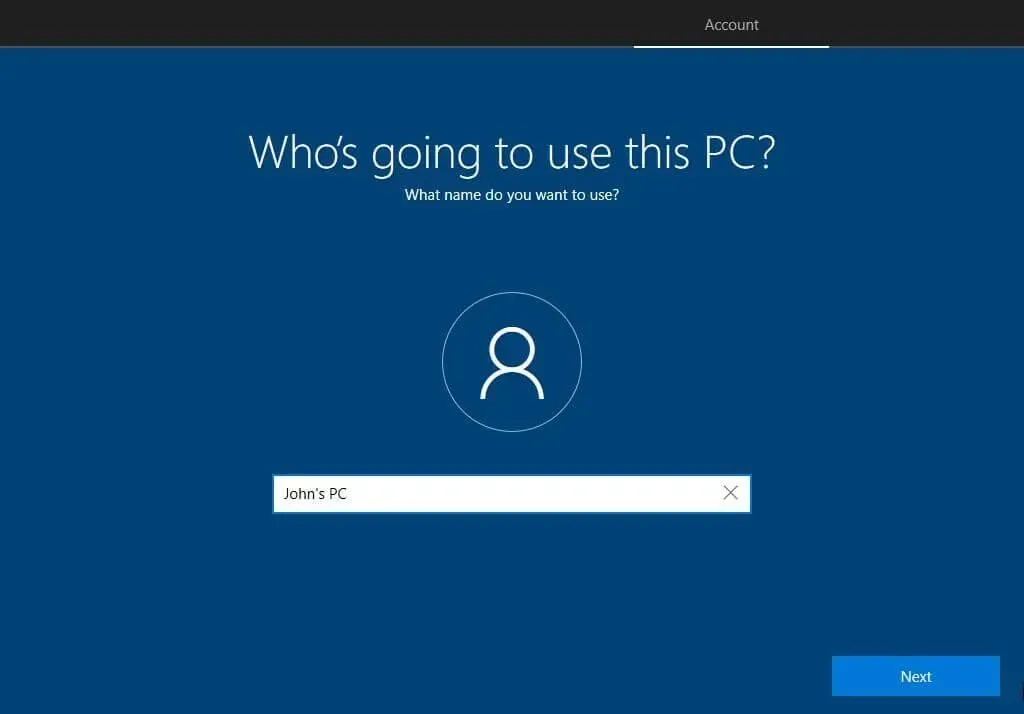
- Create a password if you like, or leave it blank to skip the password setting options.
- Continue to follow the on-screen instructions to complete the setup.
3. Set up Windows 10 with a new Microsoft account and remove it later
If the methods above didn’t work for you, there is another smart way to set up Windows 10 without a Microsoft account. This is the creation of a new Microsoft account. Wait! Stay with us.
If you don’t see a way to skip the screen asking for a Microsoft account, you should create a new dummy account to complete the setup. Then remove the account when you can access Windows 10 settings and switch to a local account.
Creating a new account is an important part of this step, because if you use your personal Microsoft account, it will keep all your settings on the new Windows, and even if you delete it, those settings may be customized on your Windows. So, you must create a new Microsoft account and delete it later.
- On the Sign in with Microsoft screen, select Create an account.
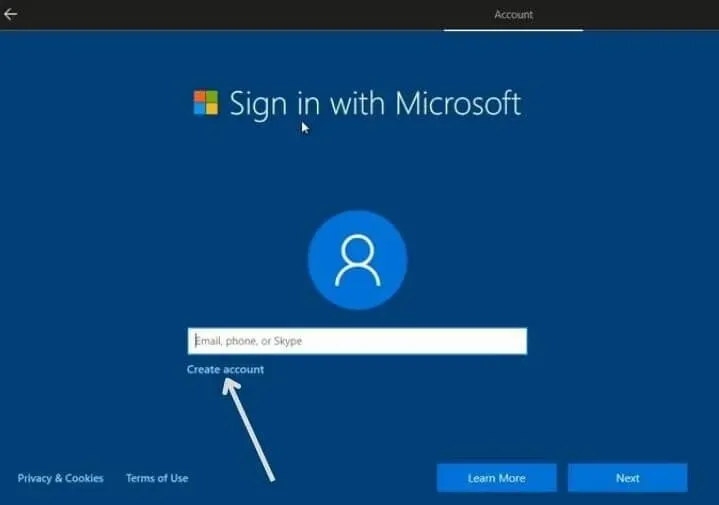
- Enter the required credentials to register with Microsoft.
- Finish setting up Windows 10 with a new account.
- When you get to the desktop, go to “Settings”.
- Select “Accounts”.
- You will be able to see your new account under “Your Information”. At the bottom of the page, look for the “Sign in with a local account”option and select it.
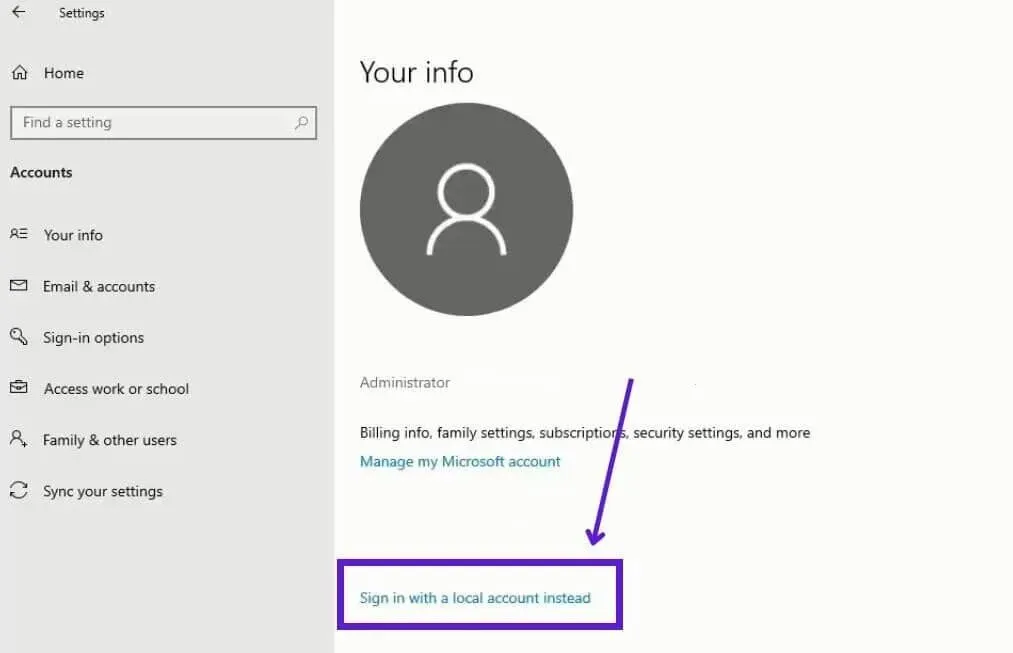
- Windows will show you an existing account and confirm if you want to continue. Select Next.
- Enter your Microsoft account password or PIN.
- Windows will now show you a screen where you can create a local account.
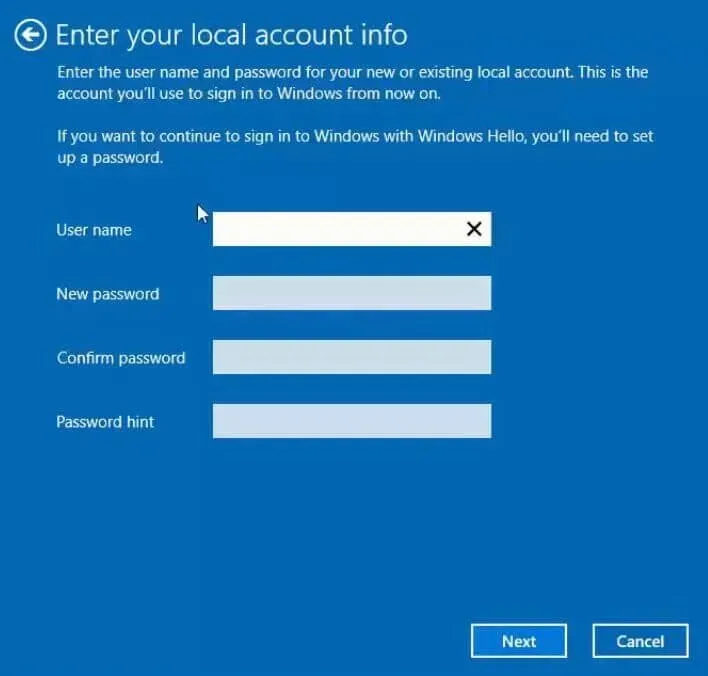
- In the Username field, enter whatever name you want to give to the account.
- You can also set a password or leave these fields blank if you don’t want to.
- Click ‘Next.’
- It will ask for confirmation. Select Exit and Finish.
- You’ll be signed out of your Microsoft account, and everything will use your new local account from now on.
Conclusion
Users who do not want to use a Microsoft account during Windows 10 setup can disable their internet connection before starting the setup. They can then proceed to create a local account.
FAQ
How to Bypass Microsoft Account in Windows 10?
To bypass the Microsoft account requirement in Windows 10, follow these steps: – When Windows 10 Setup asks you to create a Microsoft account, disconnect your computer from the Internet. Disconnect your Ethernet cable or turn off your router or modem.– Click the back arrow button in the upper left corner.– A message will appear saying “Something went wrong.”create a local account.
Will Windows 10 work without a Microsoft account?
Yes, Windows 10 works great without a Microsoft account. A Microsoft account is used to sync your data across all devices. In addition, your actions are used to improve Windows experience. But you can use Windows without a Microsoft account.
Do you need a Microsoft account to set up a new computer?
Windows Setup asks for a Microsoft account when setting up a new computer, but it’s not required. You can also select a local account. Disconnect your computer from the internet > click the back button > click try again > enter a local account.
How to add a family member in Windows 10 without a Microsoft account?
You can add a family member to Windows 10 without a Microsoft account by doing the following: – Go to Settings > Accounts > Family & other users. – Select “Add someone else to this PC”. – When Windows asks for this user’s Microsoft account, select I don’t have this person’s login information. After that, select “Add a user without a Microsoft account”. Enter the name and password for the local account.
Leave a Reply