8 Fixes: Steam Couldn’t Sync Your Files

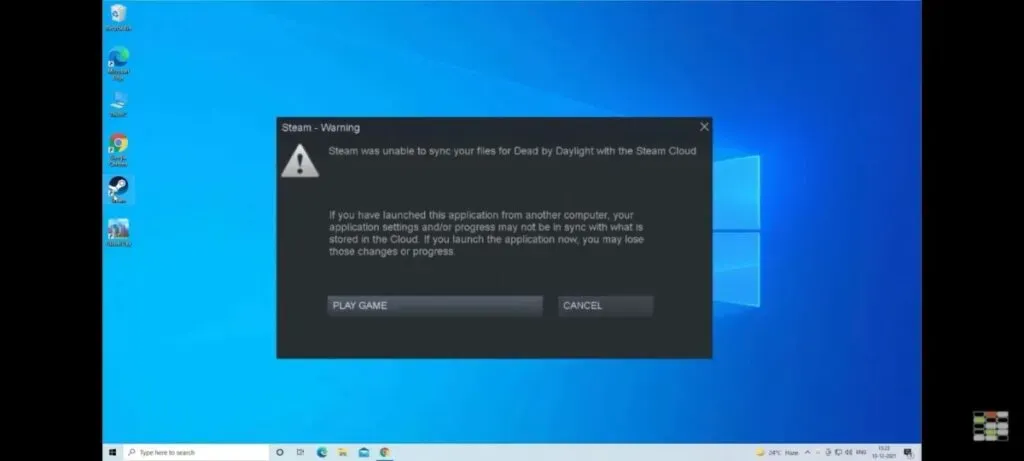
Steam is a wonderful and widely used video game sharing service among gamers. However, it, like any other software, has flaws and drawbacks. The “Steam was unable to sync your files”error is one example. This issue was reported by several users while playing games using the Steam cloud service.
There are many possible reasons why the Steam client unexpectedly quits and notifies the user that “Steam was unable to sync your files”.
In today’s sacred guide, we’re going to walk you through a few strategies to implement if you’re getting a notification about the “Steam could not sync your files”issue on Steam.
Why does the error still occur?
Before we explore the main ways to fix the Steam error, a little teaser on why the error occurs may better help you understand how to resolve the error itself.
This error can occur for various reasons. This can happen as a result of corrupt settings, preferences, or user data files. Another reason for this issue is corrupted or erroneous game data. In rare cases, the issue can also occur if the Steam servers appear to be temporarily down.
Additionally, problems with Windows Firewall or a third-party antimalware tool can cause this error.
How to fix “Steam couldn’t sync your files”error?
The bug should not be taken lightly, as it could be a type of cancer that could harm not only the games running on it, but your entire project. If you continue to ignore this error warning and continue to play games, local and cloud data may become incompatible. The result is a data loss syndrome.
Below is a list of guidelines that you may wish to write down on paper to avoid catastrophic conditions!
Solutions for Steam failed to sync your files
- Update/Update Steam Client Files
- Double Checking Steam Servers
- ClientRegistry.blob should be deleted
- Assess the integrity of the game file
- Deleting the User Data Folder
- Firewall can be disabled or add an exception
- Your Steam library folder should be fixed
- Exceptions for Steam in antivirus
1. Update/update Steam client files.
Take notes, we always start with baby steps. The most basic remedy for solving this error should be the most important. Try updating your Steam files, which will delete and restore all Steam client configuration files. To restore/update Steam client files, follow these steps:
- Start by opening Task Manager with Ctrl+Shift+Esc and end all Steam processes.
- Open File Explorer and navigate to the Steam installation location.
- Then, except for the steamapps folder and the main executable Steam.exe, select all files and directories.
- Then press the “Delete”key on your keyboard to delete all files.

- Finally, restart your computer and run the Steam client as an administrator.
- Fingers crossed, Steam was unable to sync your files. Perhaps the problem has been resolved.
2. Double Check Steam Servers
This is one of the main steps to ensure that the Steam servers are not currently down. This issue can appear if the Steam servers are having problems or are in the process of being repaired. So check the status of the Steam server and if it’s down then you should wait for Steam to fix the issue.
You can check the status of the Steam servers in a variety of ways. You can track the availability of various servers in, for example, the US, Europe, the Netherlands and China on the Steam website, which is solely for the purpose of providing this information.
The message will be green if the servers are stable and fully functional. They may appear in red if they are down or experiencing high traffic. Some servers may also appear orange, indicating that their load is medium; any further load will cause the cloud configuration to reach its full capacity.
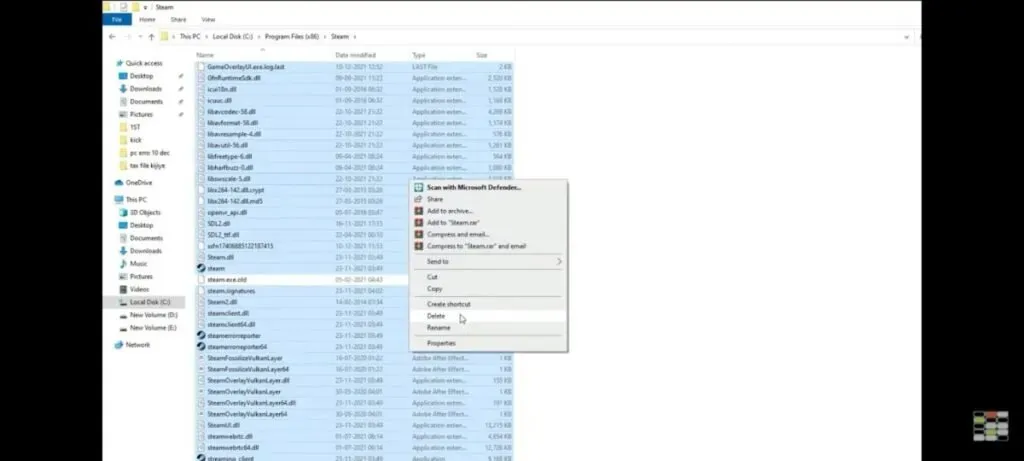
3. ClientRegistry.blob should be deleted
Next, we have the slightly unorthodox “Steam was unable to sync your file”removal method. The Clientregistry.blob file caches settings as well as various game data. This is a Steam file that stores your registration information for installed games.
If we delete it, it will be restored the next time we log in. Every game you install retains all of your default settings, including your name, skins, and so on.
The above solves about 30% of problems since this file is prone to corruption. It is possible that this file will be compromised by Steam and you will have to delete it.
You don’t need to worry about drawings, just follow the procedure below:
- First, close all Steam processes displayed in the Task Manager.
- After that, use File Explorer and navigate to the Steam installation location. You will get it by default in this location: C:\Program Files\Steam
- Locate the “clientregistry.blob”file in the Steam path.
- Copy/paste the file to another location on your computer.
- Then delete the clientregistry.blob file from the Steam installation directory.
- Finally, launch the Steam client to see if the error is resolved.
- Don’t forget to sign in to your account again after deleting the “clientregistry. blob file.
4. Check the integrity of the game file.
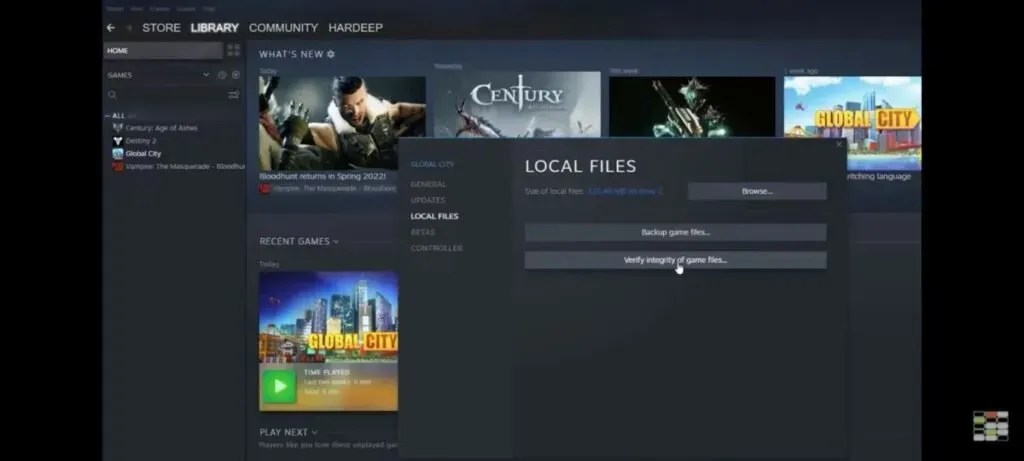
It is extremely common for game files to become fragmented during the Steam download or update process.
A large percentage of Steam games are huge files that take up many gigabytes. It is possible that some of the data was corrupted during the installation or update, resulting in corrupted game files. Steam offers a tool in the client that allows you to quickly check the integrity of game files.
In this case, you can use special tools in the Steam settings to check the integrity of the game files. This will essentially replace any corrupted or low quality game files with new ones.
- You can use the technique below to verify the integrity of game files on Steam:
- Start by launching the Steam app and select the Library option from the top toolbar.
- Select the Games tab.
- After that, select the problematic game and right-click on it.
- Select Property from the context menu.
- Finally, from the Local Files menu, select the Verify Integrity of Game Files option.
- Check if the issue has been resolved after completing the verification procedure.
5. Delete user data folder
The user data folder can be located in the Steam directory. Your account information, cloud settings, and user sync data are stored in this directory. If these files have been corrupted and you are getting a message that Steam was unable to sync your files, you should delete this folder.
You can delete the userdata folder by following the instructions below:
- To get started, click “Task Manager”and end all processes or tasks related to Steam.
- Then, in File Explorer, navigate to the Steam directory.
- Now go to the Steam folder and find the userdata folder.
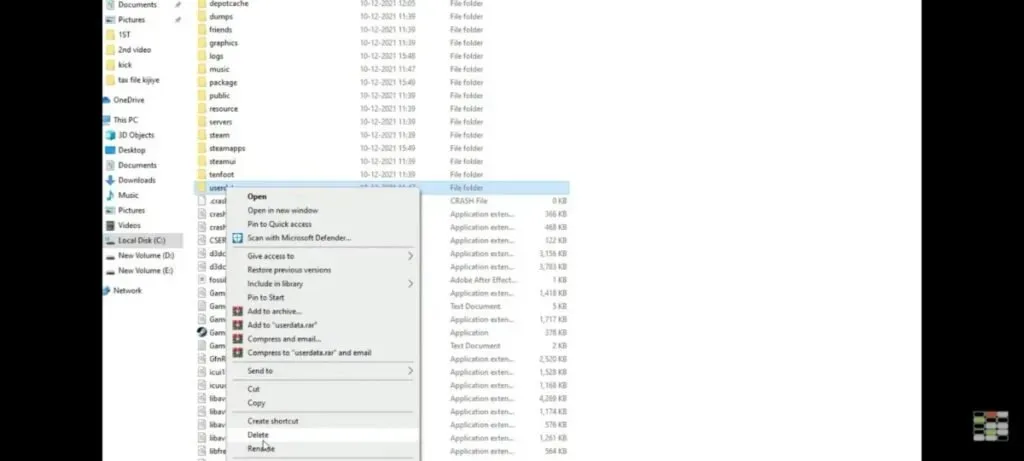
- After that, either delete the user data folder or copy it to another location on your computer, such as your desktop.
- Finally, open Steam again to see if the issue is resolved and if the cloud can sync your profile.
6. Firewall can be disabled or add an exception
Other software, such as a firewall, may be interfering with the normal operation of Steam, resulting in this error. Steam is also known to conflict with the Windows firewall.
Steam installs or updates games in the background, and a Windows Defender Firewall setting can flag Steam operations as dangerous and block them from running. If this is the case, turn off Windows Firewall for a short while to check if the issue is resolved.
If the issue is resolved, you can be sure that the Windows Firewall configuration is to blame for the “Steam was unable to sync your files”error.
Don’t worry if you don’t want to turn off Windows Firewall completely, because it could put your machine at risk. Steam may simply be allowed to bypass the Windows Firewall.
Start it by following the instructions below:
- Use the search box on the taskbar to find Windows Defender Firewall.
- Select Allow an app or feature through Windows Defender Firewall from the drop-down menu.

- Click the “Change Settings”button on the next window.
- After that, find the Steam app and activate it on both private and public networks.
- Click OK to complete the process.
- Restart the Steam client to see if the issue is resolved.
7. Your Steam library folder should be restored
If the problem is related to the Steam Library folder, you can try to fix it. There may be a specific fix for your Steam library folder. To use this option, simply follow the instructions below:
- To get started, launch the Steam client and select Steam > Settings from the main toolbar.
- Go to the “Downloads”section.
- Then, from the Downloads menu, select Steam Library Folders.
- After that, right-click on your Steam Library folder and select it.
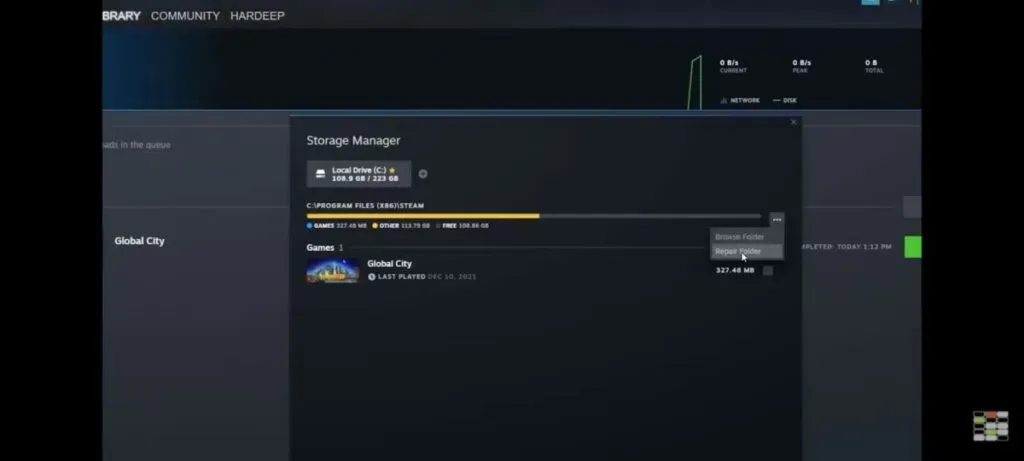
- Select the Restore Library Folder option from the context menu.
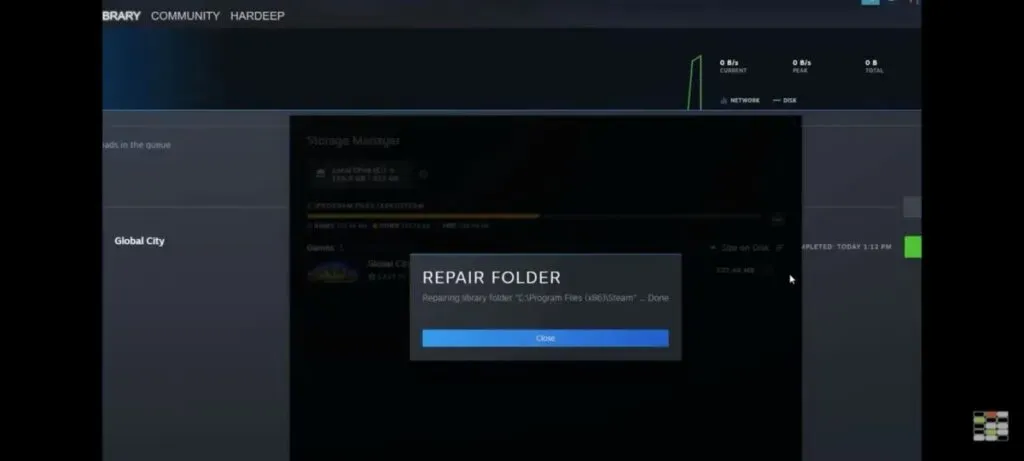
- Steam will now repair your library folder and resolve any issues you may have. After completing the procedure, check if the error is resolved.
8. Exceptions for Steam in antivirus
Some Steam tasks, such as your firewall, may be blacklisted. As a result, you can disable your antivirus protection to determine if the issue is resolved.
You can add Steam to your antivirus exclusion list if you don’t want to disable antivirus protection. To do this, go to your antivirus software’s exclusion settings and add Steam to the list of allowed applications.
For example, if you have AVG antivirus installed, you can:
- Go to Home > Settings > Features > Web Protection > Exclusions.
Navigation through the exclusion settings is similar to other antivirus applications.
Conclusion
That’s it, 8 most effective solutions for “Steam Cloud Sync Error”. Feel free to try these tactics in any order you choose.
The best cure for the “Steam failed to sync your files”ailment, recommended by the editor, is to check the status of the Steam servers. If that doesn’t work, just try to ride out the storm.
FAQ
How to force Steam to sync?
To force a Steam sync: – Go to the Cloud tab in the Steam Client Settings window. – The switch next to “can be used to enable or disable the cloud. For apps that support it, enable Steam Cloud Sync.
How to fix Steam not syncing?
To fix “Steam is not syncing”error: – Update/update Steam client files – Recheck Steam servers – ClientRegistry.blob must be deleted – Evaluate integrity of game file – Delete user data folder – Firewall can be disabled or create an exception to add – Your library folder Steam should be fixed – Exceptions for Steam in antivirus
How do I sync my Steam files?
To enable Steam Cloud Sync for specific games: 1. Right-click on any game in your Steam Library and select Properties.2. The Cloud Sync option can be enabled on the General tab. For most games: 1. Go to the “Cloud”tab in the “Steam Client Settings”window.2. The Toggle Next setting enables Steam Cloud Sync for supporting applications, which can enable or disable Cloud Sync for individual games.
How to fix the inability to sync files in Steam?
If you are facing the “Steam was unable to sync your files”issue on Steam, you can try the following methods: – Check if the Steam servers are down. – Delete the userdata folder. – Check the integrity of the game files. – The Steam Library folder should be restored. – ClientRegistry.blob should be deleted. – Turn off your firewall. – Add Steam to your antivirus exception list. – Update Steam files.
Leave a Reply