How to Set Your iPhone, iPad, and Mac to Prefer Faster Wi-Fi over Slower Wi-Fi
Is your iPhone, iPad, or Mac constantly connecting to a known Wi-Fi network that you don’t want to connect to? Of course, you can easily forget this network and put an end to it. But what if you want your device to remember the Wi-Fi network (so you don’t have to enter its password again) but just not automatically connect to it?
In this tutorial, we’ll learn how to set up your iPhone, iPad, Apple Watch, or Mac to prefer one Wi-Fi network (faster and better quality) over another (slower one).
Several well-known Wi-Fi networks (or 5 GHz and 2.4 GHz wireless bands)
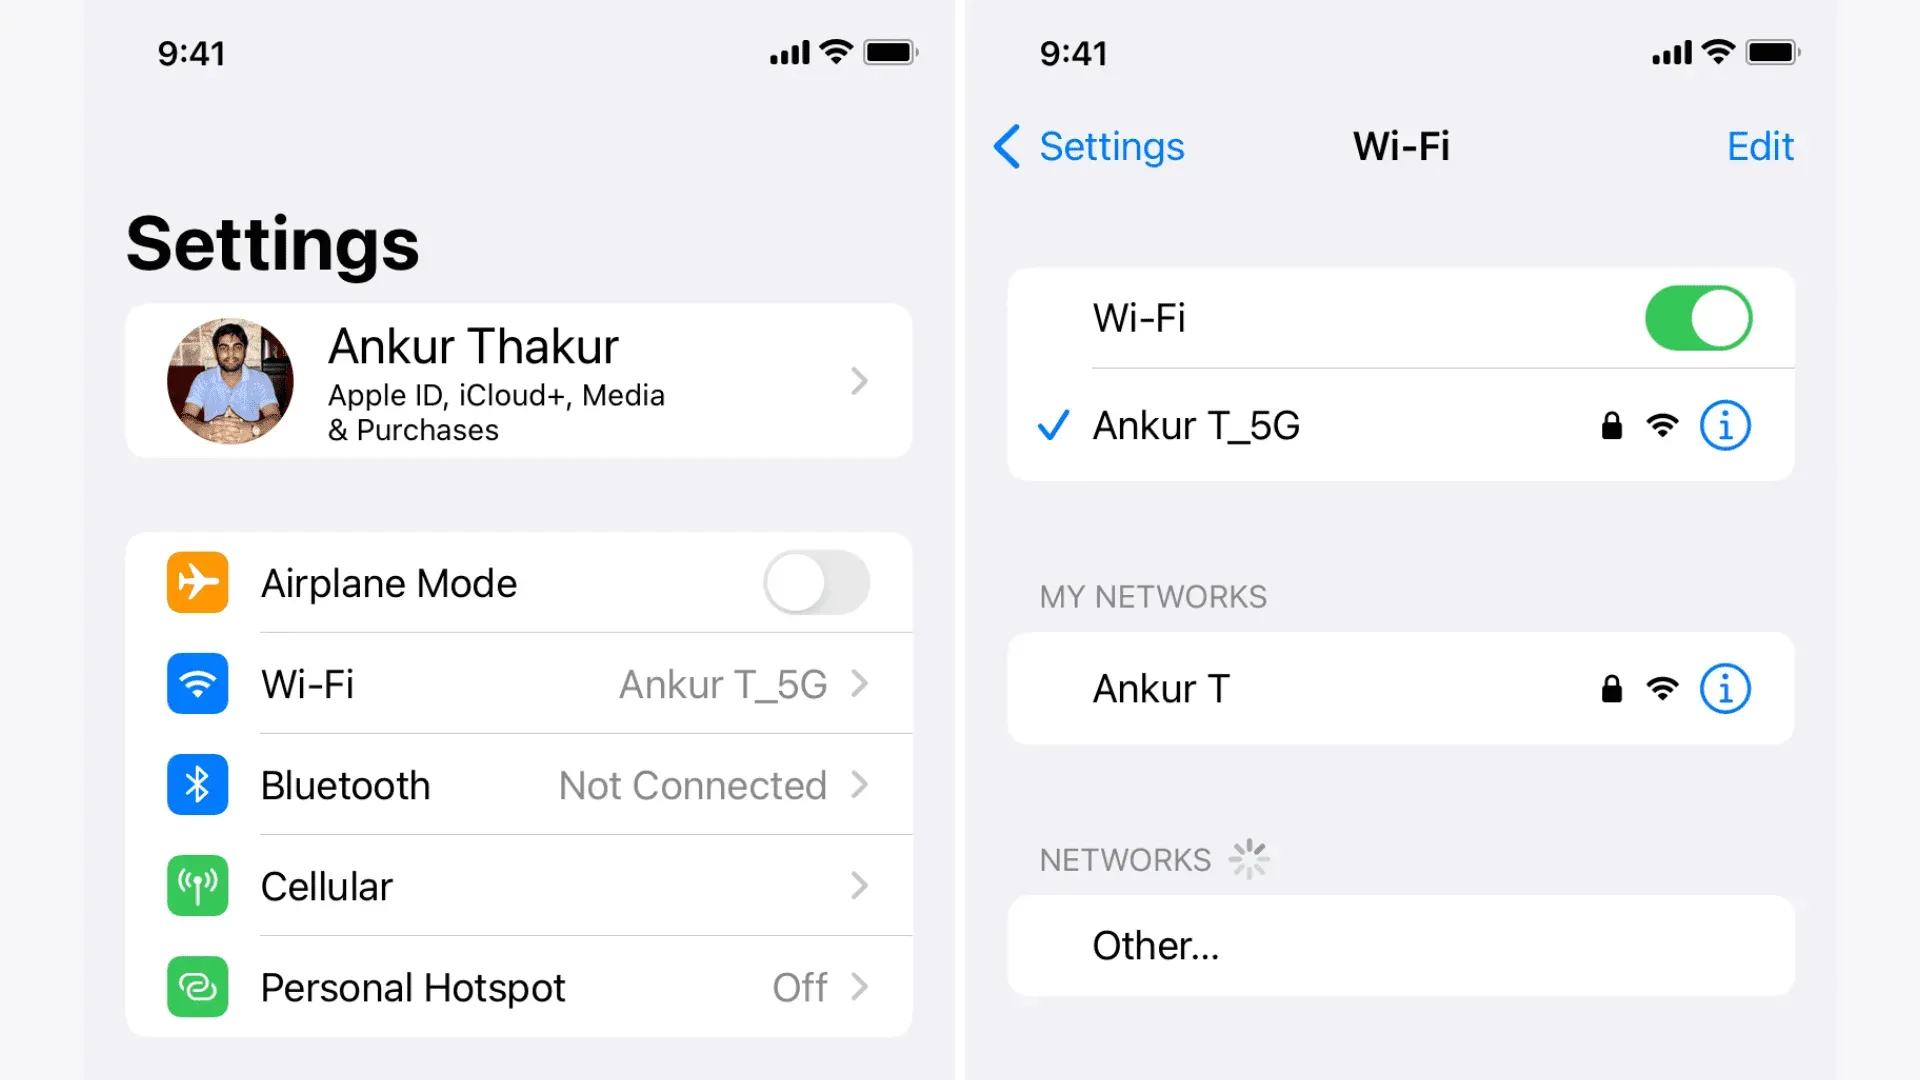
I recently got a new internet connection and a dual band router that supports Wi-Fi on both 2.4GHz and 5GHz. As a result, when I go into the Wi-Fi settings of my iPhone or Mac, I see two Wi-Fi networks – Ankur T (2.4GHz) and Ankur T_5G (5GHz).
2.4GHz Wi-Fi uses longer wavelengths for longer range and better transmission. Thus, it will work effectively even if there are many walls and obstacles between the device and the router. However, this range offers lower speeds. In addition, almost all Wi-Fi devices such as smart accessories, home appliances, garage doors, etc. support this band, which causes it to become congested and may drop connections.
5GHz Wi-Fi uses shorter wavelengths that are difficult to pass through walls etc. and offers a shorter range. But in terms of speed, it is far superior to Wi-Fi at a frequency of 2.4 GHz. In addition, not all devices support the 5 GHz band, so it is less crowded and does not drop connections.
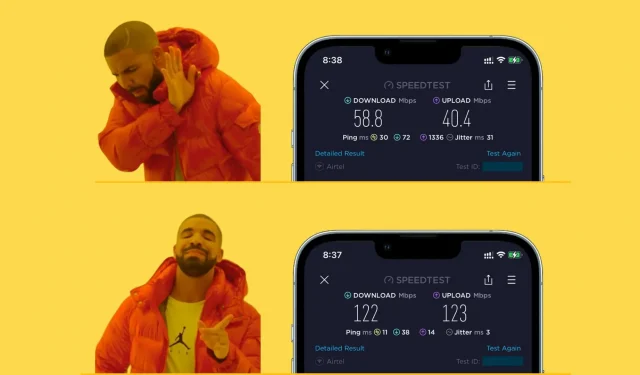
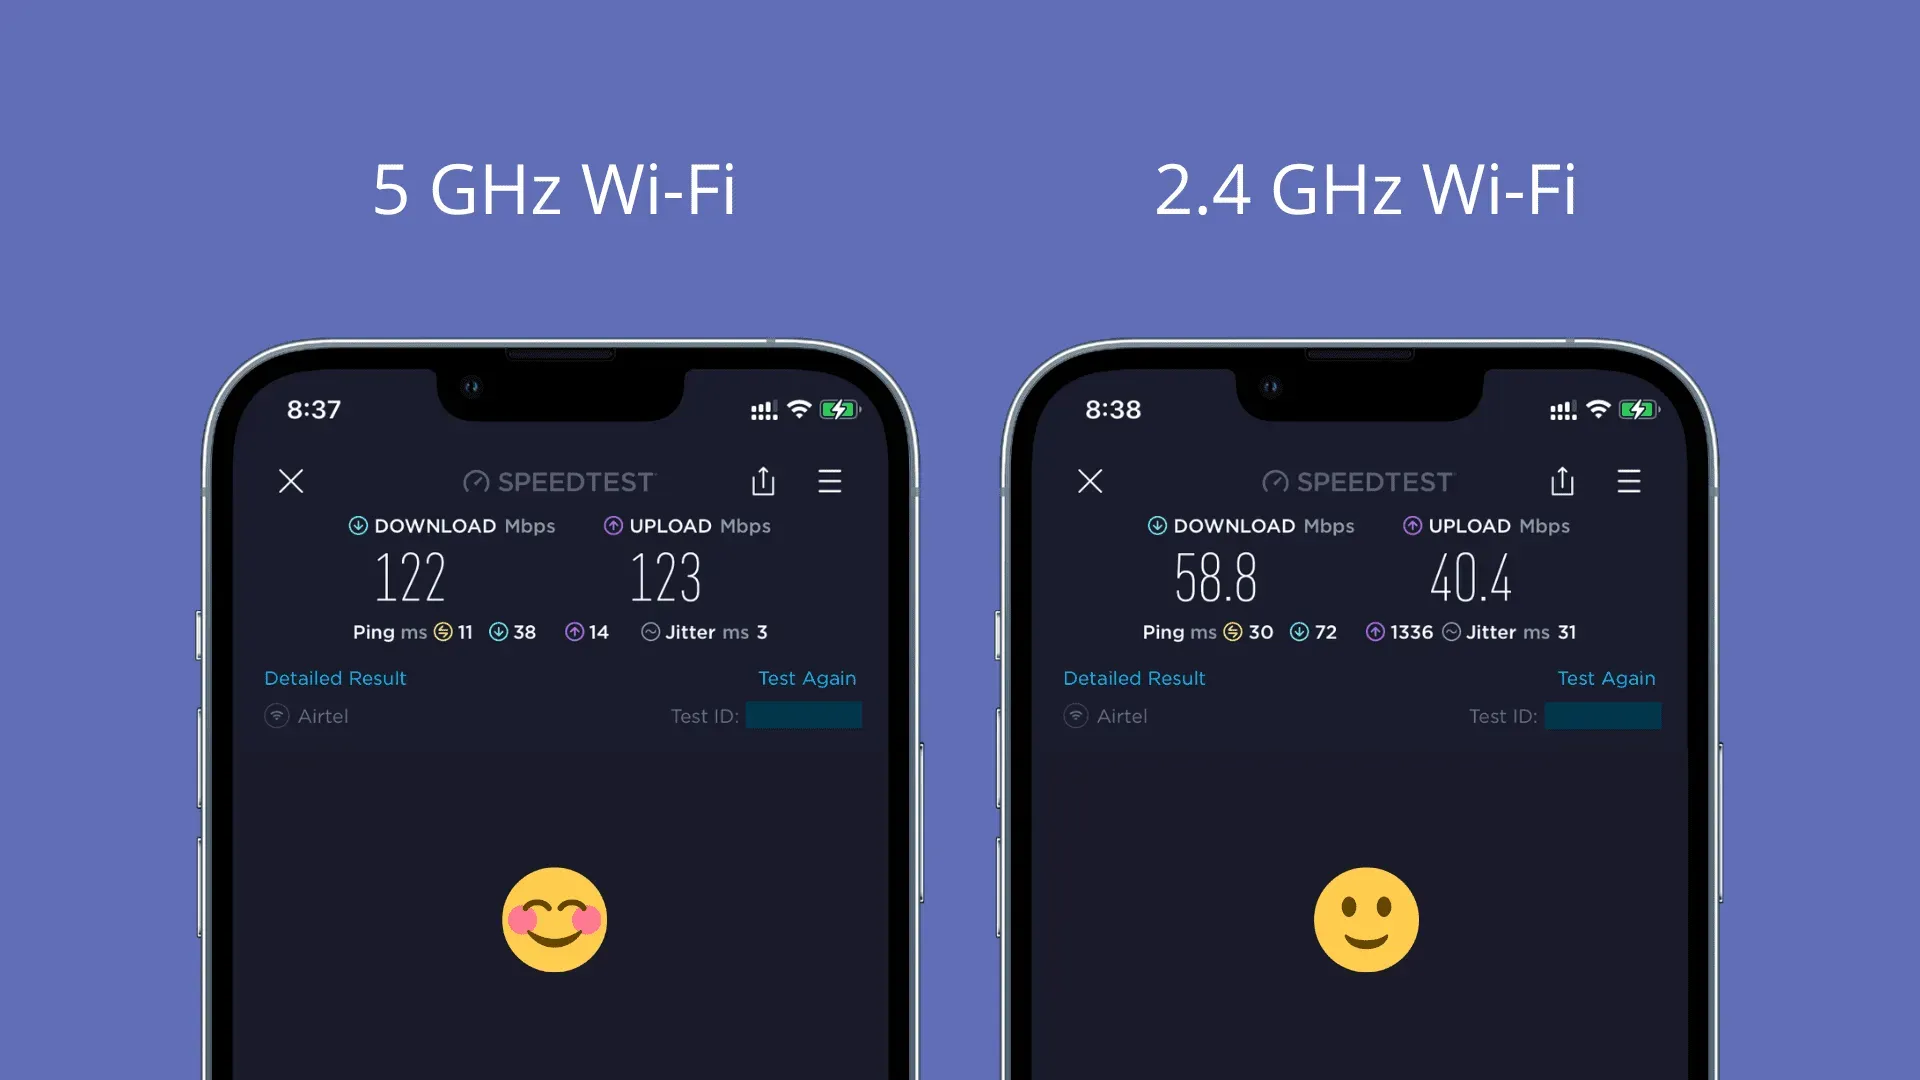
In my home, the download and upload speeds offered by 5GHz Wi-Fi are at least twice as fast as 2.4GHz (image below). Also, since it’s a small apartment, I don’t have to worry about the range, and so I want my iPhone and Mac to always only connect to the 5GHz band and ignore the other.
Previously, when I came home from the street, the router rebooted due to a power outage, or I restarted my devices, they preferred 2.4 GHz Wi-Fi and automatically connected to it. Every time I had to manually switch to 5 GHz Wi-Fi.
Similarly, my previous office had five Wi-Fi networks. My Mac always automatically connected to the slowest network and I had to manually connect to the best network every morning. A minor inconvenience, but no one likes to do this every day!
Luckily, the steps below solved this problem for good!
Automatic connection to the best Wi-Fi network through another
iPhone and iPad
Follow these steps to set your iPhone to a better Wi-Fi network and automatically connect to it instead of a slower network:
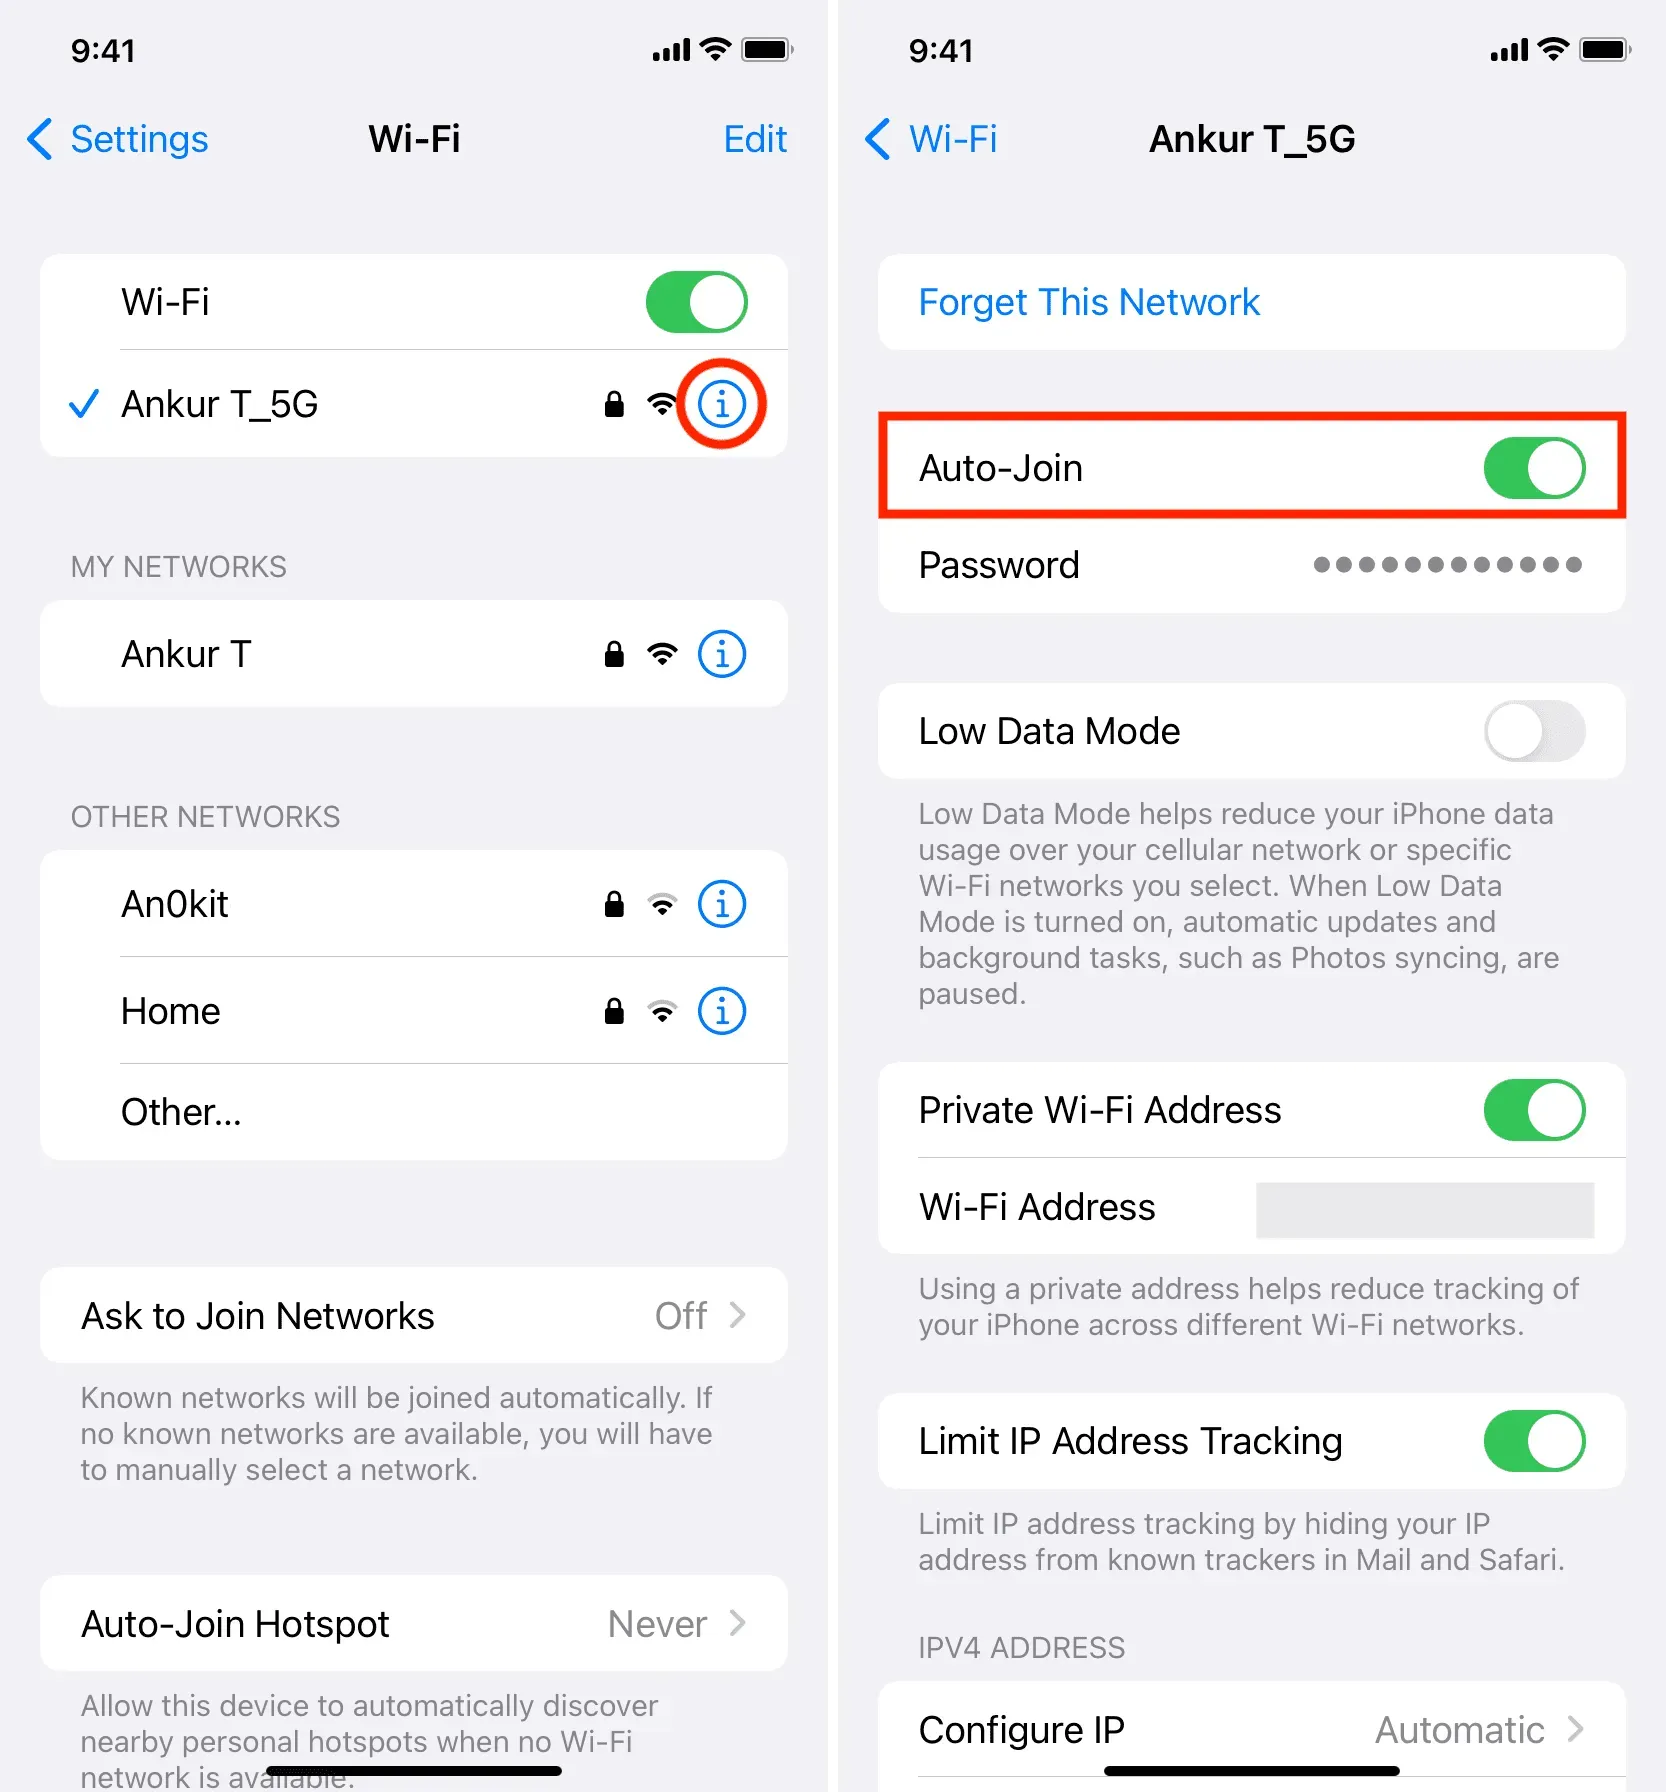
1) Open “Settings”and click “Wi-Fi”.
2) Click the information button (i) next to the slower Wi-Fi network.
3) Disable auto-connect.
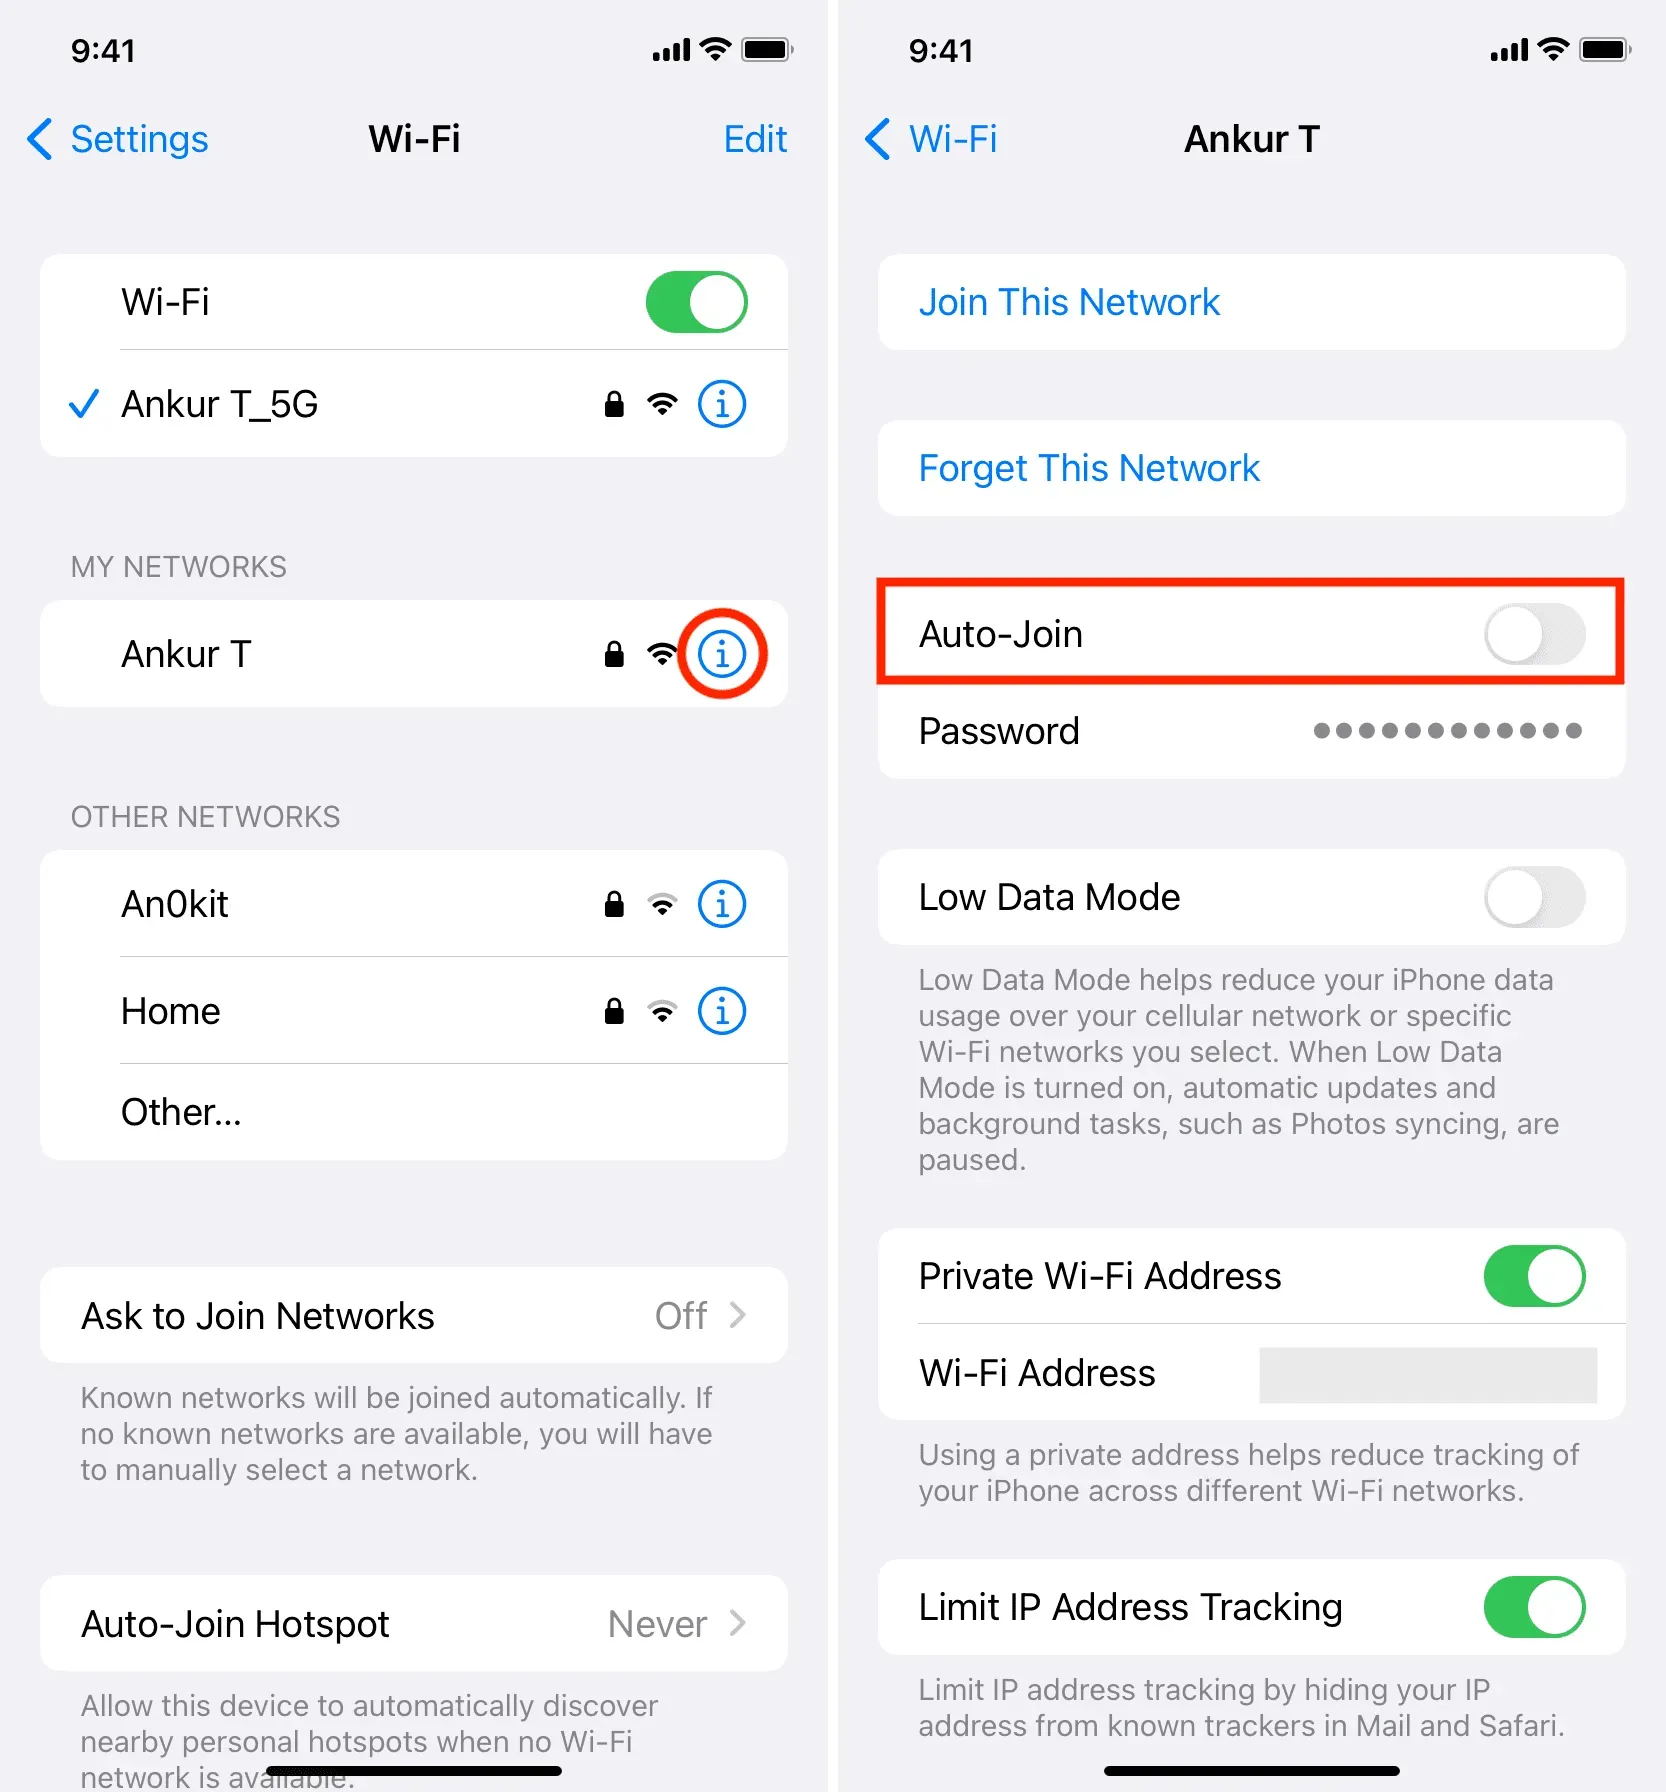
4) Return to the previous screen and click the information button next to the faster Wi-Fi network.
5) Make sure auto join is enabled for this.
From now on, when you enter this area with both known Wi-Fi networks, your iPhone will always automatically connect to the best Wi-Fi network. Goodbye, low speeds and connection drops!
Anytime the best Wi-Fi isn’t available, you can simply click on the name of another Wi-Fi network in the Wi-Fi settings or Control Center (after clicking the Wi-Fi icon) to join it. You don’t need to enter the Wi-Fi password.
Apple Watch
Apple Watch Series 6, Series 7 and later can connect to 2.4GHz or 5GHz Wi-Fi networks. However, Apple Watch Series 5 and earlier and Apple Watch SE can only connect to a 2.4GHz Wi-Fi network.
Here’s how you can set your Apple Watch to prefer connecting to one Wi-Fi network over another:
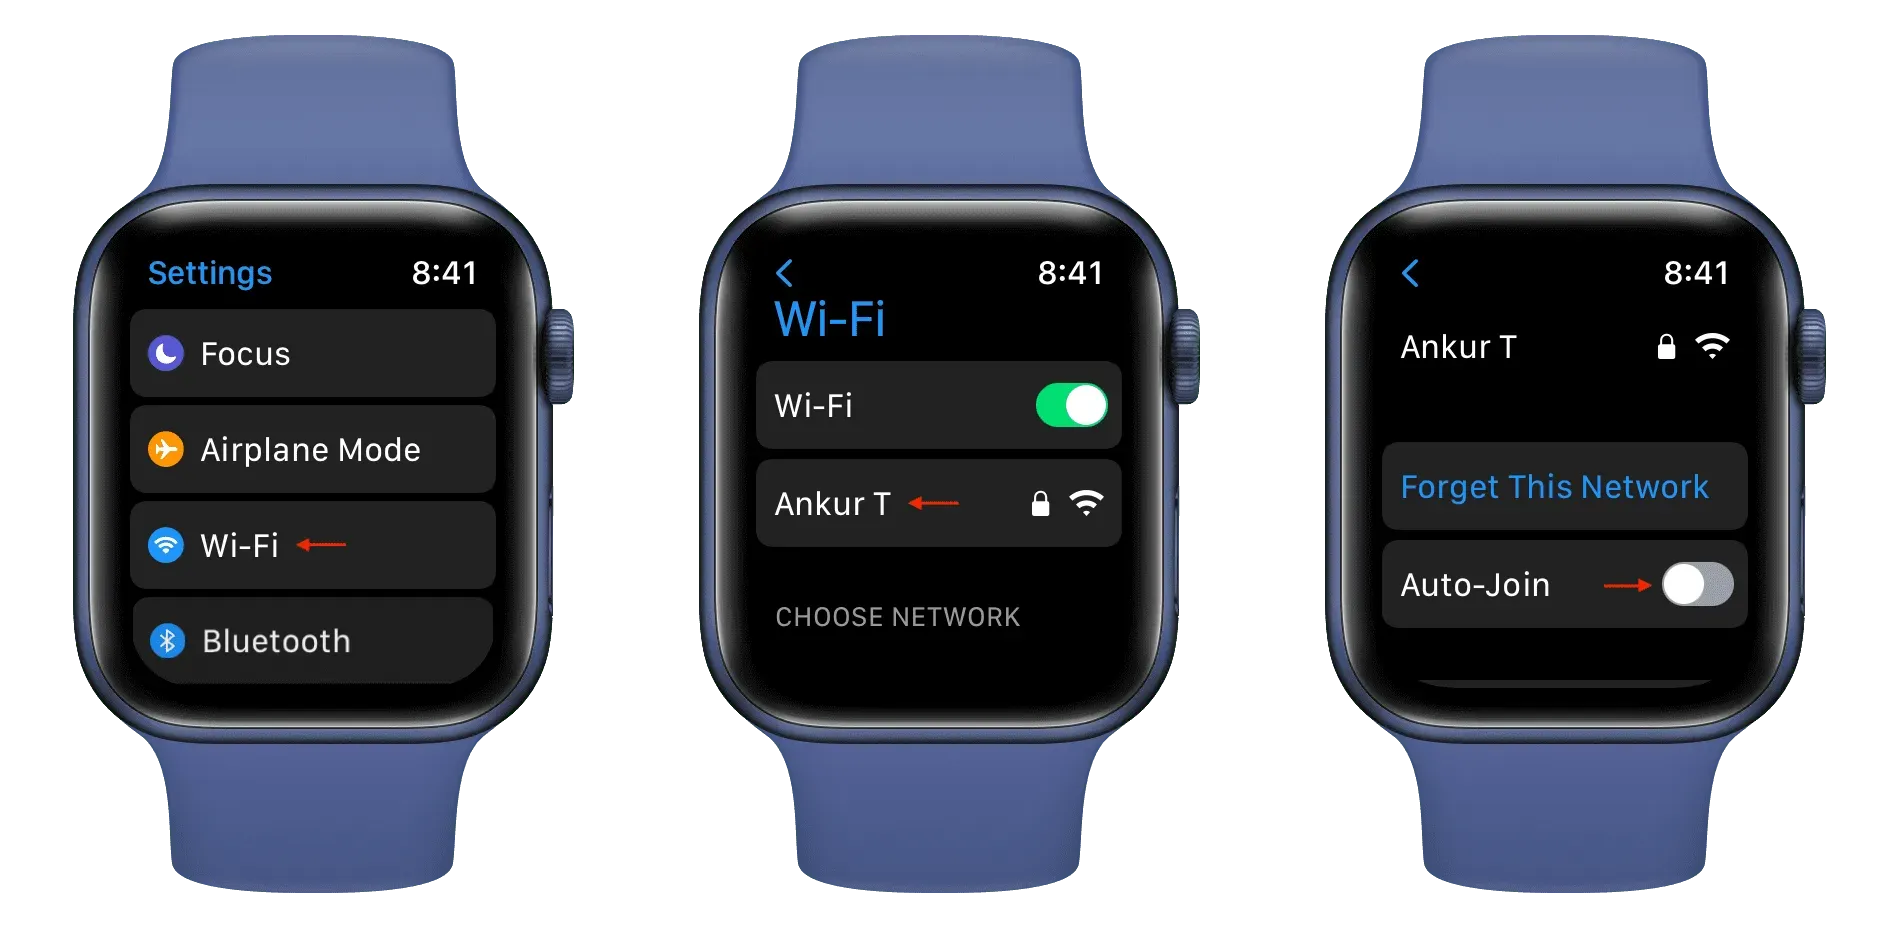
1) Press the Digital Crown and tap “Settings”.
2) Tap WiFi.
3) Touch the name of the Wi-Fi network that your watch should not automatically connect to and turn off automatic connection on the next screen.
4) Now go back and tap your preferred Wi-Fi name and make sure its Auto-Join toggle is on.
From now on, your Apple Watch will automatically connect to the Wi-Fi network you selected in step 4 and ignore the connection to another Wi-Fi network with lower quality.
iMac
Here’s how to set your Mac to prefer and automatically connect to a faster Wi-Fi network than another slower Wi-Fi network:
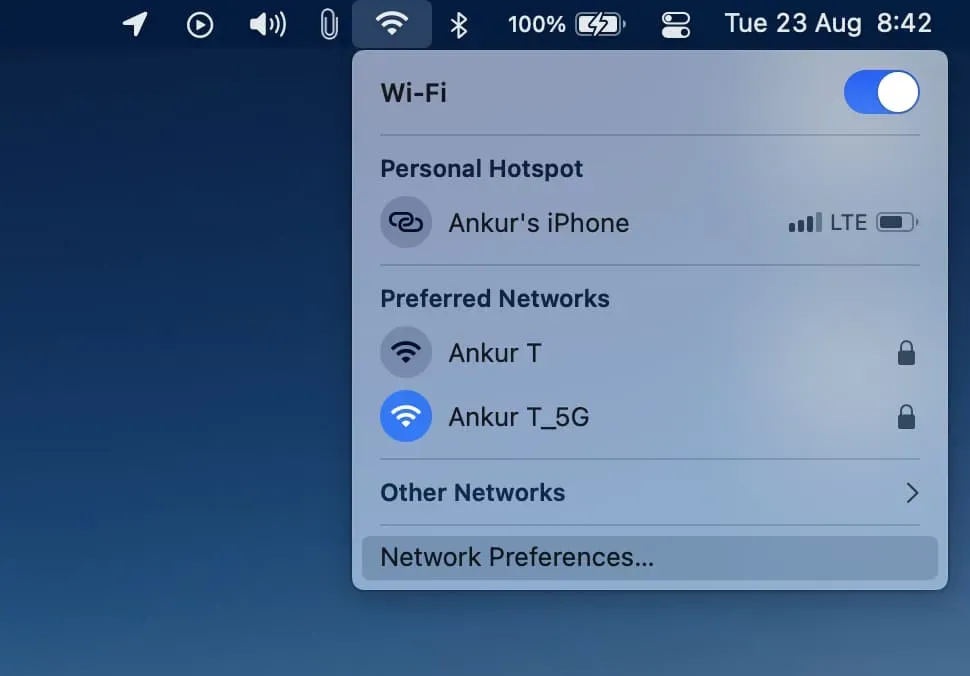
1) Click the Wi-Fi icon in the menu bar and select Network Settings.
2) Click Advanced.
3) Clear the Auto-Join checkbox next to the sub-Wi-Fi network.
4) Make sure the “Auto connect”box next to the upstream Wi-Fi network is checked.
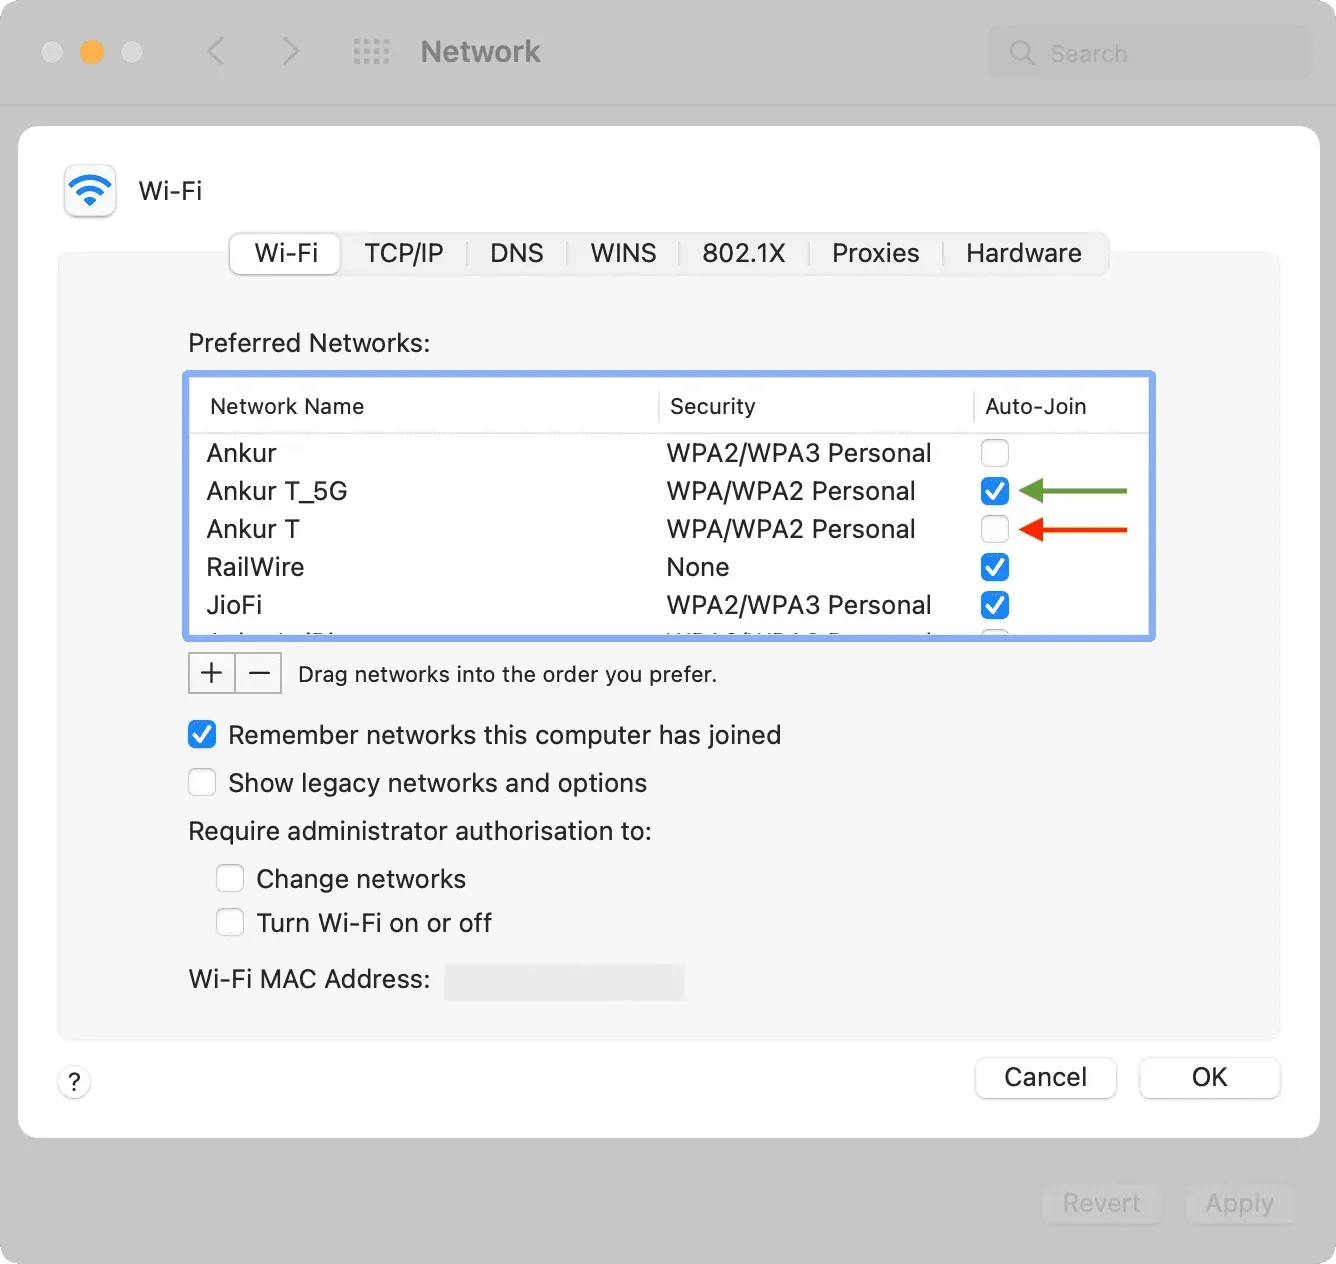
5) Click OK.
6) Click Apply.
That’s all. From now on, when you enter this area with both known Wi-Fi networks or turn on your Mac, your computer will automatically connect to the best network. No more manually connecting to a faster network each time!
Wi-Fi auto connection settings
Here’s how you can set your iPhone, iPad, Apple Watch, or Mac to prefer one network over another.
Besides speed, there are other cases where you might have to choose a network over others. For example, you can control your smart light bulb from your iPhone when both are on the same Wi-Fi network. If you have multiple Wi-Fi networks, you can use the steps above to keep your iPhone always connected to the network your smart devices are connected to.
In this tutorial, I have demonstrated the use of two Wi-Fi networks. But if your home, school, dorm, office, coffee shop, or other frequented location has multiple networks, follow the same steps to choose one over the others. Just turn on auto connect for the best and fastest Wi-Fi and disable auto connect for the rest.
I must remind you again that disabling auto-connect for a known Wi-Fi does not remove its Wi-Fi password. Your device still remembers the network, and you will be able to connect to it manually in the future without entering a password.
Leave a Reply