All Weapon Perk Blueprint Locations in Dead Island 2
Dead Island 2 Weapon Perk Locations
Dead Island 2’s crafting tutorial introduces perks along with weapon customizations. From that point on, you can locate a variety of weapon perk blueprints everywhere across the game, whether they’re in plain sight, concealed, in lockboxes, or being sold by merchants.
Remember that perks can be incompatible with low-level weapons because they have rarity much like mods do. For instance, damaging is «rare,» thus it cannot be used on weapons of unusual quality (green).
By the time you reach level 12, this won’t really matter, and by the time the game is nearly over and zombies on the street can drop high-class weapons, it won’t matter at all.
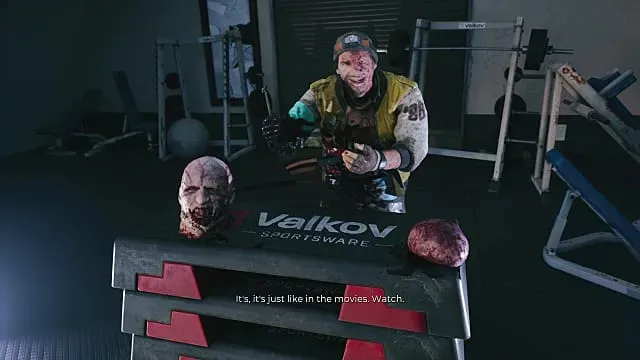
At the beginning, weapon perks use the same common crafting resources as weapon mods, which may restrict your ability to use them. Yet once you finish «The Giant-Slayer» in Venice Beach, your new friend Patton offers you a fresh, intriguing choice.
It’s brand-new, exhilarating, and horrifying.
After that, by making sure to remove a few of their limbs before you take them out, you can farm a variety of disgusting body parts from both normal and Apex Infected enemies. Within these recognizable yellow biohazard sacks, all harvested zombie bits fall (below).
This then provides you with the wide range of virally changed organs you need to step up your weaponry. By the time you reach the final two maps in DI2, you ought to have a good assortment of zombie pieces that will enable you to advance your weapon perk strategy to the next level.
Here is a list of all the Dead Island 2 weapon perks, which is incomplete and under construction.
- Accurate
- Keep a look out for a workstation hidden under a tent, next to a practically empty flatbed truck, while you explore the military scientists’ field base on the Pier. On that workbench is the blueprint for this perk.
- Acid Rain
- You may see a vacant mansion that has been converted into a military base when you first arrive in Beverly Hills, located roughly in the middle of the area. On your initial visit, it’s filled with high-level zombies, but once you reach level 15 or so, you can take a chance and enter. Sgt. Hernandez, a named Runner, is present on the property and, upon death, drops the Biohazard Containment Key. By doing so, a lockbox inside the home containing this Perk is unlocked.
- Agile
- Check the workbench in the Play ‘n’ Win booth on the Santa Monica Pier.
- Bloodthirsty
- To make Francesca a trader, finish the first part of the «Body Art» side quest chain in Beverly Hills. For $1,000, she will sell you the blueprint.
- Contagious
- Complete the Contagious 1 Challenge by landing 100 heavy attacks.
- Damaging
- Oddly, there are two ways to obtain Damaging. Before reaching level 13, run through the Brentwood Sewers to obtain the Damaging blueprint on one of the workbenches.
- The other benefit in the game that you actually can’t miss is damaging, which is a reward for level 13 (below, lower right).
- Destructive
- When you’ve defeated «Beach Offensive,» the unusual zombie Lt. Land can show up at any time throughout the day inside the westernmost landing craft on the Venice Beach shoreline. The blueprint for this perk is located in Land’s personal chest, which is opened with his key in the officer barracks.
- Do or Die
- Check the workbench in the back room of the Re-Aging Clinic safe room on Hollywood Boulevard.
- Empowering
- Check the shelves in the gate control room at the water treatment plant in Beverly Hills.
- Energized
- Visit the sKOpe store on Ocean Avenue after hours to locate the Runner, a Serling Hotel guest who appears in the back office. It leaves the Guest’s Keepsake lockbox key in the vacant Serling Hotel room.
- Enhanced
- You automatically receive this from Sam as part of the weapon modification tutorial.
- Ferocious
- Complete “Lending a Hand” on Ocean Avenue.
- Guardian
- Complete the side quest “The Hero’s Journey.”
- Hair Trigger
- ???
- Hazardous
- This blueprint may be found adjacent to the first workbench on the map’s west end once the Metro has been unlocked.
- High-Caliber
- Purchase this from Rodriguez in Venice Beach for $1,000 after completing «Beach Offensive.»
- Honed
- Go back to Roxanne Kwon’s Beverly Hills home after finishing «Justifiable Zombicide.» Roger the trader will sell you this blueprint for $500 and is currently set up shop in Roxanne’s living room.
- Infectious
- 50 instances of the Bleeding status effect on zombies is required to complete the challenge of the same name. Kicking zombies into obstacles like barbed wire or using the Nail Bomb Curveball are various ways to accomplish this.
- Leech
- Complete the Leechblade Challenge by killing 100 zombies with melee weapons.
- Lightweight
- To obtain Curtis’ house keys, complete the side mission «The End of the Party» in Bel-Air. This enables you to unlock the door that is locked and leads to the study where this blueprint is located at the bottom of the stairs in his foyer.
- You can visit Roxanne’s Beverly Hills home during «Set Sail for Santa Monica» to find a new trader, Roger, in her living room if you don’t finish this quest or didn’t open that door. For $500, he will sell you Lightweight.
- Mind-Blowing
- As you’re leaving the CDC facility at the end of “Blood Drive,” check the workbench.
- Precision Shots
- Complete the post-game side quest “Diaries of the Dead” in Venice Beach.
- Precision Strikes
- Purchase this from Dougie in the Serling Hotel on Ocean Avenue for $1,000 at the start of “Plumbing the Depths.”
- Primed
- On the southeast corner of Ocean Avenue, adjacent to a defunct military checkpoint, is a workbench that is simple to overlook. It is located inside an unlocked shipping container. There is a workbench right next to the Primed blueprint.
- Reinforced
- To unlock the left-hand door of Curtis’ garage in Bel-Air, press the switch on the front of the building. Go through the opening, smash the flimsy crate against the building’s back wall, and you’ll find a secret workbench with this blueprint on it inside.
- Relentless
- Complete the late-game side quest “More Than the Badge” in Ocean Avenue.
- Restoring
- While you wait for the train to start up in «The End of the Line,» you’ll need to combat a couple waves of zombies. The subway vehicle to the northwest of the platform contains this blueprint inside.
- Russian Roulette
- Once you reach the Serling Hotel on Ocean Avenue, you can buy this from Dougie in the bar for $1,000.
- Shockwave
- Complete the Challenge Shockwave 1 by knocking zombies down 100 times.
- Skilled
- Complete the story quest “Boardwalking Dead.”
- Slaughter
- This blueprint may be found on a nearby workbench when you enter Stage 03 on the Monarch Studios lot during «O Michael, Where Are Thou?»
- Speedloader
- After the conclusion of the «Justifiable Zombicide» story quest, this blueprint can be found in the gun room of Nikki’s Beverly Hills home. When you go to get Nikki’s rifle, it won’t be there, but when you come back to see Sam, it will be.
- Static Charge
- Complete the Challenge of the same name by inflicting the Electrified status effect on zombies 50 times.
- Tactical Reload
- Purchase this from Rodriguez in Venice Beach for $1,000 after «Beach Offensive.»
- Tear ‘N Sear
- 50 occurrences of the Ignited status effect being applied to zombies is required to complete the Infernal Combustion Challenge. You should be able to find this without trying given the numerous combustible items that are strewn over Hell-A.
- Tenacious
- Return to the third floor of the Halperin Hotel in the late game to locate a named foe called the Mutated Guest. It’s a challenging battle, but winning will net you the key to the neighboring Fancy Leather Trunk, which has this perk.
- Unstable
- You receive this automatically during the story quest “The Giant-Slayer” in Venice Beach.
- Vampire
- Collect 200 zombie parts in total to complete the corresponding challenge. This only becomes possible as part of the «The Giant-Slayer» story quest once you arrive at Venice Beach.
- Vengeful
- Kill the Voltaic Screamer, a member of the Randgate Staff, on the top floor of the Ocean Avenue subterranean garage between Silicon Street and Stoker Place. This location may be familiar to you from the Lost & Found mission «Missing: Greg.» The lockbox behind the table in the security room of the hidden lab on the east side of Ocean is unlocked when the Randgate Security Key, which is dropped by the Screamer, is turned. There is a blueprint there.
- Vigilant
- On the west side of Venice Beach, next to the quick travel point, check the workbench on the second floor of the guard tower.
- Violent
- Complete the post-game side quest “Organ Donor.”
- Weighted
- This can be found in Marissa’s bedroom at the Goat Pen house in Bel-Air, close to the door. By shattering a window, you can obtain this on your first visit. Alternatively, during Curtis’s side mission «Creature Comforts,» you can go back to the Goat Pen house and kill the named zombie Goat Pen Jamie in the bowling alley to obtain the Goat Pen Master Keys.
Weapon perks’ various effects are detailed below. Perks marked with an asterisk require zombie parts.
- Accurate*: Gain an Accuracy boost while aiming down iron sights.
- Acid Rain*: Zombies killed with this weapon explode into a cloud of fumes that deals Caustic damage (Requires Liquidator Weapon Mod).
- Agile*: Kills temporarily boost Agility; effect stacks.
- Bloodthirsty*: Kills boost Damage, generate increased Fury.
- Contagious*: Heavy Attack a zombie to spread its current status effects to other nearby zombies (Melee only).
- Damaging: Increases Damage.
- Destructive: Any zombie killed with this weapon explodes.
- Do or Die*: At low health, gain bonus Toughness in proportion to how close you are to death.
- Empowering: Critical hits/heavy attacks do more Damage.
- Energized*: Killing a zombie recharges stamina; the lower your stamina, the better the effect.
- Enhanced: Increases Damage, lowers durability (Melee only).
- Ferocious*: Kills generate additional Fury.
- Guardian*: Increased Toughness while weapon is equipped (Melee only).
- Hair Trigger:?? ? (Firearms only)
- Hazardous*: Hit a zombie that’s suffering a status effect to trigger a high-Force explosion.
- High-Caliber: Increases Damage/Force, but reduces magazine size and accuracy (Firearms only).
- Honed: Increases Critical Damage, reduces Damage.
- Infectious*: Zombies suffer additional Bleed damage on hit and other nearby zombies start Bleeding (Requires Puncturator weapon mod).
- Leech*: Damaging zombies may restore health (Melee only).
- Lightweight: Increases attack speed, lowers Force (Melee only).
- Mind-Blowing*: Headshot kills make zombies explode with high Force (Firearms only).
- Precision Shots*: Multiple hits in succession give you a small but stackable Damage boost (Firearms only).
- Precision Strikes: Multiple critical hits in succession give a temporary Critical Damage boost; effect can stack (Melee only).
- Primed*: Zombie kills make Curveballs recharge faster.
- Reinforced: Increases Durability/Force, lowers attack speed.
- Relentless: Critical hits temporarily boost Damage.
- Restoring*: Kills or critical hits restore stamina.
- Russian Roulette*: Increased Damage when your magazine’s low (Firearms only).
- Shockwave*: Knock down a zombie to trigger a high-force explosion (Melee only).
- Skilled*: Zombie kills give a temporary bonus to heavy attacks’ damage and charge time (Melee only).
- Slaughter: Increases limb damage/Durability (Melee only).
- Speedloader: Increased reload speed (Firearms only).
- Static Charge*: Hits generate more Electrified charge; multiple hits cause an explosion that Electrifies nearby zombies (Requires Electrocutor Weapon Mod).
- Tactical Reload: Zombie kills temporarily boost reload speed (Firearms only).
- Tear ‘N Sear*: Maim a zombie to generate a pool of burning fuel underneath it (Requires Cremator Weapon Mod).
- Tenacious*: When low on health, Toughness goes up; the lower your health, the stronger the effect.
- Unstable*: Critical hits may trigger an explosion (Melee only).
- Vampire*: Killing zombies may restore health.
- Vengeful*: Gain a significant Damage boost if you’re knocked down or an enemy interrupts your attack.
- Vigilant*: Reloading temporarily boosts Damage (Firearms only).
- Violent*: Kills temporarily boost Damage.
- Weighted: Increases Force, lowers attack speed (Melee only).
Legendary and Advanced Weapon Benefits
In Dead Island 2, special weapons like legendary and exceptional weapons have special benefits. As of this writing, it doesn’t seem possible to separate or duplicate these bonuses from these weapons, and special weapons cannot be destroyed.
The majority of these weapons are prizes from several side missions that you can access after finishing DI2’s main campaign. Although they are fairly strong, their main purpose is to help you complete the remaining Fight Challenges or get bragging rights. When equipped with a legendary weapon, a level 30 Slayer is a threshing machine. Level 30 Slayers are dangerous on their own.
Leave a Reply