Organize your iPhone reminders with tags that you can search, filter, view, and create smart lists
The standard way to sort notes and to-dos in Reminders has always relied on you putting them in the correct list and group. This was followed by smart lists for flagged and scheduled tasks, and soon a smart list for tasks assigned to you. In iOS 15, Apple offers another way to make it easier to find reminders – tags.
Tags in reminders work as expected; add tags to tasks and then you can search or filter tasks by those tags. If you use hashtags on Twitter, Instagram, or any other social platform, tagging reminders will become second nature to you. However, there is one big difference in that emojis can be part of your tags.
Adding tags to tasks in reminders
There are several ways to add tags to reminders, and it all depends on your preferences. But before we get to them, let’s look at the basic rules for formatting tags:
- Tags cannot contain spaces.
- All letters and numbers work.
- You can combine letters, words, and numbers into one tag using hyphens, underscores, and other special characters.
- Supported dashes include the hyphen (-), en dash (-), and em dash (-).
- All letters have diacritics (accents) should work.
- Some special characters that will work include:
$ ₽ ¥ € ¢ £ ₩
’ ‘ ` ” “ „ ^ |
() < > [ ] { }» «
_ + = ≠ ≈ ~ - – —
- Some special characters that don’t work include:
: ;.? ¿! ¡.. .
& § @ # % ‰ * • / \
- Entering any unsupported character will create a tag using whatever came before it.
- Smilies work as a single smilie or as a group of smilies.
- You can combine emoticons with any supported letters, numbers, and special characters.
- Tags only work for lists in iCloud, so lists attached to Outlook, Yahoo, etc. won’t work with them.
- Tags work in headings, notes, and tag lines.
- All your devices should be running the latest version of Reminders. Otherwise, you’ll see an “Update”button for your iCloud lists. Use this to update to the latest Reminders. Any devices that haven’t been updated won’t be able to see or use your reminders in your primary iCloud account after the update.
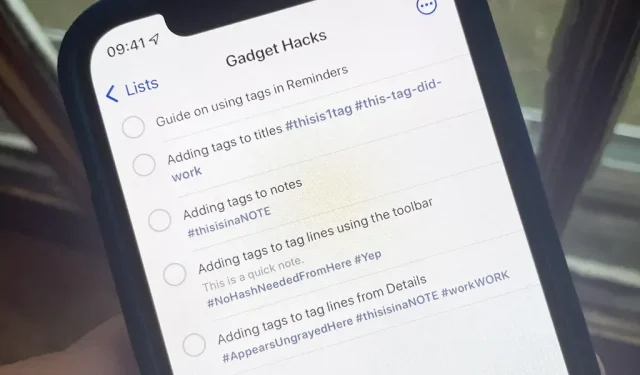
adding tags to titles
When you add a new task or edit a reminder you already have, you can include the tag in the main title bar. This makes it more obvious than with the other options as it stands out big and bold. Begin with:
- Adding a new reminder.
- Click the title of the reminder.
- Click on the title of the reminder, press the Details button (i) and place the cursor in the Title field.
- Swipe left on the reminder, tap Details, and place your cursor in the Title field.
In the title of the task, enter the # symbol (also known as a number, pound sign, or pound sign), and then enter the word, number, special character, emoticon, or a combination of those that will be your tag. You’ll notice that while you’re typing your tag, it’s a shade of light gray, letting you know it’s still running.


Pressing space, return, or an unsupported character will create a tag. If you see dark black text, that means it’s not working, so it only acts like regular text and symbols. To fix this, replace the # sign with another # sign and it will turn light gray again.


Also, after you hit the # sign to run a tag, you can see tag recommendations in the menu above the keyboard. If you select one of them, it will add the tag immediately.


adding tags to notes
You can also include tags in the notes section of each task. When you do, they will still appear in bold on your to-do list view; only they will be displayed right below the heading in a smaller font.
To get started, create a new reminder and click the Details button (i). Or you can tap the title of the current reminder and tap the Details (i) button, or swipe left on the reminder and select Details. Whatever you do, place your cursor in the Notes field. Then enter your tag starting with # as shown in Option 1 above. Click Finish on the Details window to close and save.


adding tags to tag strings using the toolbar
Another way to add tags to reminders is to use the new tag line, which is for tags only, if it wasn’t obvious. If there are no notes, the tag line appears directly below the task title. Otherwise, you will see it under the title and notes. There are several ways to get started, but first we’ll look at the toolbar method.
Create a new reminder or tap the reminder name. You can place the cursor in the title or in the tag line if you already have tags there. Then click the # icon in the toolbar above the keyboard. Then enter your tag and use a space, return key, or an unsupported character to create the tag. You do not need to enter the # sign first. It is possible, but it is not necessary.
You can also click on a tag recommendation in the menu above the keyboard to add it right away.


adding tags to tag lines from details
The result of this method is the same as Option 3 above; only you add tags from another area. First, create a new reminder and click the Details (i) button. Or you can tap the title of the current reminder and tap the Details (i) button, or swipe left on the reminder and select Details. Whichever you are, click “Tag”from the Details panel.
Just enter your tag in the Add New Tag field, then use the space or return key to create the tag. You don’t have to type the # sign first, but unlike all of the methods above, the text appears black as you type, and the only unsupported character that the tag will create is a comma; nothing will happen when you try to use another one.


Tag recommendations don’t appear in the menu above the keyboard, but regular recommendations work and work the same – tap one of them to create a tag right away.
If you already have tags in your reminders, they will all be listed above the Add New Tag box. Used ones are displayed in blue, and unused ones are grayed out. To use the one you already have, tap the gray tag so it turns blue.
When you’re done with all your tags, click Done in the Tags window, then Done in the Details window to close and save.


Removing tags from tasks in reminders
I won’t go into a detailed guide on how to remove tags because it’s basically the opposite of what you see above for adding them.
- Highlight the tag in the title in the list, then delete it.
- Highlight the tag in the tag line from the list, then delete it.
- Highlight the tag in the title and/or note fields in the Details view, delete it, and click Done.
- Deselect the tag so it turns gray in the Tags view under Details, then click Done and Done again.
View tasks in reminders by tags
Now that you have tags in your reminders, you can view them. On the main Reminders page, scroll down through all your lists to find the new Tag Browser. Tap a specific tag to view all reminders with that tag, or select All Tags to view all reminders with the tag or tags.
If you select all tags, you can switch to a specific tag using the scroll menu at the top of the Tag Browser page. And if you want to find reminders that include a set of specific tags, select all applicable tags and the Tag Browser will show you reminders that have them.


Search for tags in reminders
In the search bar at the top of the main Reminders page, type search. It will search for tags and plain text throughout the entire task, so you don’t have to start your search with a # sign. In fact, the # sign has no weight in the search tool, so you will still see issues with matching non-running text, if any.


Use Smart Filters to Organize Tags in Reminders
The tag browser is the main way to view your tags, while the search bar is an easy way to find something directly. But if you want to further organize your tags, you can create smart lists for them. In the Tag Browser, select the tag or tags for which you want to create a Smart List, then click the ellipsis (•••) button in the upper right corner and select Create Smart List.
Your new smart list will appear where the rest of your iCloud lists are, and its title will be the tag or tags you selected. Open the smart list to view all related tasks.


You can click on the ellipsis (•••) in the upper right corner of the smart list and select “Show smart list info”to edit it. You can also get here by swiping left on the list itself, or by pressing and holding to open quick actions.


Here you can change the name, color, and symbol of the list, but you can also click Manage Smart List to select more tags or deselect those you no longer need. And there are other filters like date and location that you can turn on. Click “Done”, then “Done”again to save your changes.
Leave a Reply