Selling on Shopify in 2022: A Step by Step Guide

Are you thinking about selling on Shopify? It only takes a few simple steps to get your online store up and running. You will get a professional looking online store ready to take orders in no time!
In this step-by-step guide, we’ll walk you through everything you need to know to get started selling on Shopify. We also covered how to sell on platforms like Instagram, Facebook, and Pinterest with Shopify.
How to start selling on Shopify in 10 easy steps
You probably already have a business plan in place with an idea of what you are going to sell and who your target audience for online sales is. If you don’t, the first step should be creating one, finding products, and branding your organization.
Otherwise, here’s how to sell on Shopify in ten easy steps.
1. Buy a domain name
Buying a domain name is quite an important step. A domain name is similar to your internet address. You want it to be easy to remember and, above all, relevant to your business.
Shopify offers a free URL, but it won’t rank well. It looks like this [yourshopifystore.shopify.com], so it has the added disadvantage of having “Shopify”crammed into the URL.
When you first sign up for Shopify, it will ask you to enter your store name. It will then use your store name to generate a free URL for you. You can change this after registration:
- Shopify admin login on desktop
- Go to Sales Channels
- Access to the online store
- Switching to domains
- Clicking the Change primary domain link
- Selecting a new domain from the list
- Clicking Save
Choose a domain name that matches or is close to your brand name. Your social media accounts should also be similar to your brand name. This way, customers can easily find you online through search engines.
You can buy a domain name by visiting major registrars such as A2 or GoDaddy. It’s relatively easy as long as no one has taken the domain name you want. You will need to provide payment information for this transaction before it is completed, but once that is done, that domain name is yours!
2. Choose and customize a Shopify store template.
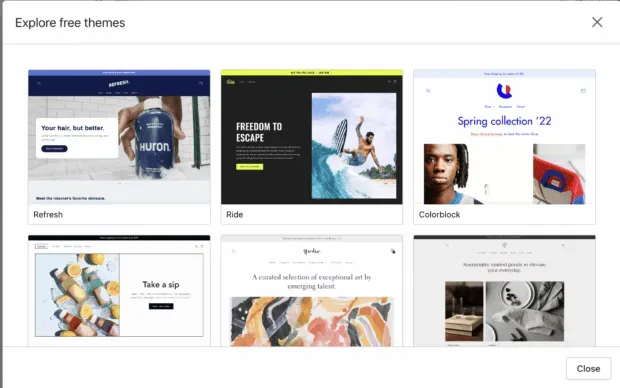
You will want to customize the look and feel of your online store. Fortunately. Shopify offers a wide variety of themes, both free and paid.
You can find them in the left menu under Themes.
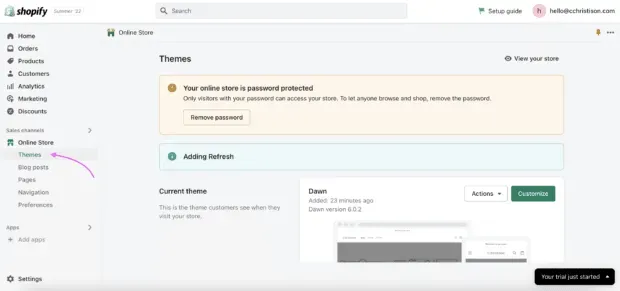
Source: Shopify
Your theme organizes your store, sets features, and defines style. Take the time to browse the available themes; different layouts can give your customers a different experience.
After choosing a theme, you can customize the content, layout, and typography. If you click Customize, you will be taken to the editing site where you can start creating your own store. When you customize your theme, make sure everything matches your brand.
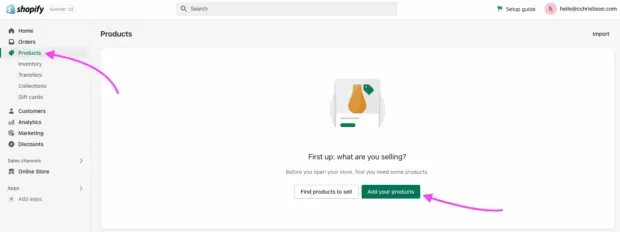
3. Load your inventory
Once you have your Shopify Store template, it’s time to upload your products. You can do this in the Shopify admin space that you’ve already worked in.
Here’s how:
1. Go to “Products”in the menu on the left.
2. Click Add Products
3. Fill out all your product information and upload photos.
4. Click Save
Loading inventory manually can take a while if you have a lot of items. Luckily, you can bulk upload your inventory, if you have it in your CVS file, in four easy steps:
1. Navigate to products from your Shopify admin.
2. Click Import
3. Click “Add File”and then select the CSV file containing your products.
4. Click Download and continue
Inventory management is an important part of store maintenance. Keep your product pages updated to start building a successful eCommerce store.
4. Set up payment methods
When someone clicks the buy button, they are ready to make a purchase. You want to make your customer’s shopping experience as convenient as possible so you don’t lose transaction fees.
Set up a secure Shopify checkout to accept orders and accept payments through your Shopify store. When a customer adds an item to their cart, they check with your store’s stock levels. If inventory is available, then it is held for the customer until the customer completes the payment.
Go to the checkout settings page in your Shopify admin to view and change your checkout settings. Add banking information about your business so that you have a place to transfer funds.
From there, you can also choose to collect customer email addresses during the payment process to use later for email marketing purposes.
5. Decide on shipping procedures and set shipping rates.
Before accepting your first order, you must decide how that order will reach your customer. This can be done in four main ways:
- Dropshipping
- retail delivery
- local delivery
- local pickup
Dropshipping is when you use a supplier that stores your stock and ships your product. You will pay wholesale prices to the supplier, but you can decide how much you will charge your website visitors.
Dropshipping is popular because it saves you from inventory costs like storage or product waste. Your supplier stores your products in a fulfillment center and you simply buy the quantity you need from them. They ship your products to your customers for you.
Dropshipping is great for people who are just starting out because of the low overhead. But, he has flaws.
With dropshipping, you have no control over the amount of stock you have. If your supplier has run out, that’s your problem. You also have limited branding control as you will be dependent on the supplier to brand your products. And you won’t control shipping – your dropshipper can ship one order of three items three times, charging a shipping fee for each product.
Another shipping option is to do it yourself. Thus, you have full control over packaging, shipping methods and branding. If part of your brand is to provide a beautifully designed experience right down to packing and unpacking, then this might be the right one for you.
Shipping as a retailer is more labor intensive than dropshipping. You will have to pack the products yourself, use a courier delivery service such as DHL or FedEx, and make sure you include shipping costs in your e-commerce model.
Local delivery and pickup is pretty easy. You will still have to pack your groceries and keep an eye on your inventory.
With local delivery, collect the addresses of your customers and either deliver the packages yourself or use a local courier service. For local pickup, give your customers clear instructions on how to pick up their packages from you.
6. Add pages, navigation and customize your preferences.
You will see the option to add pages, navigation, and settings on the left menu bar. In Pages, add any additional site pages that your customers might be interested in, such as your brand story in the About Us section.
In the Navigation section, you can make sure your menus are understandable to your store visitors. Nothing stops a user like a website with bad UX.
You need to make sure your Shopify Store is set up for SEO, which you can do in Settings. Add your page title and meta description here. This is what will be displayed on the search engine response page (SERP) when people search for your company. Systems like Google also use this to match your store with search terms, so be sure to include relevant keywords here.
In this section, you can link Google Analytics and Facebook Pixel and decide how you will collect user data. Toward the bottom of this page, you’ll see a box that says your site is password protected.
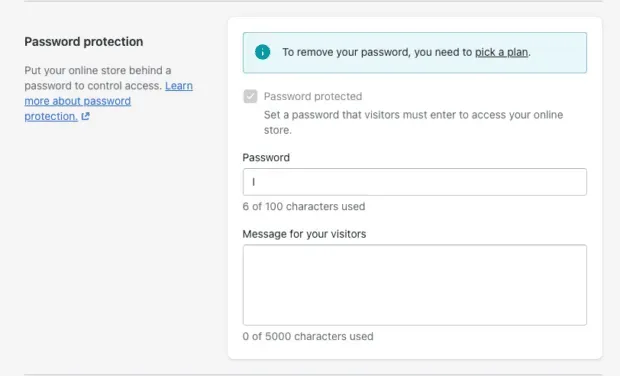
When you’re ready to get started with your store, remove your password and click Choose Plan.
7. Go live
Choose a Shopify plan! There are many touchpoints in your Shopify Admin to navigate to their plans. It’s pretty easy for them to give money. But if you get a little lost, go to the “Home”section in the menu on the left. In the bar at the top of the screen, select Choose a plan.
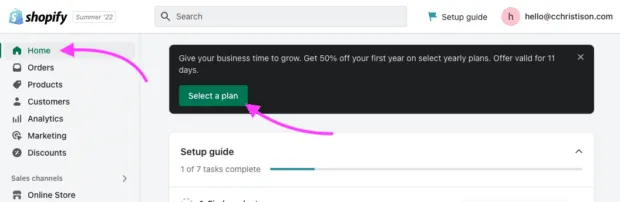
From here, you just need to decide which plan is right for you.
8. Connect your store to your social media accounts.
To add your social media accounts to your Shopify store, choose a theme that already has them built in. You can find them by searching for “social networks”in the Theme Store.
Or you can check if the theme you are already using supports by clicking on the footer or area of your choice and then on the right menu go to the social media icons section and click “Show social media icons”.
If you would like to connect your social media accounts to Shopify in order to sell through them, see below.
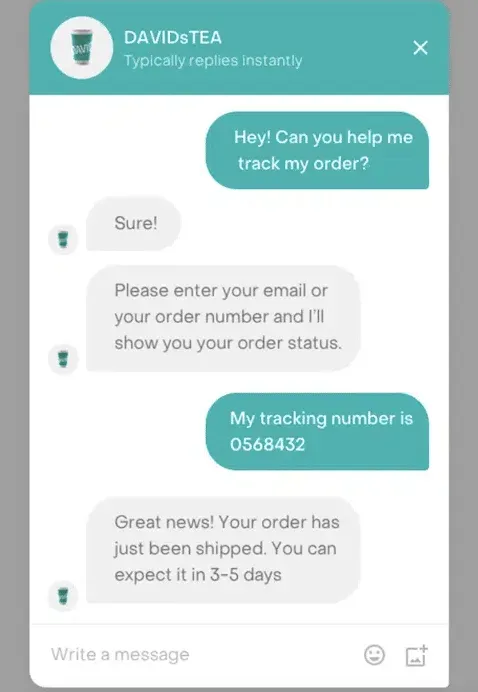
9. Set Up a Shopify Chatbot
Once your store is set up, you’ll want to invest in a Shopify chatbot. Shopify chatbots can automate your tasks, saving you time and money.
First, find out which chatbot is right for your store. We recommend our sister chatbot Heyday as it works with almost all eCommerce business models. Plus, the easy-to-use interface simplifies integration.
Heyday can remotely connect a site visitor with store employees via chat and video calls.
Source: Rise
Try Heyday’s 14-Day Free Trial
10. Integrate Hootsuite
Your last step will make your life a lot easier when managing your store. Integrate Hootsuite into your Shopify store using Shopview. You will be able to easily share products from your store on social networks.
Did you know that you can sell through your Shopify store directly on many social media platforms? This allows you to sell and sell products where your customers prefer to shop.
How to sell on Facebook with Shopify
Selling on Facebook with Shopify is easy; There are a few easy steps to get there.
Make sure you’re an administrator for your Facebook Business Manager.
To sell on Facebook with Shopify, you must have a Facebook advertising account and be an administrator of your Facebook Business Manager. Under your Facebook business manager, you must own your brand’s Facebook page. You will need these accounts to connect to your Facebook channel in Shopify.
Set up a Facebook channel in Shopify
First, you will need to sign in to your Shopify store on desktop. Then go to the Shopify admin page.
- Click Settings
- Click “Visit the Shopify App Store”.
- Facebook search
- Click Add Channel
- Select the feature you want to install (for example, Facebook Shop) and click “Start Setup”.
- Click Connect Account
- Login to your Facebook account
- Follow the instructions to connect the Facebook assets required for setup.
- Accept terms
- Click Finish Setup.
Start selling and marketing on Facebook
Your product category will automatically upload to your Facebook store when you install the Shopify feature for Facebook store. So, all you have to do is promote and sell your products on Facebook!
What if I already have a Facebook store set up?
If you have already set up your Facebook store, this is not a problem. You can easily integrate Shopify into your store by following the instructions above.
Here’s how to set up your Facebook store via Meta instead of Shopify.
How to sell on Instagram with Shopify
There are a few things you need to do to sell on Instagram with Shopify.
Make sure your Facebook business page is linked to your professional Instagram account.
Meta owns Facebook and Instagram. To integrate your Shopify store with your Instagram account, make sure your Facebook business page is connected to your professional Instagram account.
Learn how to convert your personal Instagram account to a professional account here.
Set up a Facebook channel
Follow the steps above to install a Facebook feed to your Shopify account.
Install the Instagram store feature
Once you’ve integrated a Facebook feed into your Shopify account, you need to install the Instagram store feature. Go to your Shopify admin page.
- In Settings, go to Apps and Sales Channels.
- Click Facebook
- Click Open Sales Channel.
- Click Browse
- In the Instagram Shopping section, click Set Up to get started.
- Connect your Facebook accounts to the Facebook sales channel if you haven’t already.
- Accept the terms and conditions, then click Request Approval.
- Wait for Facebook to review your products (this may take 24-48 hours).
Start Selling!
You are now ready to start selling on Instagram! The Hootsuite insta experts have put together a few cheat codes for you to shop on Instagram (what to do to sell more).
How to sell on Pinterest with Shopify
Selling on Pinterest with Shopify is incredibly easy. Plus, it can introduce your products to 400 million Pinterest users.
Add a Pinterest sales channel to your Shopify store
Basically, all you have to do to sell products on Pinterest is add a Pinterest sales channel to your store.
- Make sure you’re signed in to your Shopify account
- Go to the Pinterest App
- Click Add Application
- Follow the instructions to install the Pinterest app on Shopify
Once installed, purchasable Pins for all your products on Pinterest become available. This means users can browse Pinterest and buy your products. Shopify takes care of data syncing for these purchases for you.
Have you manually added Pinterest tags?
If you have manually added Pinterest tags to your Shopify account, you need to remove them before integrating the Pinterest Shopify app. Don’t worry, you can add them again later.
Hootsuite Pinterest experts have developed a benefit here for your Pinterest shopping strategy.
Selling on Shopify Frequently Asked Questions
What can you sell on Shopify?
On Shopify, you can sell products and services (digital and physical) as long as they are consistent with Shopify’s values and are not illegal.
Shopify’s Acceptable Use Policy states that they believe in “the free and open exchange of ideas and products.”Claiming that this free and open exchange is a key commerce principle, however “there are some activities that are inconsistent with Shopify’s mission to improve commerce for everyone.”
These activities include things like child abuse, illegal substances, and the services of terrorist organizations. If you’re trying to monetize, say, your formulaic social media strategies or your grandma’s homemade pies, you’re probably doing just fine. Unless grandma uses wild ingredients.
Why should you sell on Shopify?
Shopify is one of the largest e-commerce platforms for a reason. They boast a range of affordable pricing plans for stores of all sizes and an easy-to-use backend. It’s an attractive choice for store owners with any digital skill set.
Shopify can scale as your business grows. They have a whole ecosystem of digital tools that can be integrated into your store, such as chatbots to help with customer service inquiries.
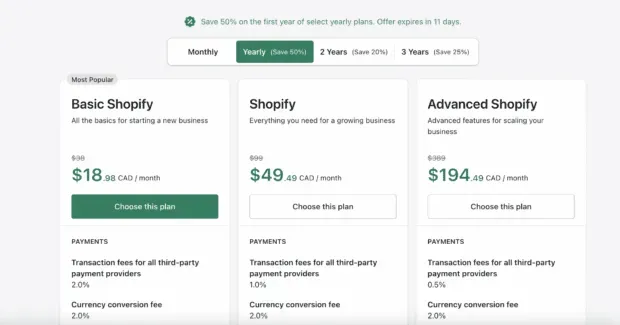
How much does it cost to sell on Shopify?
Pricing packages range from $38/month for the Shopify Basic plan, $99/month for the Shopify plan, to $389/month for the Advanced plan. So, how much it costs to sell on Shopify is up to you and the plan you choose.
That being said, if you sign up for a free 14-day trial (like I did), Shopify can offer you 50% off your first year.
However, there are other costs associated with selling on Shopify. If you’re wondering exactly how much it costs to sell on Shopify, you need to calculate your costs. It could be your internet bill, the price of your packaging, the cost of shipping, the cost of your branding, or your advertising efforts.
How do I start selling on Shopify?
If you’ve completed steps one through eight in the 8 Steps to Start Selling on Shopify section above, congratulations! Your store is up and running and ready to start selling on Shopify.
Now it’s time to promote your brand and advertise your products or services so you can get your first sale. Make sure you follow the social commerce guidelines for the best results.
Can I sell on Shopify through social media platforms?
Yes! You can sell products on your social networks like Facebook, Instagram and Pinterest. Customers can view your products and then checkout directly in the apps. And setting up your stores is easy; see instructions above.
Engage with shoppers on social media and turn customer conversations into sales with Heyday, our custom AI chatbot for social commerce retailers. Deliver a 5-star customer experience – at scale.
Leave a Reply