How to disable or restrict Airdrop on your iPhone, iPad and Mac

In this article, we’ll show you how to disable or restrict Airdrop on your iPhone, iPad, and Mac, giving you control over who can send files to you and providing you with a higher level of privacy and security.
Note the difference between disabling and restricting AirDrop. By simply disabling it, you are essentially pausing the function. However, by restricting it, you completely block this feature. This is especially handy if you want to prevent your child from using AirDrop, for example.
Why disable AirDrop
Privacy: Turning it off in a public place (or setting it to be visible only to contacts) will make you undetectable and ensure you don’t get unwanted AirDrop requests to get random files.
Less confusion between multiple devices: If you have multiple devices of the same type, such as two or more iPads, iPhones, Macs, etc., it can get confusing when choosing which device to send files to. In this situation, you can disable AirDrop on one of the devices where you do not need to receive files. Alternatively, you can give unique names to all of your iPhones, iPads, and Macs so they show up with their specific names in the AirDrop panel.
How to disable AirDrop
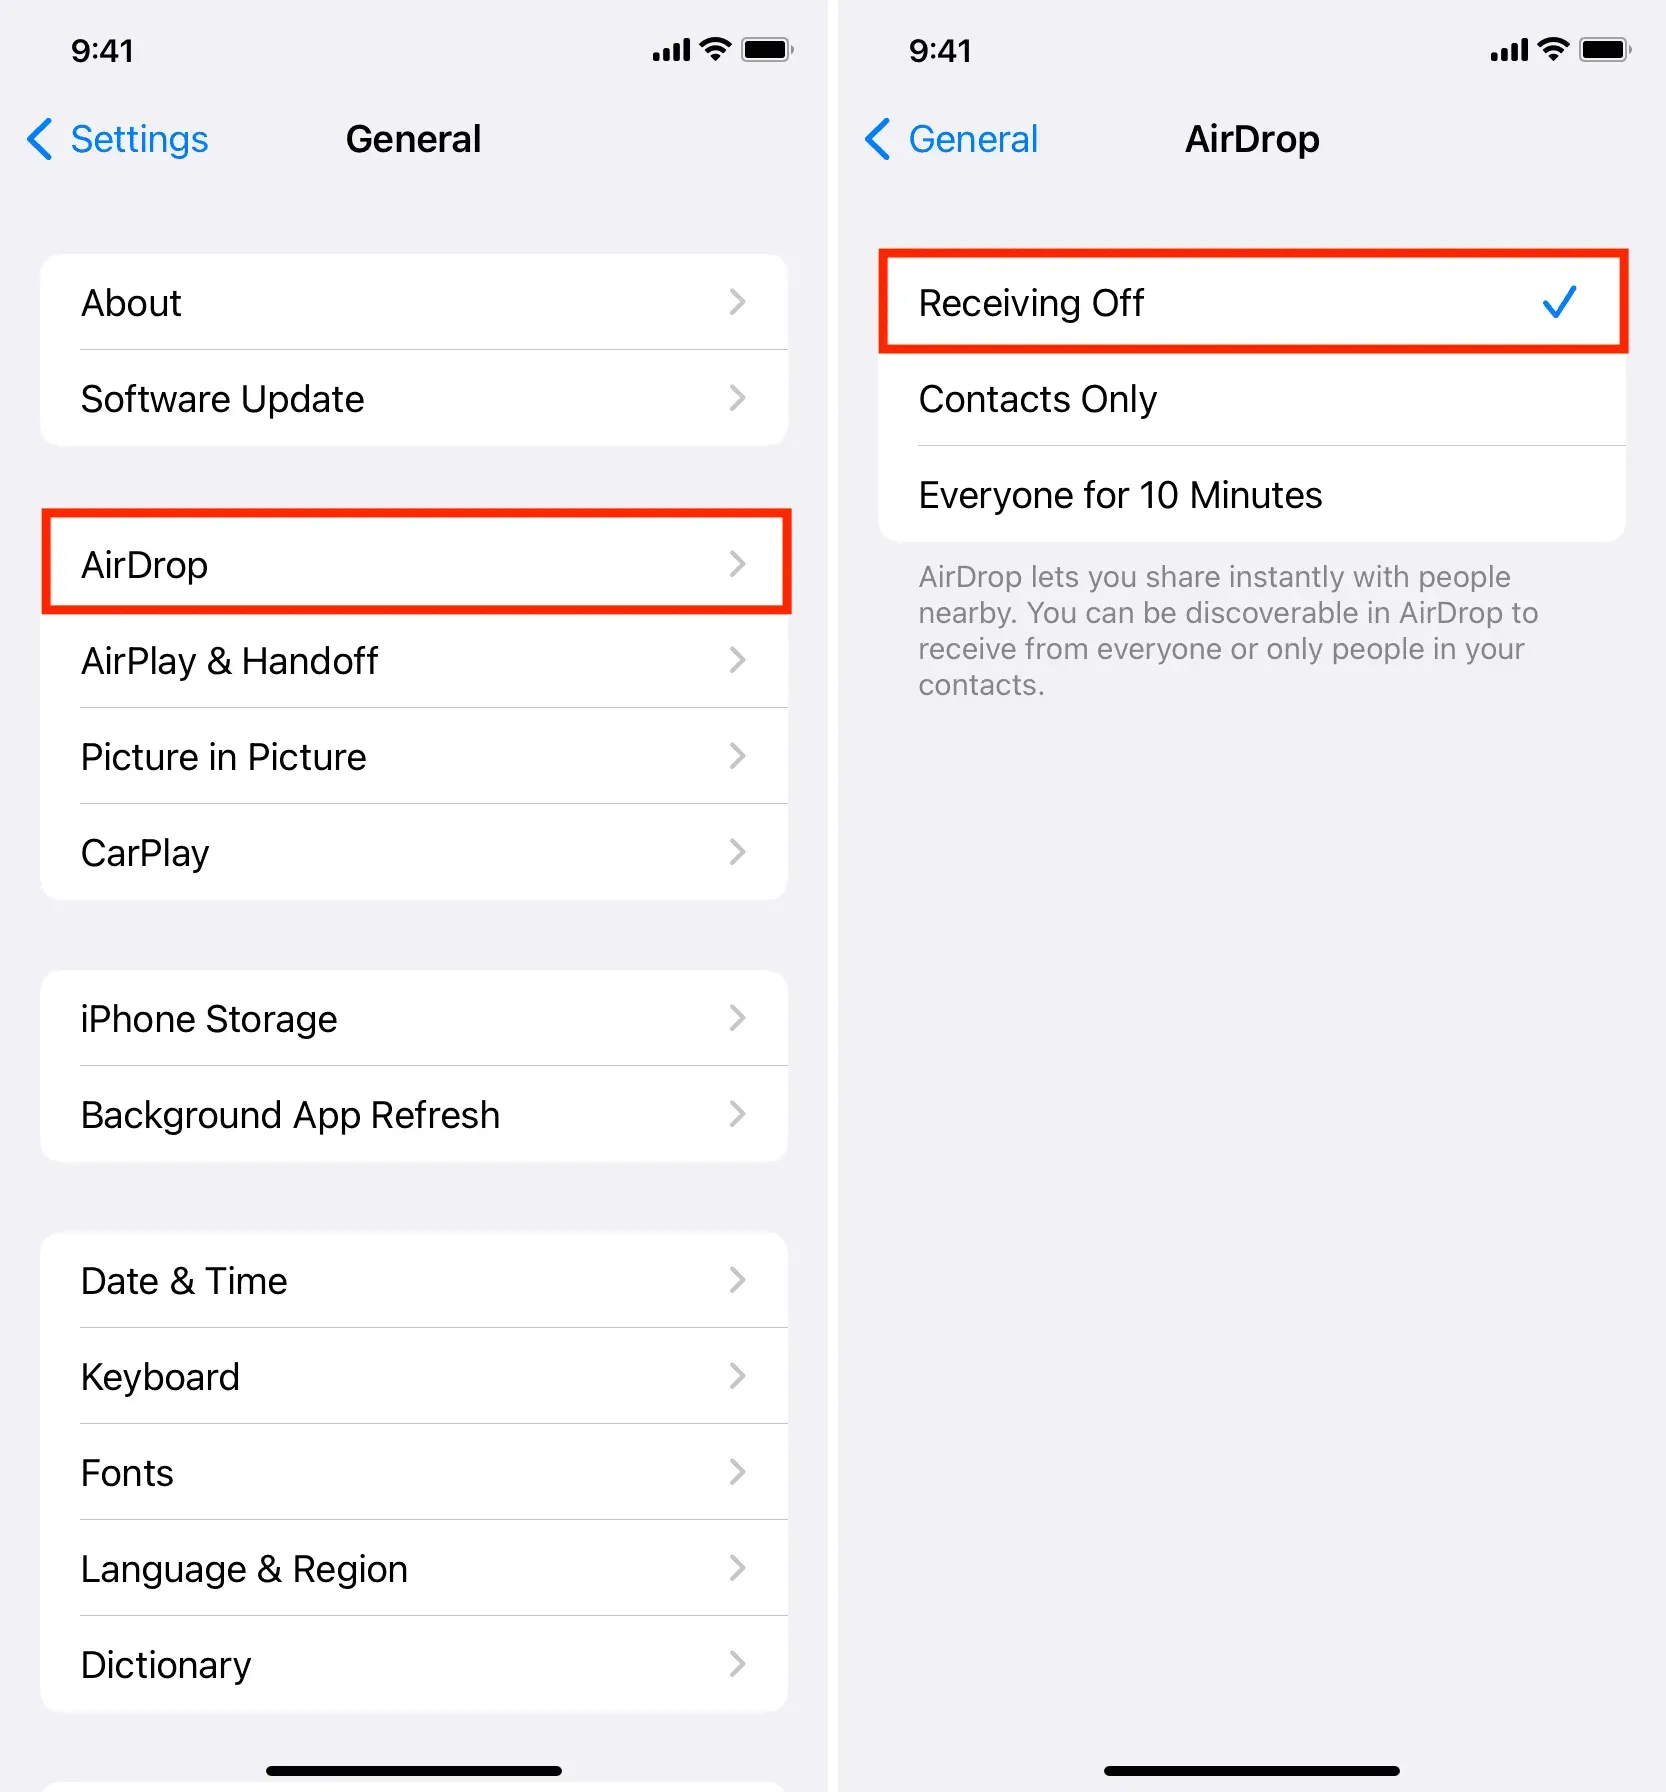
On iPhone or iPad
- Open the Settings app and tap on General.
- Select AirDrop.
- Tap “Mute Receive”to turn off AirDrop on your iPhone or iPad.
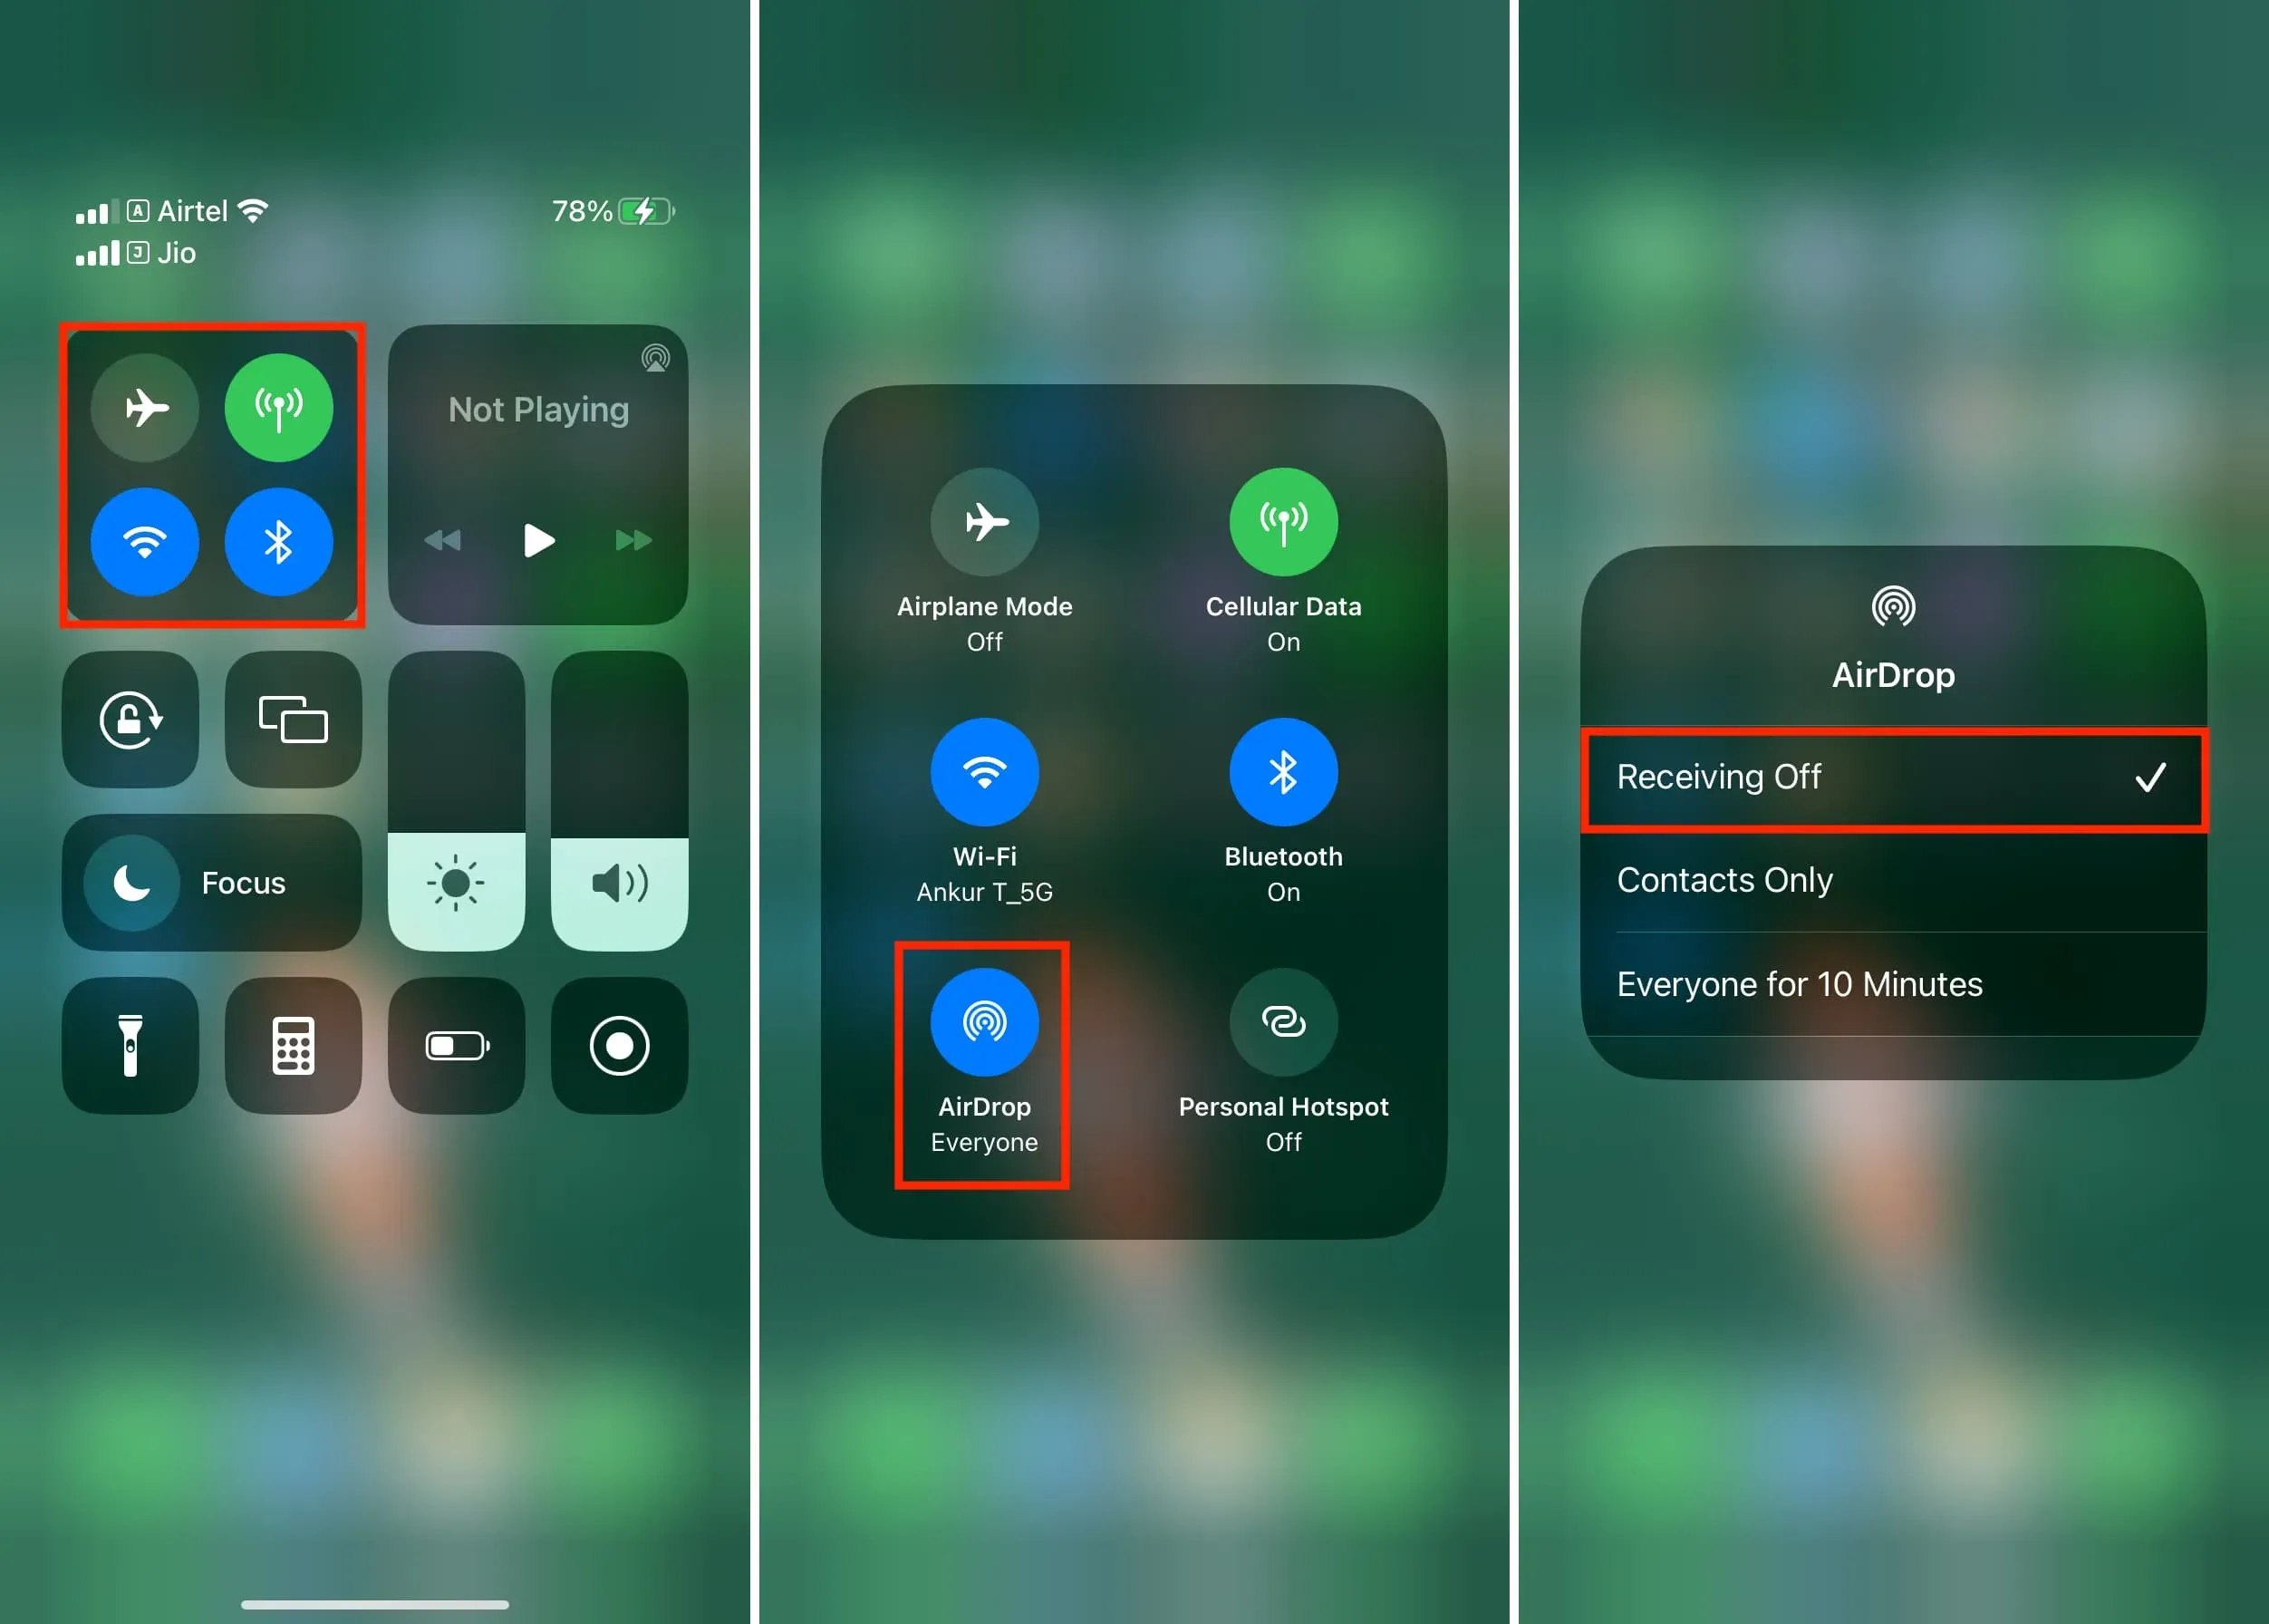
Another method:
- Open the iPhone Control Center, touch and hold the first block with network icons to open additional options.
- Tap AirDrop and select Reception off.
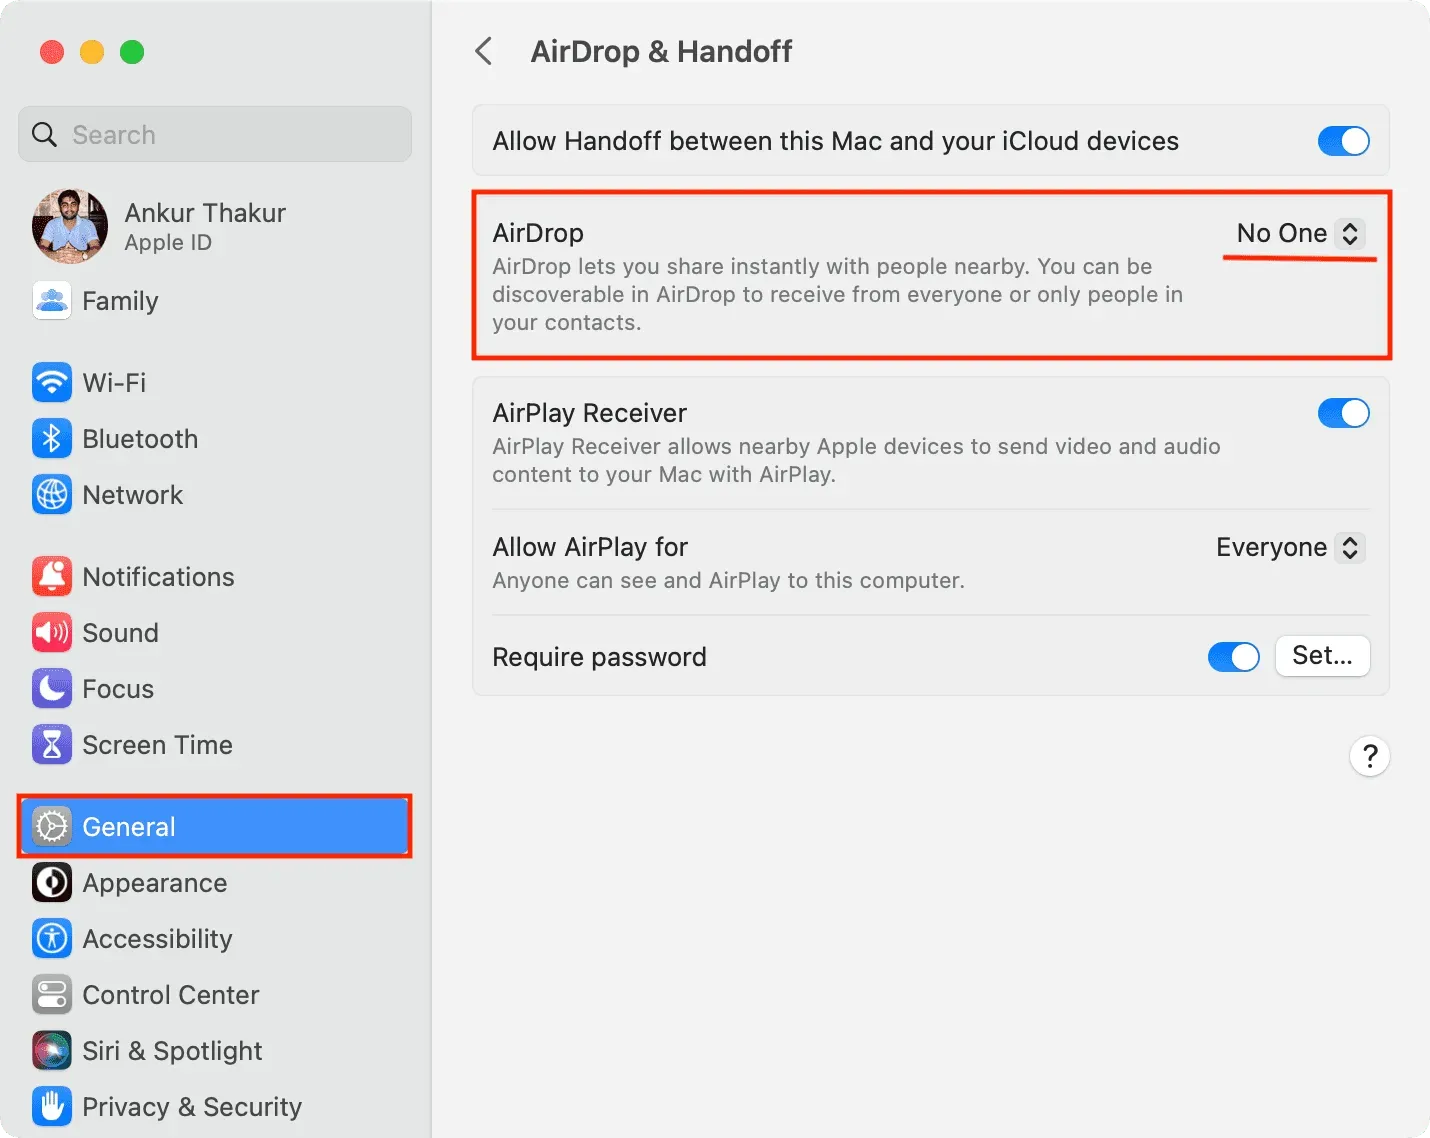
On Mac
- Click the Apple icon and select System Preferences in macOS Ventura or later.
- Select General on the left sidebar.
- Now select AirDrop and Handoff.
- Click the drop-down menu next to AirDrop and set it to “Nobody”. This will disable AirDrop on your Mac.
Another method:
- Open Finder and select AirDrop from the sidebar.
- Click “Allow me to be discovered”and select “No one”which will disable AirDrop on this Mac.

Re-enable AirDrop if needed
You won’t need to change the above settings to send files via AirDrop. However, if you want to receive files, follow the steps above and select Contacts Only, All for 10 Minutes, or All.
Related: AirDrop not working? Here’s how to fix it
Turn off Wi-Fi, Bluetooth, or both to disable AirDrop.
AirDrop uses a combination of Bluetooth and Wi-Fi to work on the sender’s and recipient’s Apple devices. Thus, if you disable one or both of them, AirDrop will automatically turn off. To do this, go to the Settings app and turn off Wi-Fi or Bluetooth.
Note. Don’t use Control Center: Tapping the blue Wi-Fi or Bluetooth icon in Control Center only disconnects your iPhone or iPad from the currently connected network/device and stops it from scanning or joining new Wi-Fi or Bluetooth connections. However, they continue to work for other purposes such as AirDrop, personal hotspot, displaying the battery level of wireless devices, etc.
Completely restrict or block AirDrop
The above approach just disables AirDrop. But what if you want to limit the AirDrop feature on your iPhone or iPad?
For example, let’s say you use an iPad as a menu for your restaurant or use it for some other purpose in your business, and you want to restrict AirDrop on that device so that people can’t send or receive files from it. It’s easy to do and no one can enable AirDrop without your Screen Time password. As a result, this device cannot receive or send files via AirDrop. Here’s how to do it:
- Open the Settings app on your iPhone or iPad and tap Screen Time. If Screen Time is not enabled, be sure to enable it.
- Click Content and Privacy Restrictions.
- Turn on content and privacy restrictions, and then click Allowed Apps.
- Turn off the switch for AirDrop.
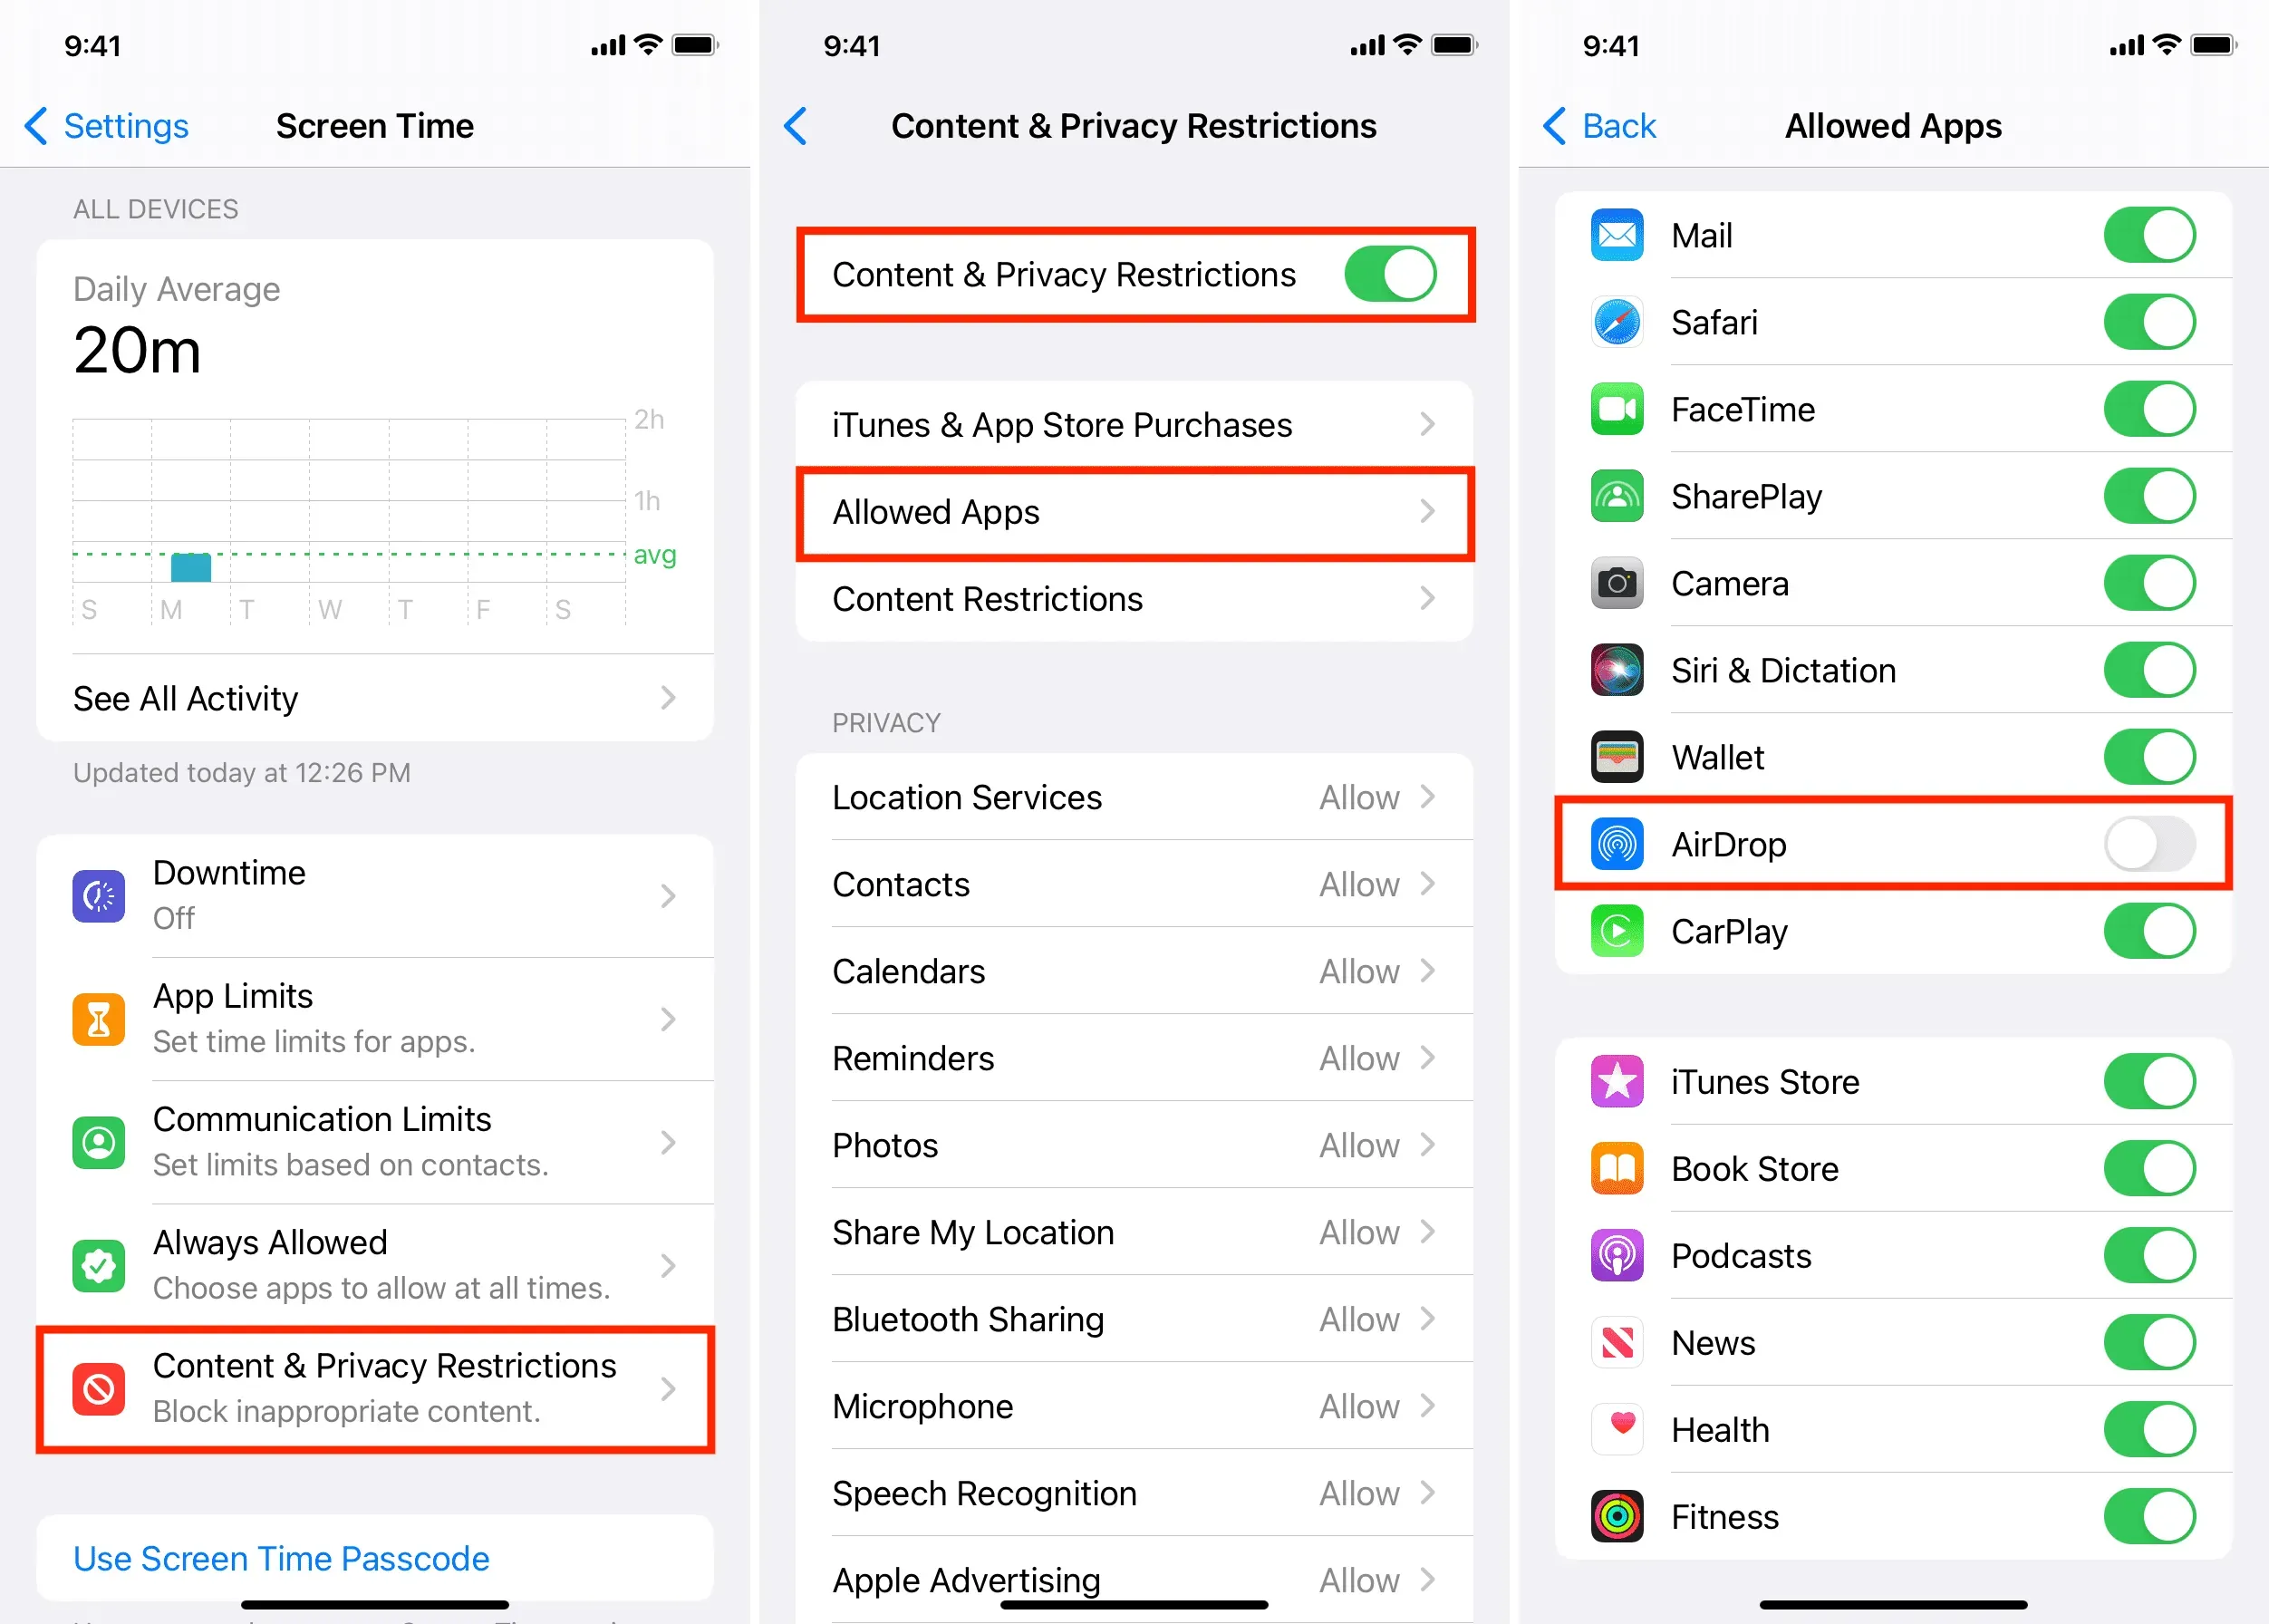
This will block AirDrop on that iPhone or iPad. From now on, you won’t see the AirDrop button in the Settings > General app, and you won’t see the AirDrop icon on the iOS or iPadOS share sheet after clicking the Share button in any app (as shown in the first image in this article).
Leave a Reply