Tips for using the People album in the Photos app on iPhone like a pro!
The Photos app can automatically identify the people in your images and then group photos of the same people. Thus, you do not need to sort photos separately and create an album. You can also give names to each person and customize albums. Interesting, right? Let’s learn how to use the People album in Photos on your iPhone like a pro!
How the People album in the Photos app works on iPhone
Apple has brought advanced machine learning and facial recognition technologies to the Photos app. Thus, it can analyze your photos to identify faces, places, and objects in them. It then sorts and groups the images of a particular person and creates a profile or People album. As a result, all people will have different People albums.
Plus, you’ll get a flashback slideshow of your images with matching soundtracks and themes. In addition, you can add a name, mark any person as a favorite, set a thumbnail, and more. Also, when you turn on iCloud Photos, all albums are synced between your Apple devices.
Now that you understand how your iPhone sorts photos, let’s learn how to master the People album in Photos.
How to Create a People Album on iPhone
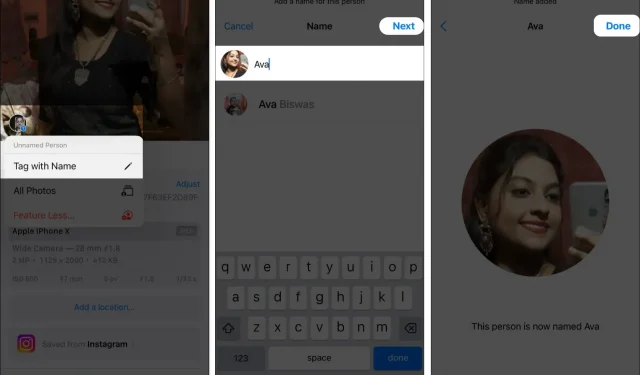
You will usually find different People albums for all the faces that appear frequently in your gallery. If your iPhone missed, you can add someone to the photo album on your iPhone.
- Launch the Photos app and find the person’s photo in your gallery.
- Swipe up → tap the face of the person with the question mark.
- Select a tag with a name.
- Now enter a name for this person and click next.
- Confirm by clicking Done.
It will automatically create an album and add all similar images to it.
Add a name to a face
Many untitled albums can be created in the Photos app. Your iPhone will recommend names for people in your contacts. You can also enter the name manually:
- Go to Photos → Albums.
- Select the People album in the People & Places section.
- Touch the thumbnail of the person you want to name.
- Select Add Name.
- Enter a name or select one from a list of suggestions → click next.
- Finally, click Done.
You entered the wrong name on the People album by mistake. The Photos app lets you rename it. Just open the People album and tap its name at the top. Now enter a new name and select “Next”and then “Finish”.
How to find someone in Photo Album on your iPhone
The People album allows you to find images of a specific person, so you don’t have to tediously browse through the entire gallery.
- Open Photos → tap Album.
- Select People.
- Here you will see a thumbnail of the faces. Tap the one you want.
Alternatively, if you have given the person a name before, do the following:
- Go to Photos and click Search.
- Enter the person’s name.
- Then choose one from the list shown.
Tag your favorite people
If you have multiple People albums in your gallery, it will be difficult to find a specific person. Thus, you can mark any album as your favorite. The person’s profile will be pinned at the top for quick access.
- Go to Photos → Albums → People.
- Tap the little heart icon on the thumbnail you want to tag.
- If the profile is unnamed, you will need to provide a name now.
Combine similar faces into one album
Due to different angles, your iPhone may classify the same person in different albums. So this can create confusion. Therefore, combine all the albums of one person into one album. You can also bring several people together to make a family album.
- Tap Select in the People album.
- Choose people to join.
- Tap Merge.
- Select “Yes”in the pop-up window.
Validate photos without categories
When you create a People album, you may see fewer images because iPhone Photos doesn’t recognize faces properly. So, you can look through the photos and make sure it’s the same person.
- Open the People album.
- Select the three dots icon and click “Verify Additional Photos”.
- All blurry photos will pop up and ask Is this [person’s name]?
- Touch Yes to confirm.
- After reviewing all photos, select Done.
Change photo thumbnail
Whenever your iPhone identifies a face, it will take a random photo as a thumbnail for the People profile. If you don’t like it, you can upgrade it.
- Look through the album “People”and find the right image.
- Now press and hold it.
- Click “Take Key Photo”on the pop-up window.
Remove photos from the People album
If you find that the Photos app has added the wrong image to the People album, you can easily delete it.
- Open the People album.
- Tap Select.
- Now select the images you want to remove.
- Tap the three dots icon.
- Finally, click “This is not [person’s name].”
Delete album “People”
Multiple “People”albums can confuse your gallery. This way you can clean up the mess by deleting the ones you don’t need.
- Open the People album you want to delete.
- Tap the three dots icon.
- Select Remove [person’s name] from the people list.
How to Use Fewer Features in People Album on iPhone
You may notice that your Photos app shows images of people everywhere, from Memories, Featured Photos, or Photo Widgets. If annoying, you can set to see the person less.
- Go to the People album and tap the three dots icon.
- Select Feature [person’s name] Less.
- Choose between “Tag this person less often”or “Never tag this person.”
- Click Confirm.
You can also undo your changes and allow Photos to highlight the person.
- Select any photo of that person and swipe up.
- Now tap on the person’s photo thumbnail.
- Select “Reset [name] feature settings”.
- Touch it again in the pop-up window.
So that’s all for today, friends!
Setting up People albums will help your iPhone better recognize your images and categorize them. You can also use the Memories feature in Photos to create beautiful videos. Do you find it useful to use the People album in the Photos app on your iPhone? Let me know in the comments below.
Leave a Reply