9 Ways to Take a Screenshot on HP Laptops, Desktops and Tablets
Taking a screenshot is useful in many situations. You can take a screenshot of an issue to show to a friend or support rep, take a screenshot of text found on a website or book, take a screenshot from a video clip, and more.
If you’re using an HP computer, it will probably run Windows, but many HP laptops also have Chrome OS. What’s more, HP tablets run on either Windows or Android. Follow below to get the easiest ways to take a screenshot on an HP device.
Best Ways to Take a Screenshot on an HP Windows Computer
- PrntScr (keyboard shortcut)
- Scissors
- Fragment and sketch
- Game panel
- Third Party Screenshot Tools
1. PrntScr (keyboard shortcut)
This is a tried and tested method for taking screenshots on any version of Windows on HP computers and all other brands. Follow these steps to take screenshots using the PrntScr method:
- Navigate to the window/video you want to capture and press PrntScr (Print Screen key) on your keyboard. It is located in the top row on the keyboard. Basically, the PrntScr key is in the center of the Insert and Delete keys. If just pressing PrntScr doesn’t work, press function key + PrntScr or Windows key + PrntScr. You can also try ALT + PrntScr to capture the active window.
- The screenshot is saved in the Pictures folder of the user account. If not, find the Screenshots folder in your Pictures folder.
- Keep in mind that when you take a screenshot, nothing appears on the screen. So, if you are new to this method, you may need to go to This PC > Pictures > Screenshots to confirm that a screenshot has been taken.
Its advantage is that it instantly takes a screenshot of what is on your computer screen when you press the keys. It takes a screenshot even when you are in full screen mode, such as watching a video or playing a game.
What’s more, with PrntScr, a screenshot is taken instantly. You don’t have to wait for an app to open that allows you to take a screenshot. Thus, it is the preferred method for people who want to take screenshots instantly or who need to take many screenshots in a short amount of time.
The only downside to the PrntScr screenshot method is that it doesn’t let you choose what to do. Takes a screenshot of the entire screen when a key is pressed.
If you want to select an area of the screen to capture, use methods 2 and 3.
2. Scissors
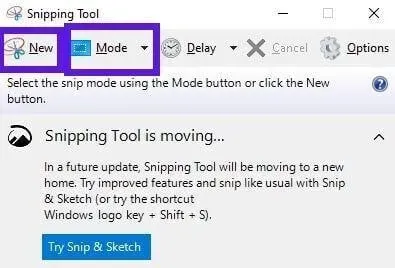
The Snipping Tool is a built-in screenshot application for Windows.
- Open the start menu, type “scissors”and open the app.
- A small application will open. You can click the New button if you are in a hurry. The default settings allow you to take screenshots in rectangle variations. The entire screen will be covered in white. (But if you have time to explore the options, click the Mode button and select the screenshot selection method).
- Click and drag your mouse to select the area you want to capture. When you release the mouse button, the selected area will be captured.
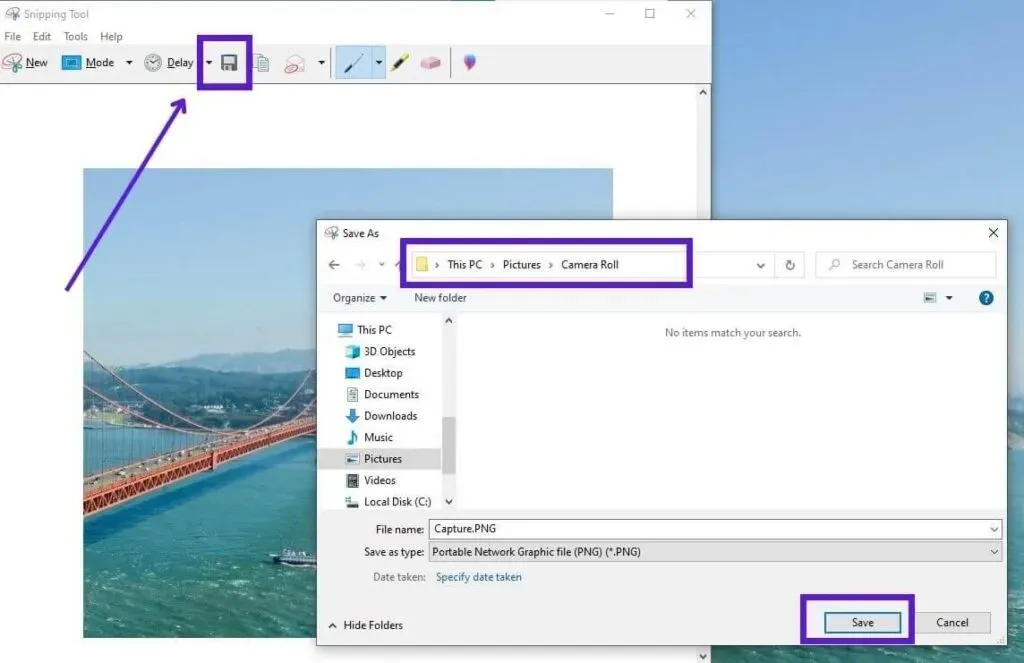
- You will get a window with a fresh screenshot and several editing options.
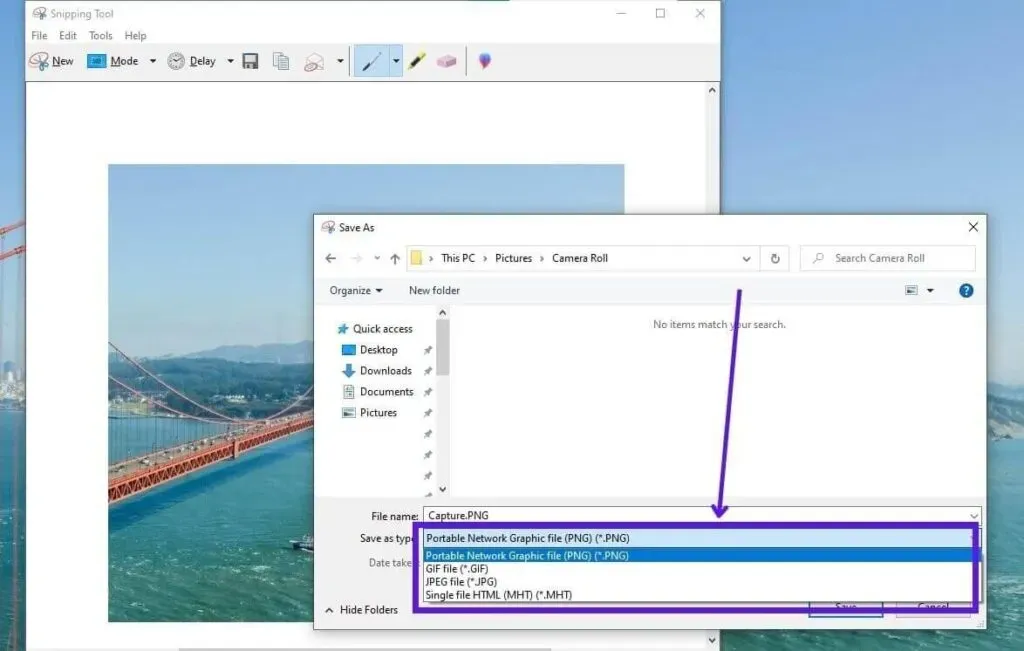
- If you don’t want to edit anything, click the Save button (disk icon) in the toolbar, select a location to save the screenshot, and click OK.
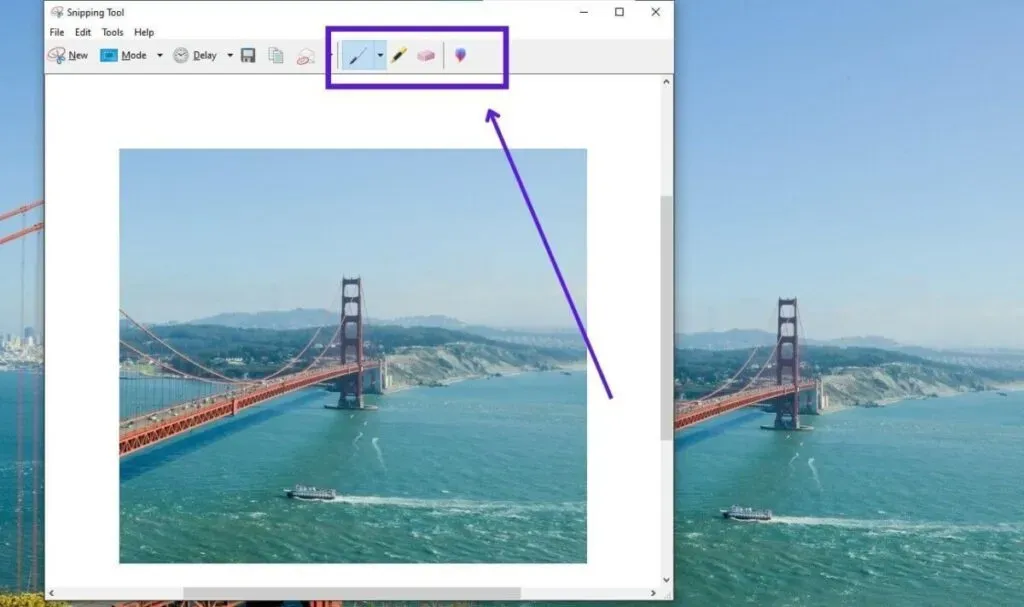
- But if you want to write something on it or erase something, use the Pen and Eraser tools in the toolbar. If you want to do more editing, you can click the colored ball icon in the toolbar to edit it with Microsoft Paint 3D.
- By default, images are saved in PNG format. If you want to change the format, you can click the drop-down menu to select the desired image format when you save the screenshot. You have JPG, PNG, GIF and MHT options. The most popular formats are JPG and PNG.
- You can open the saved file with image editing apps if you need more editing options.
The advantage of using the Snipping Tool is that it allows you to select the selection area and save the screenshot in the desired folder. This is not possible with the PrntScr method.
The disadvantage of the Snipping Tool for taking screenshots is that it cannot capture everything. It cannot take a screenshot of a fullscreen game or video without going into windowed mode.
Also, you cannot capture certain menus and options that disappear when you click elsewhere. For example, if you want to take a screenshot of the context menu on the desktop, you must right-click on the desktop to bring up the menu, but when you open the Snipping Tool, the context menu will disappear. If you’re having this kind of problem, use methods 1 and 3 to take screenshots.
3. Snip and sketch
It is currently the best screenshot tool that Microsoft offers pre-installed in Windows 10 and 11. It is the best version of Snipping Tool as it does not have the disadvantages of Snipping Tool. But if you like the Snipping Tool, it comes preinstalled with Windows 11, 10, 8, and 7.
Here’s how to use Snip & Sketch:
- Open the start menu, type “snip and sketch”and open the app.
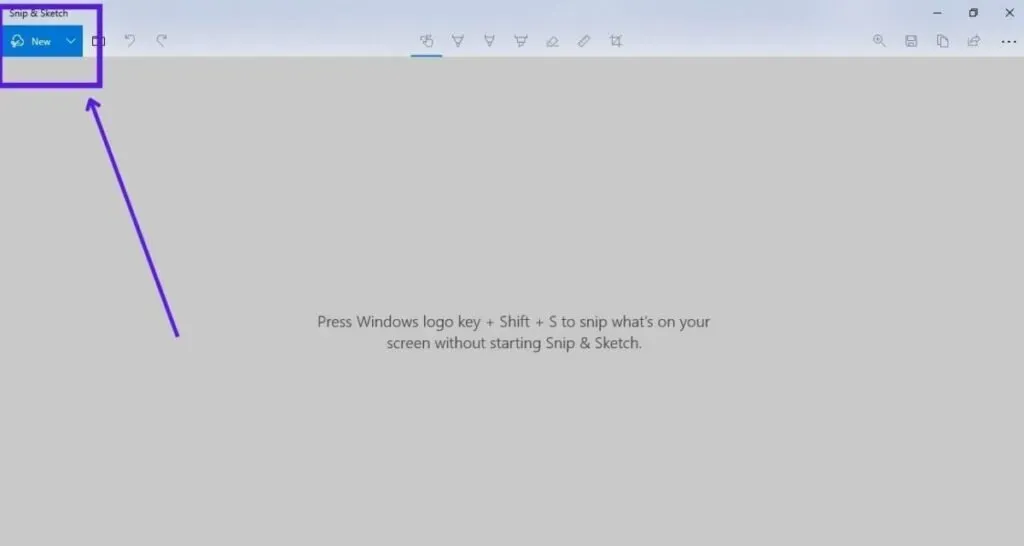
- When the app opens, click the “Create”button in the top left corner to make a new snippet. Alternatively, you can press the Windows logo key + SHIFT + S on your keyboard to have Snip & Sketch ready to take a screenshot without even opening the Snip & Sketch app.
- To take any screenshot, you will see the option to take a rectangular slice, a freeform slice, a window slice, or a full screen slice. If you don’t select anything but select an area directly, a rectangular screenshot will be used, which is the most efficient option.
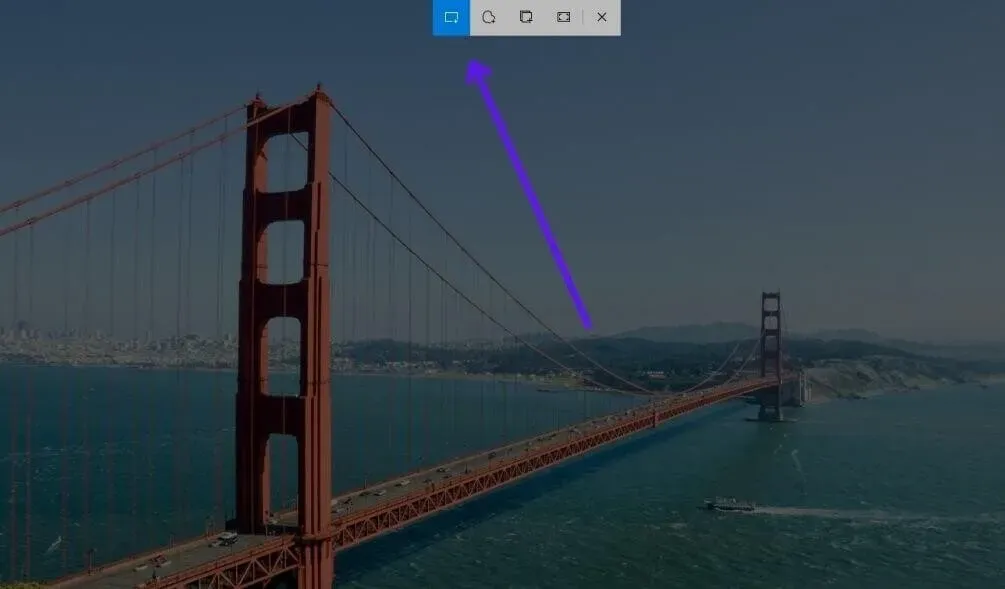
- Click and drag the pointed cursor to take a screenshot. Release the mouse button when you have selected the screenshot area.
- The screenshot will be saved to the clipboard so that it can be accessed from the notification area.
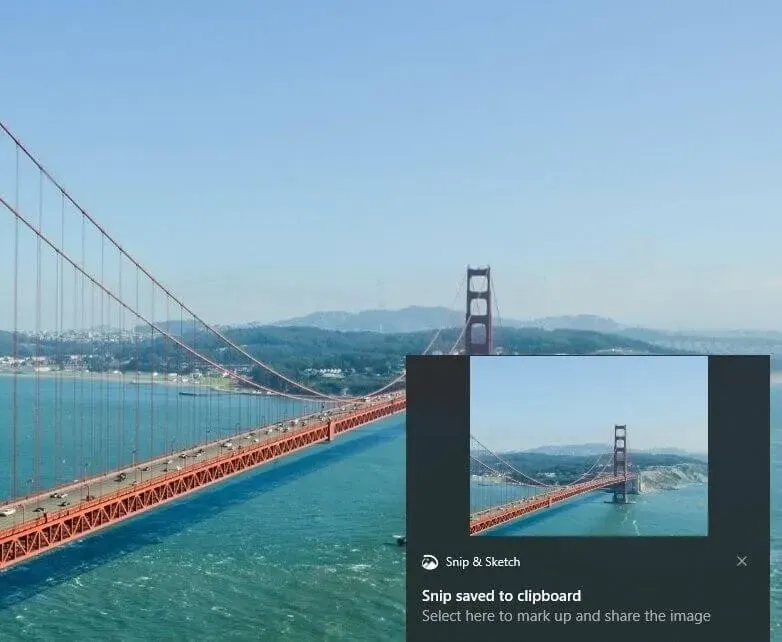
- The new screenshot will open in Snip & Sketch where you can edit and save it.
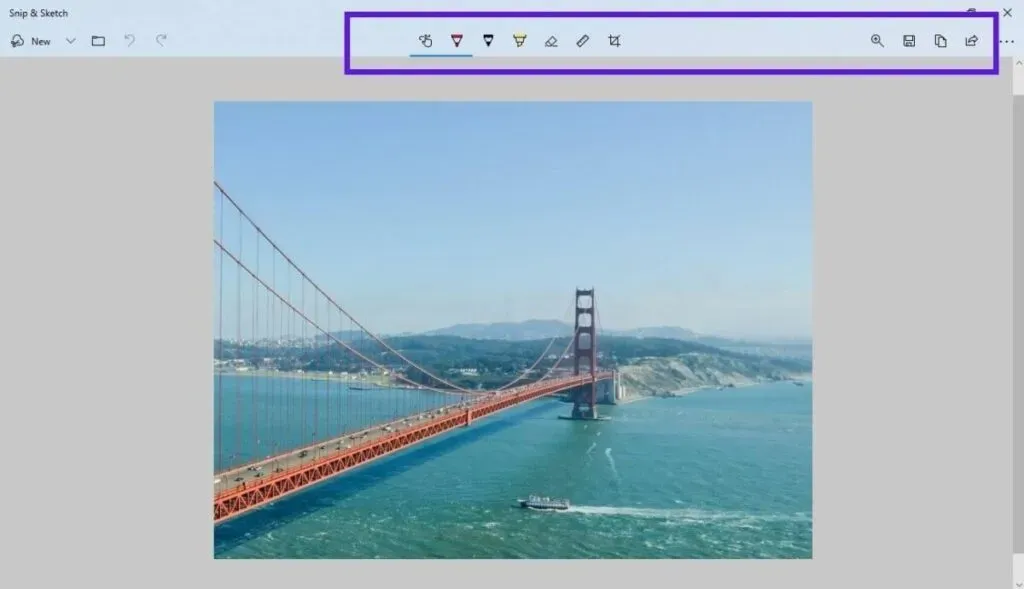
- When saving, you can choose the name of the screenshot, location (folder) and format (JPG, PNG).
Snip & Sketch has many advantages and most HP users prefer it for taking screenshots:
- This allows you to select the part of the screen you want to capture.
- You can choose the screenshot name, location and format.
- Easy screenshot editing options.
- Snip & Sketch can take screenshots when you are in full screen mode. Just press the Windows key + SHIFT + S and take a full screen screenshot.
- It allows you to take screenshots of menus and options that disappear when you click elsewhere. This feature is not in the Snipping Tool, but it is in Snip & Sketch. For example, if you want to capture the context menu on the desktop, right-click to display the menu, press Windows key + SHIFT + S, select the area to take the screenshot, and save it.
4. Game Bar
Windows 10 and later have an interesting built-in screen capture tool called Game Bar. As the name suggests, it focuses on screen recording for games, but anyone can use it as a screen capture tool.
Note. Game Bar is a resource-intensive application, so it may not work if your laptop has modest specs. But its screenshot option works on any laptop and desktop.
- Click the start menu, type “
game bar“and open the application. - You will see Game Bar widgets on your screen. Click the camera icon in the top left corner of the widget to take a screenshot.
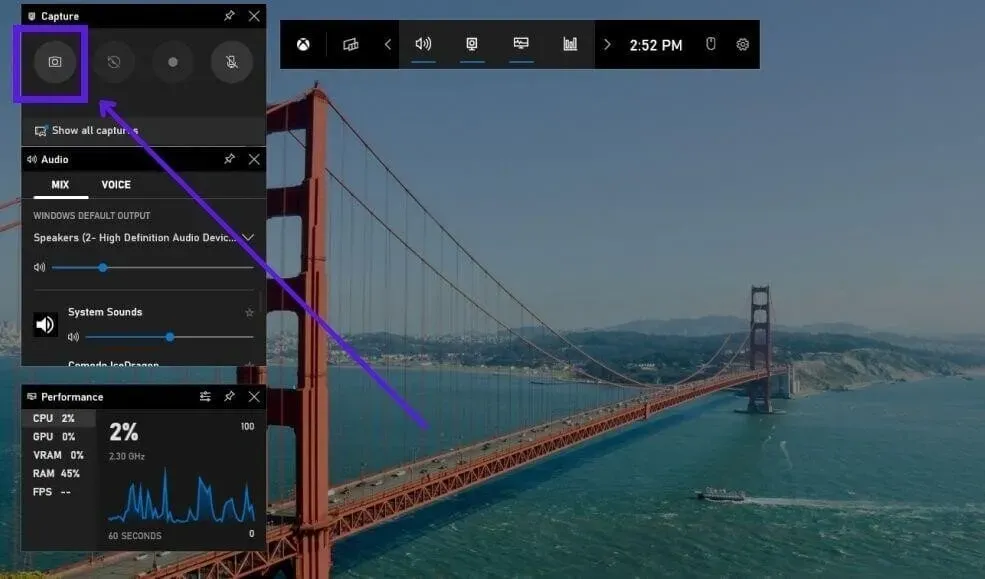
- You will receive a notification that the screenshot has been saved. By default, it’s saved under This PC > Videos > Captures.
The advantage of Game Bar is that it allows you to quickly take a screenshot of any screen (but preferably a full-screen game during screen recording).
Because it’s geared towards games, you don’t have many of the great options that Snip & Sketch have, like:
- The Game bar does not allow you to select an area for the screenshot.
- This does not give you the option to choose a name, location, and format for your screenshot.
- You don’t get editing options after screen capture.
5. Third Party Screenshot Tools
Taking a screenshot is a simple process, which is why many free Windows apps offer it. Some only offer screen capture while others include screen recording as well.
While Windows’ native screenshot apps are excellent, if you need more options or want to experiment, follow these steps to get third-party screenshot tools on your HP laptop:
- Open a web browser.
- Search Google for “free screen capture tools for Windows”.
- Look through the various options and install several applications to find the right one for you.
How to take a screenshot on an HP Chromebook (Chrome OS)?
- Screen capture tool
- Quickly take a screenshot of the entire active window
1. Screen capture tool
Google offers its own Screen Capture variant that makes it easy to take screenshots on your Chromebook. It’s a screenshot tool similar to Snip & Sketch but without the editing tools.
- Press CTRL+SHIFT+Show Windows Keys on Keyboard to see screen capture tool appear on screen to capture screen.
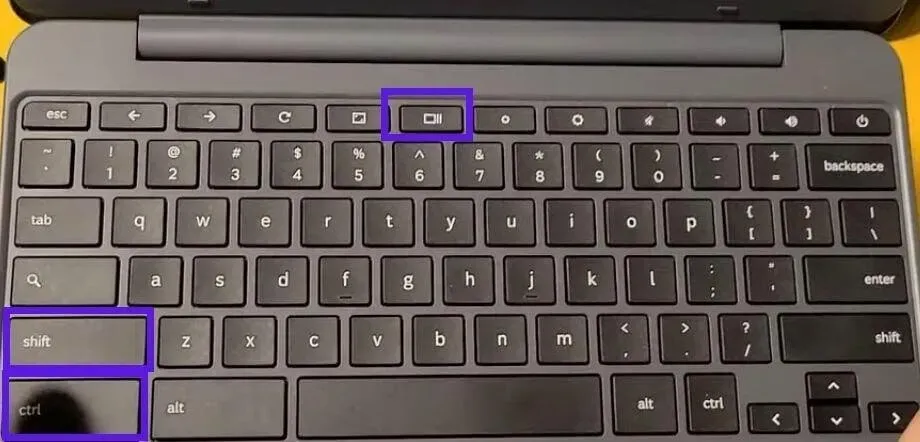
- If you can’t remember the keyboard shortcut, click the time in the bottom right corner of the screen to open the menu and select Screenshot. Click the down arrow next to the settings icon to open more options if it’s not showing.
- The screen will dim and you will see a floating screen capture tool.
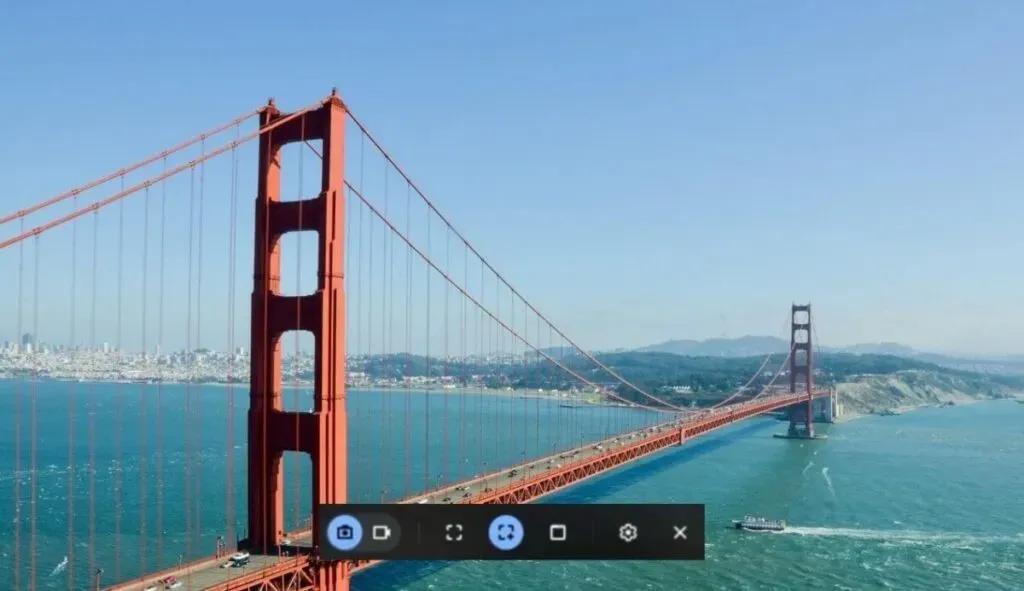
- The toolbar offers the option to take a screenshot or record a video. The default is a screenshot. In addition, you have the option to make a full-screen capture, a user-defined rectangular capture, or an active window capture.
- The default selection is rectangular. You can click and drag the crosshair cursor to select an area of the screenshot and release the mouse button.
- You will receive a notification that the screenshot has been saved.
- To open the screenshot, go to the Downloads folder.
The Screenshot tool lets you select the area you want to capture and automatically saves a screenshot. But it doesn’t offer editing options. In addition, it also does not provide options for choosing the name, location, and format of the screenshot.
2. Quickly take a screenshot of the entire active window
If you like the PrntScr method in Windows and want to have something similar on your HP Chromebook, you have a simple shortcut.
- Press the CTRL + Show Windows keys on your keyboard to take a screenshot of the window.
- It will be saved in your Downloads folder.
How to take a screenshot on HP tablets?
- Taking a screenshot on an HP Windows tablet
- Taking screenshots on an HP Android tablet
1. Take a screenshot on an HP Windows tablet
If you’re using a Windows tablet, it can take screenshots just like a Windows laptop or desktop computer. So, you can use the methods discussed in the first section:
- Scissors
- Snapshot and sketch
- Game panel
- Third Party Applications
Alternatively, you can also instantly take a screenshot by pressing the power button and volume down button on your HP tablet at the same time. This method takes a screenshot of the entire screen.
2. Taking screenshots on an HP Android tablet
Taking screenshots on an HP Android tablet is similar to any Android smartphone.
2.1 Use the power and volume buttons
If you want to capture the entire tablet screen, use this method:
- Press the power and volume down buttons at the same time.
- The screenshot will be captured.
- Depending on your Android version, it will be saved directly to your gallery or a pop-up will appear allowing you to edit the image before saving it.
2.2 Capturing a screen with the screenshot tool from Notification Center
Some people don’t like the above method because it’s awkward to press both buttons at the same time. If you are one of them, follow these steps:
- Bring the screen you want to capture.
- Swipe down from the top and select the Screenshot button.
- It will take a screenshot of your screen. You may get a popup where you can edit the image before saving it.
2.3 Install third-party screenshot apps
If you need additional features, such as the ability to select which part of the screen to capture, you can find screenshot apps on the Google Play Store:
- Open the Google Play Store.
- Type “screenshot app”and search.
- Install several of them to choose the right one. Then delete all the rest.
Conclusion
Taking screenshots on HP laptops, desktops and tablets is the easiest task. On Windows, you have a few options, whereas on a Chromebook, you have the default Screen Capture app.
FAQ
How to take a screenshot on HP EliteBook?
On the HP EliteBook, press the Windows logo keys + SHIFT + S together to get the screenshot options. You can also open the start menu and type “snip and sketch”to open the screenshot app.
How to take a screenshot in Windows?
To take a screenshot in Windows, press the Windows logo + SHIFT + S on your keyboard and select the selection area to capture the screen.
How to take a screenshot without Print Screen?
If your laptop or computer does not have a Print Screen button, use the following methods: – In Windows, press the Windows key + SHIFT + S. – In Windows, click the start menu, type “crop tool”and open the application.. – For Chromebook: Press CTRL+SHIFT+Show Windows Keys.
How do you take screenshots on laptops?
Simultaneously press the Windows key + SHIFT + S on Windows laptops. However, press CTRL+SHIFT+Show Windows keys for Chromebook laptops.
Leave a Reply