Apple Pencil Not Working? 8 Fixes to solve the problem

Apple Pencil works flawlessly, there are no delays. You can take notes, mark documents or draw with it. What’s more, several professionals use the Apple Pencil to create drawings in Procreate. However, if your Apple Pencil is not working properly, it could be due to various reasons. Here’s how to fix it.
Let’s start with the basics!
1. Check Apple Pencil Compatibility
So you just bought an Apple Pencil and it’s not responding to your iPad? You may have bought an Apple Pencil that is not compatible with your iPad. The Apple Pencil Gen 2 is not backward compatible, and the first generation Apple Pencil is not supported on devices released after it. Here is a list of iPads supported by both generations of Apple Pencil.
Apple Pencil (Generation 1)
- iPad (6th-9th generation)
- iPad Air (3rd generation)
- iPad mini (5th generation)
- iPad Pro 12.9″(1st and 2nd generation)
- iPad Pro 10.5 inch
- iPad 9.7 inch
Apple Pencil (Generation 2)
- iPad mini (6th generation)
- iPad Pro 12.9″(3rd – 5th generation)
- iPad Pro 11-inch (1st – 3rd generation)
- iPad Air (4th and 5th generation)
If your Apple Pencil is not compatible with your iPad and you just purchased an Apple Pencil, return it as soon as possible and replace it with a compatible model. If you have a compatible pencil, move on to the next fix.
2. Charge your Apple Pencil battery.
The Apple Pencil works via Bluetooth and has a built-in battery that needs to be charged. If your Apple Pencil isn’t working, it might be out of power. To check the battery life of your Apple Pencil on iPad, you need to add the Battery widget to your home screen. Here’s our detailed guide to checking your Apple Pencil’s battery.
If you have a 1st generation Apple Pencil and want to charge it, remove the cap from the back and plug it into your iPad’s Lightning port. Because the 2nd generation Apple Pencil comes with wireless charging, you’ll need to attach it to the right side of your iPad, where it will attach with a magnet and charge wirelessly.
Make sure your iPad has enough battery to charge your Apple Pencil.
3. Activate Bluetooth
As I mentioned earlier, the Apple Pencil works over a Bluetooth connection. So, you need to turn on Bluetooth on your iPad in order to connect the Apple Pencil. Here is how to check if Bluetooth is enabled on your iPad,
- Open Control Center on iPad.
- If the Bluetooth icon is blue, it means that Bluetooth is enabled.
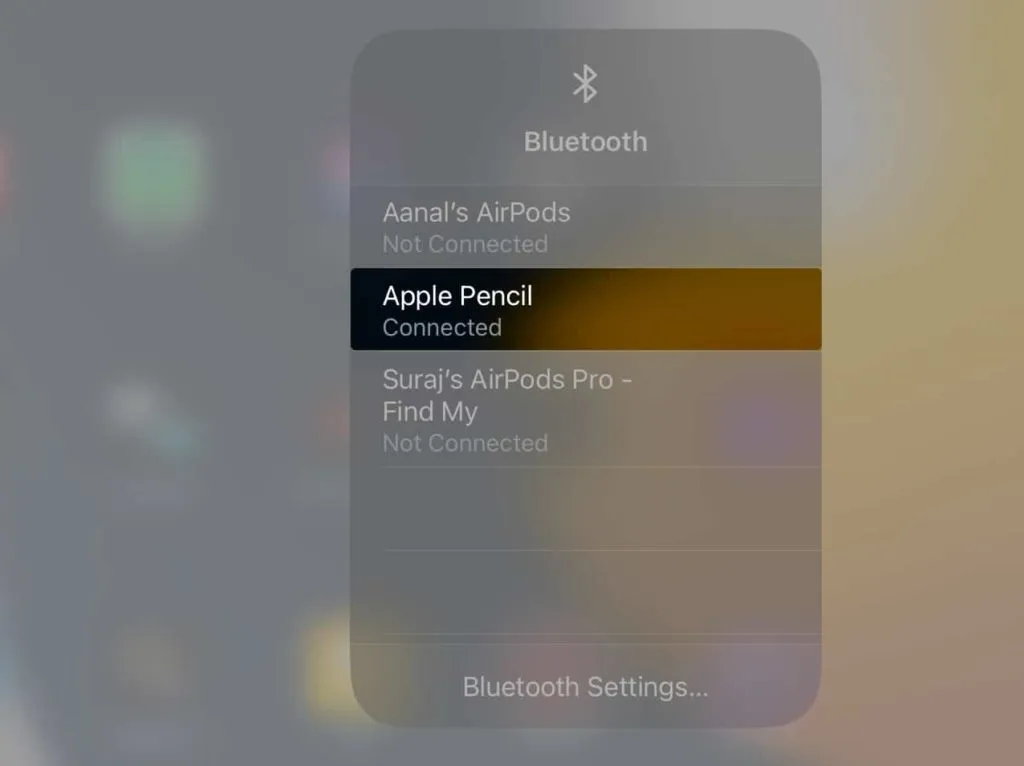
Follow the steps below to check if Apple Pencil is connected to your iPad.
- Tap and hold on the center of the connection widgets.
- When the widgets expand, press and hold the Bluetooth icon. A list of available and connected devices will appear.
- Make sure your Apple Pencil is connected.

If everything is ok, turn off and on Bluetooth on the device and then try to connect them.
4. Check App Compatibility
You already know that different Apple Pencils are compatible with different iPads. Similarly, not all apps support Apple Pencil input. While the widely used Notes and Sketching apps are compatible with the Apple Pencil, most apps that support the Apple Pencil mention this in their description.
If you’re looking for apps, here’s a list of the best Apple Pencil apps for iPad to get the most out of it.
5. Reconnect Apple Pencil
Connectivity issues with wireless devices are more common than you might think. One of the easiest ways to resolve these issues is to re-link a device to its parent device. The same applies here. Just disconnect your Apple Pencil from your iPad and reconnect it after a couple of minutes.
Follow our step by step guide to pairing and unpairing Apple Pencil with iPad!
6. Restart iPad
Restarting is another quick way to troubleshoot your devices, especially if you’re having trouble connecting to your wireless devices. A quick reboot might be more helpful than you think in resolving connection issues. Here’s our guide to help you reset your iPad if you don’t know.
7. Make sure the tip is properly attached
In case you haven’t noticed, the Apple Pencil has an interchangeable tip. And the tip eventually wears out with use and needs to be replaced. What’s more, if the tip of your Apple Pencil is loose, it could cause your Apple Pencil to not respond to pressure.
Rotate the tip of your Apple Pencil clockwise to attach it to the body of your Apple Pencil. However, if you’ve lost the nib or it seems to be worn out, here’s our guide to replacing your Apple Pencils nib and when to do it.
8. Contact Apple Support.
As I always say, if none of the steps worked for you, the only solution is to contact Apple Support. If your Apple Pencil is under AppleCare or AppleCare+ and has a manufacturing defect, you can replace it free of charge. However, contact Apple Support or take it to your nearest authorized Apple Store.
FAQ
Open iPad Settings → Bluetooth → tap the i button next to the connected Apple Pencil → select Forget This Device → tap Forget Device to confirm your choice.
Apple Pencil can last up to 12 hours on a full charge.
The life of the Apple Pencil tip is between 6 months and 2 years, depending on usage.
No. Apple Pencil is beyond repair. If your device has manufacturing defects and is covered by the Apple Care program, Apple will look into this issue. However, accidental damage isn’t covered by Apple Care, and if you have AppleCare+, you can get your Apple Pencil for a fee.
Apple charges you $29 in service fees if you have AppleCare+ for both generations of the Apple Pencil. If your Apple Pencil is out of warranty, repairs will cost you $79 for a 1st generation Apple Pencil and $109 for a 2nd generation Apple Pencil repair.
If you have other doubts about your Apple Pencil not working, leave a comment below and I will try to help you.
Leave a Reply