How to alter the font style on iPhone, iPad, and Mac Notes app

The Apple Notes app is significantly more versatile than most people realize. Of course, it’s a fantastic tool for taking notes, but you can also use styles and headings to make lists and outlines. Here’s how to modify the font style in Notes on iPhone, iPad, and Mac so you can improve your next note.
How to change font style in Notes on iPhone and iPad
In Notes on the iPhone and iPad, you may format your font using features like bold and italic as well as decorate it with options like titles, headings, and lists. Moreover, you can make quick adjustments by using the Quick Styles gesture.
Format the title, heading, body text, and subheadings.
- Launch the Notes app on your iPhone → open an existing note (or create a new one).
- Select the text you want to adjust or make sure that your cursor is on the same line.
- Tap the Paragraph Styles (Aa) button in the toolbar at the bottom, which is above your keyboard.
- Choose from Title, Heading, or Subheading. You’ll see this style only for the text on that line. When you press Return, you’ll go back to the default Body text.
- For the body text, you can select Body or Monospaced. Also, like on macOS, this style then remains as you continue to type your note and press Return.
- To apply bold, italic, underline, or strikethrough, make sure to select the text first, then pick one of these options in the Format window.
- When you are done with the Format window, use the X on the top right to close it.
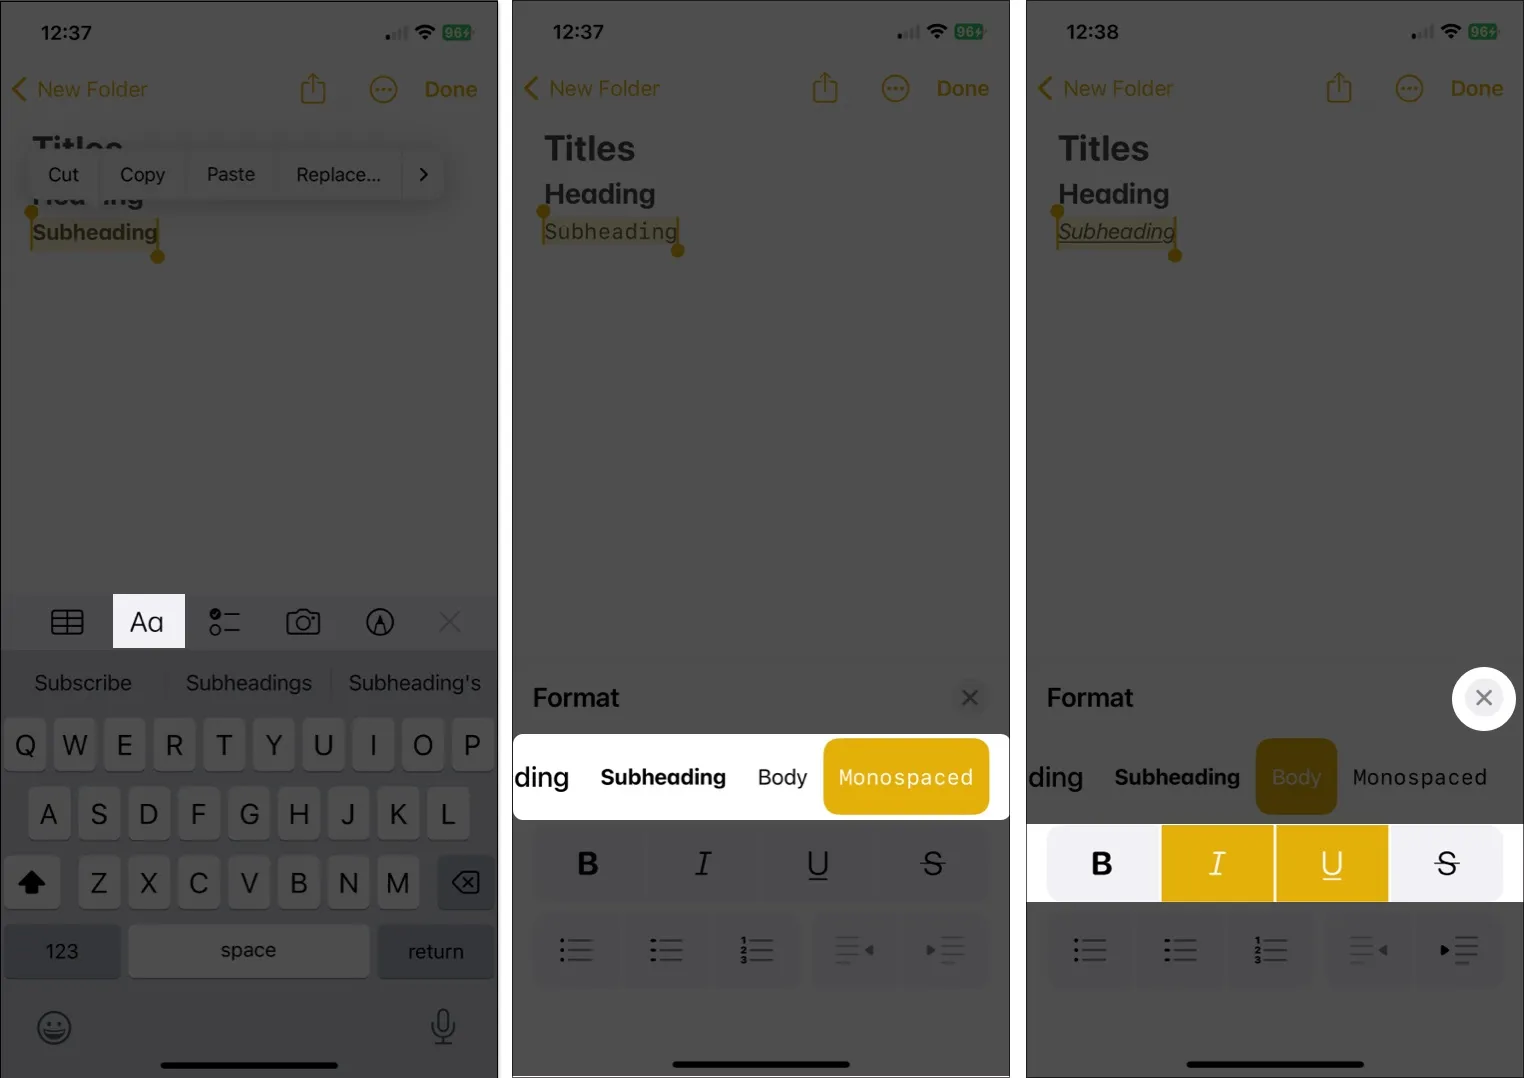
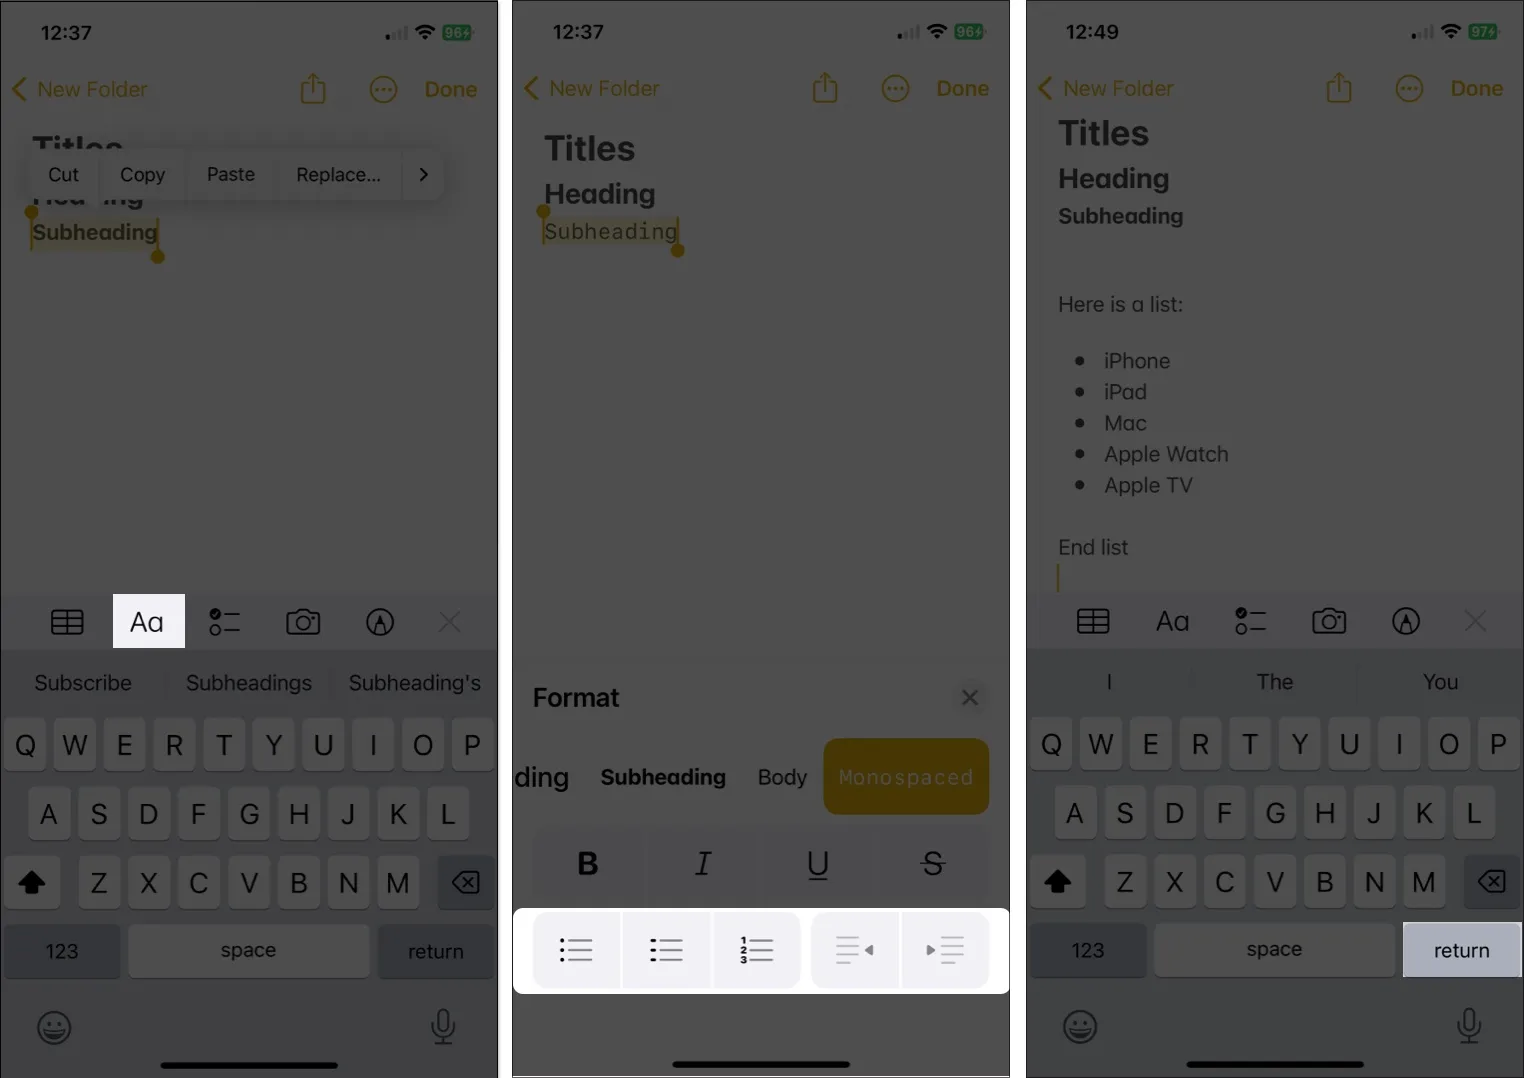
Lists of formats
- Choose the existing text to make changes. If not, just make a fresh list and keep adding items to it.
- Choose the Bulleted, Dashed, or Numbered list button in the Format window by tapping the Paragraph Styles button in the toolbar.
- After closing the Format window with the X, start typing your list items and press Return to finish.
- Tap Return twice to end a list and halt list formatting.
With Quick Styles, alter the font format.
Using Quick Styles is a less well-known method of changing the font formats in Notes on your mobile device. Titles, headings, body text, and lists will all be available to you, but you can use them more quickly.
- Choose the text that needs to be changed.
- In the toolbar, long-press (touch and hold) the Paragraph Styles (Aa) icon.
- Release your finger after sliding it to the desired style.
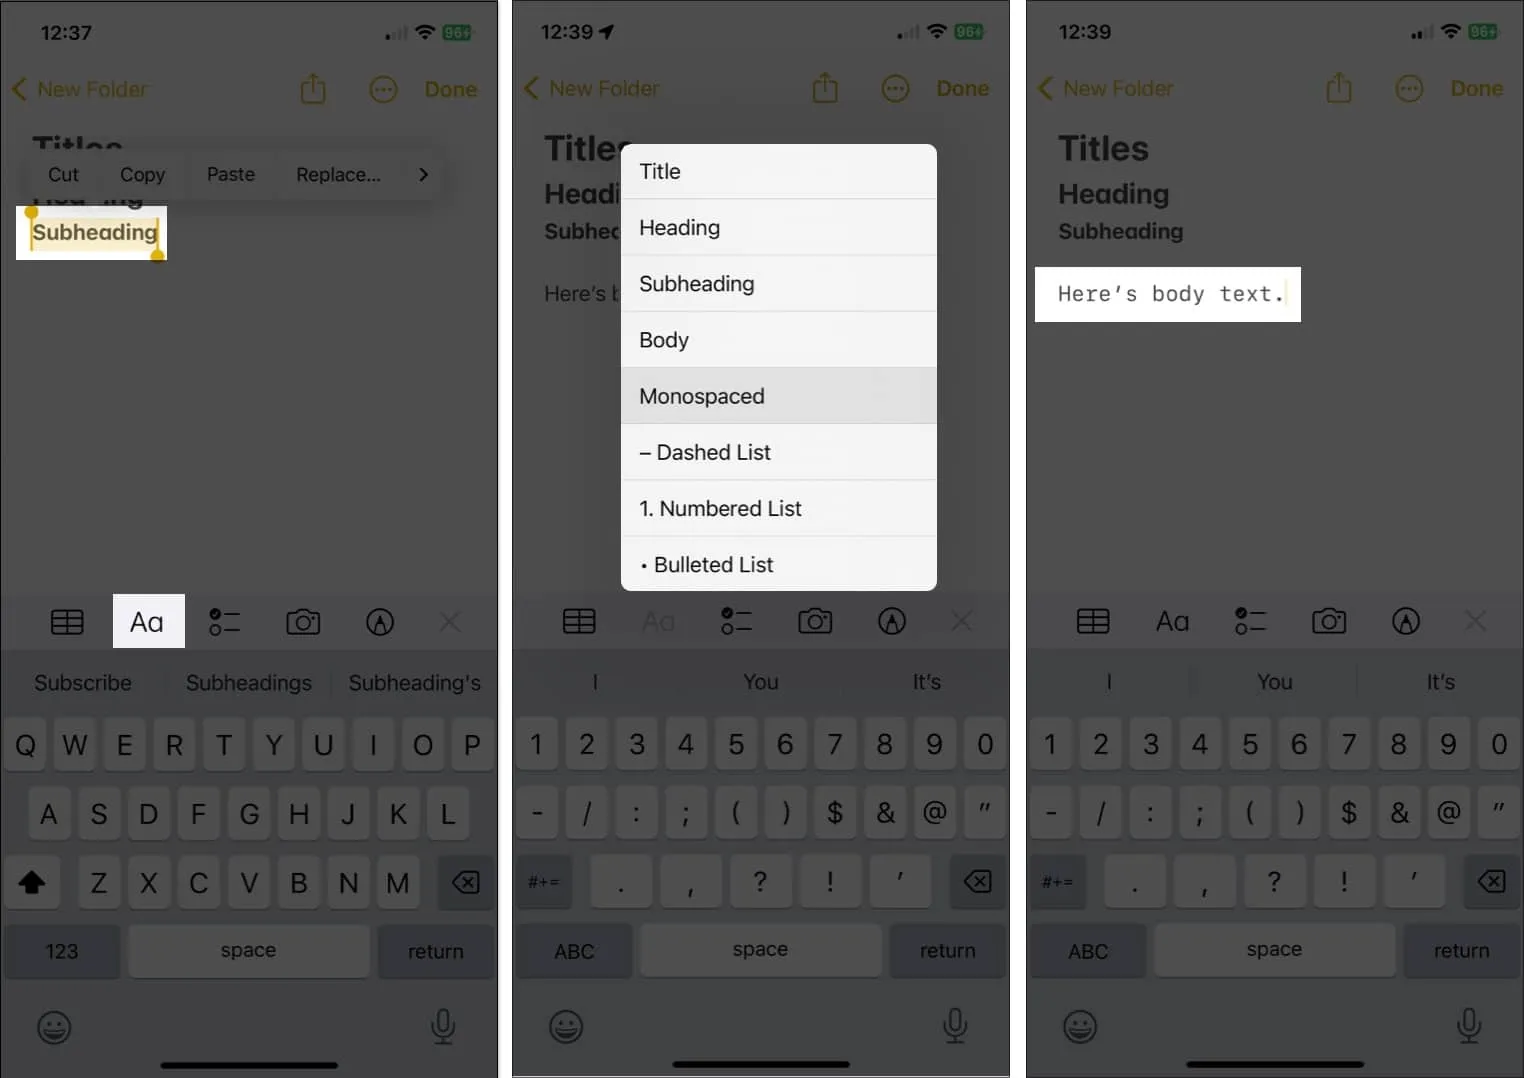
You’ll notice right away that your text has adopted that style.
Altering the new notes’ default font style
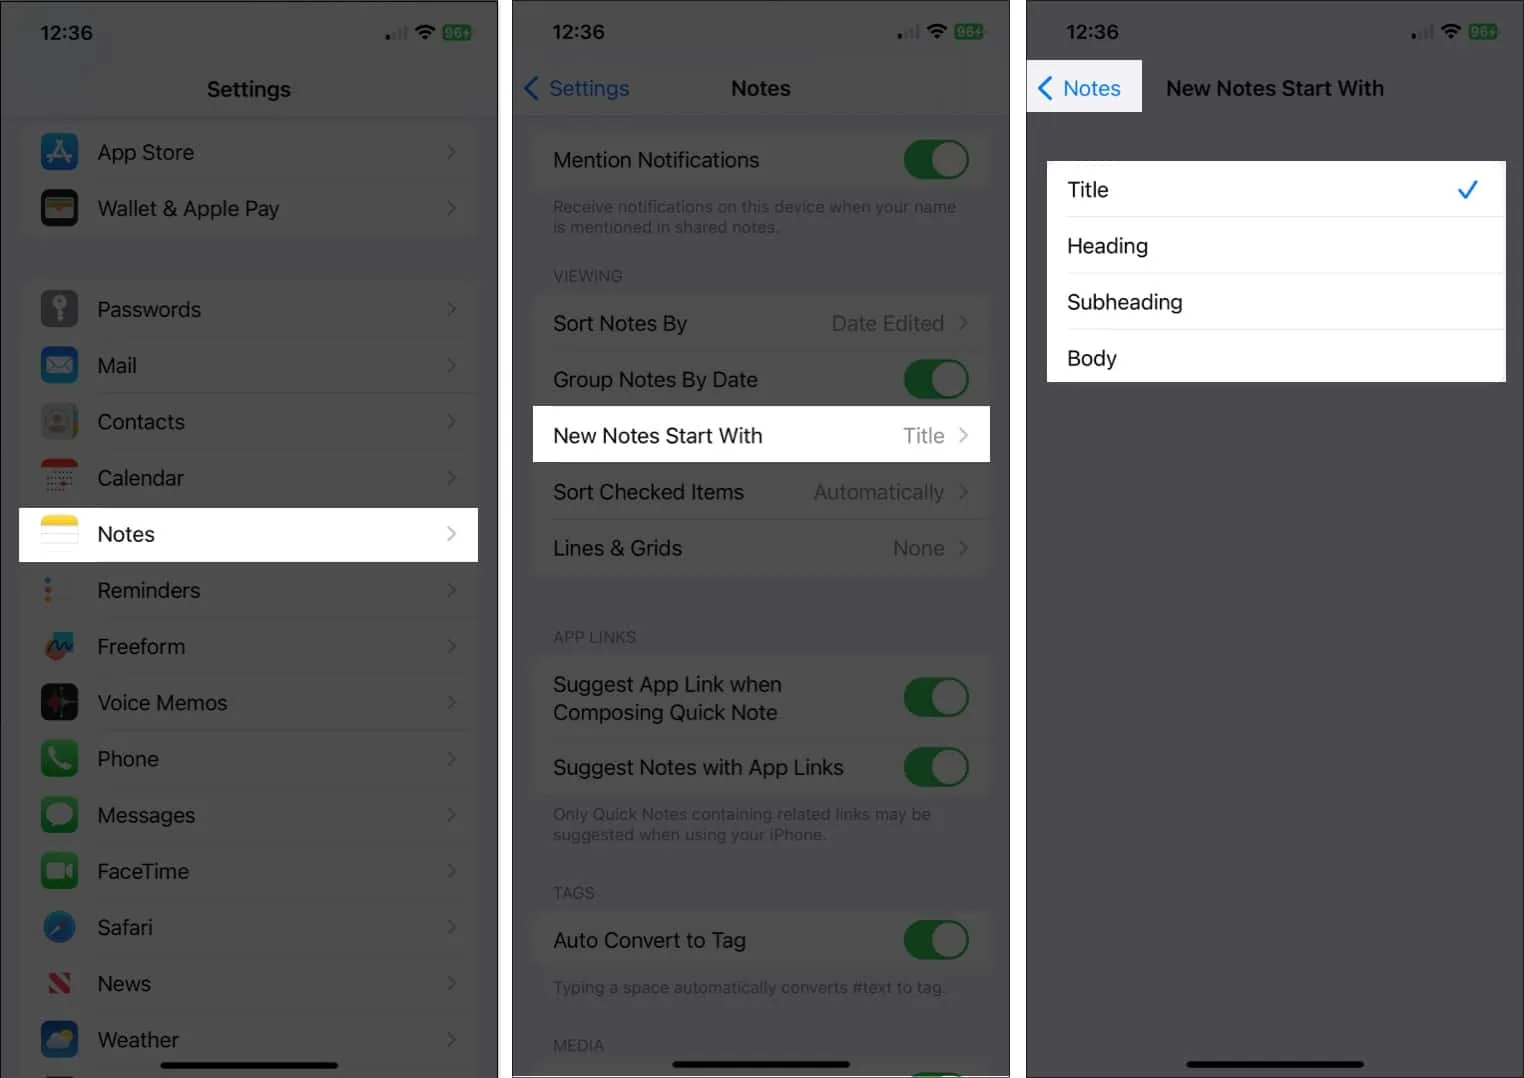
While the default font size for new notes on the iPhone and iPad cannot be changed, you can choose a different paragraph style, much like on a Mac.
- Choose Notes in the Settings app.
- Choose New Notes Start With under the Viewing section.
- Decide between Title, Heading, Subheading, and Body.
- To leave the settings and save your changes, tap the arrow in the top left corner.
Let’s get started because Notes on macOS offers more options for font formatting than it does on iOS and iPadOS.
How to change the font style in Notes on Mac
You can change the font in Notes on Mac for titles and headings, body text, and lists. Also, you have a few extras that can support custom text formatting.
Format headers, titles, and subheadings.
Depending on what works best for you, you can format already-written text or set up the style before you start typing.
- Select the text if you already have it by dragging your mouse over it.
- Choose the Title, Heading, or Subheading option by clicking the Paragraph Style (Aa) button on the Notes toolbar.
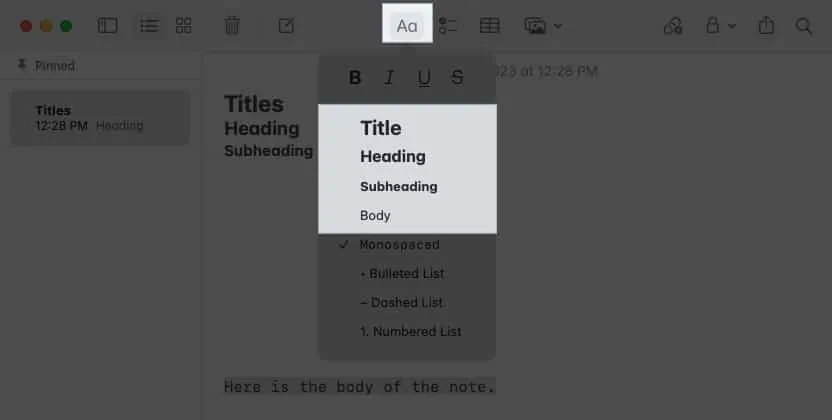
- Instead, choose Format from the menu bar and a selection will appear.
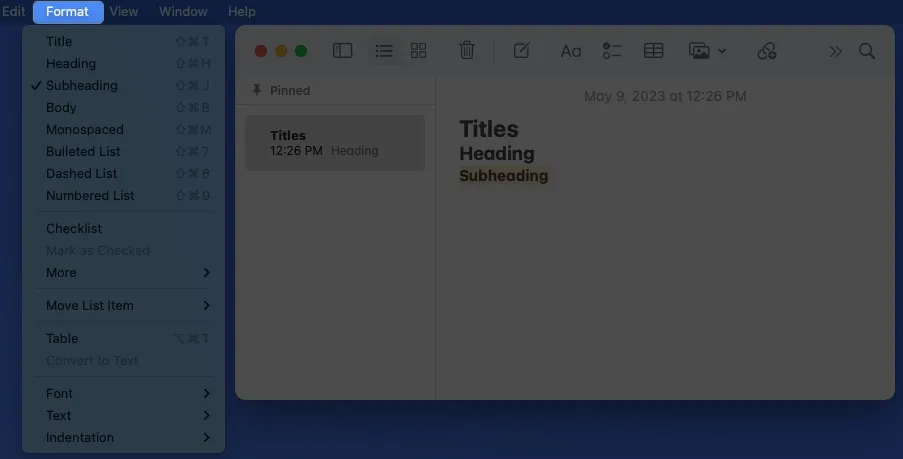
- If you use one of these formats and then press Return, the Body font will return until you manually change it.
Format the body text and the lists
You’ll see that there are additional options when you visit the Paragraph Styles menu.
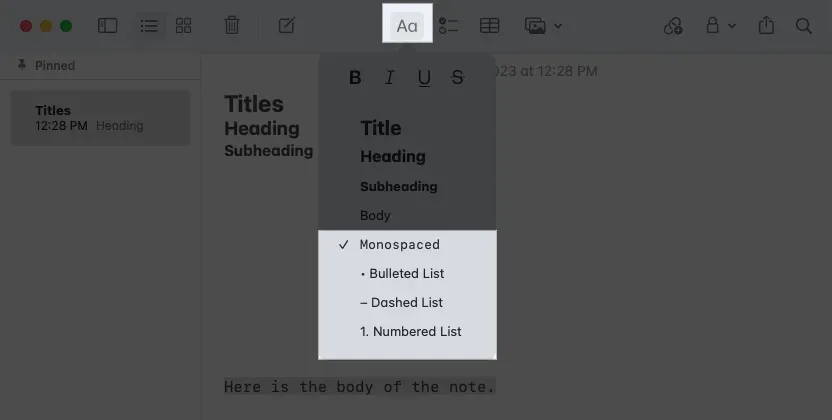
- For the font type in the primary section of your note, you can choose Body or Monospaced. Unless you make a modification, your note uses this structure when you press Return throughout it, unlike titles, headers, and subheadings.
- By selecting one of those styles, you can also format your note with a bulleted, dashed, or numbered list. The Body style font is the standard typeface for lists.
- You’ll see another dot, dash, or number waiting for your next item when you select a list style, enter the list item, and press Return.
- Press Return twice to end a list and halt list formatting.
Use strikethrough, bold, italic, underlining, and
You can add bold, italic, underline, or strikethrough to your text to make it stand out in addition to the styles mentioned above.
To format the text, choose one of the following:
- Choose a choice at the top of the pop-up window after clicking the Paragraph Style button in the toolbar.
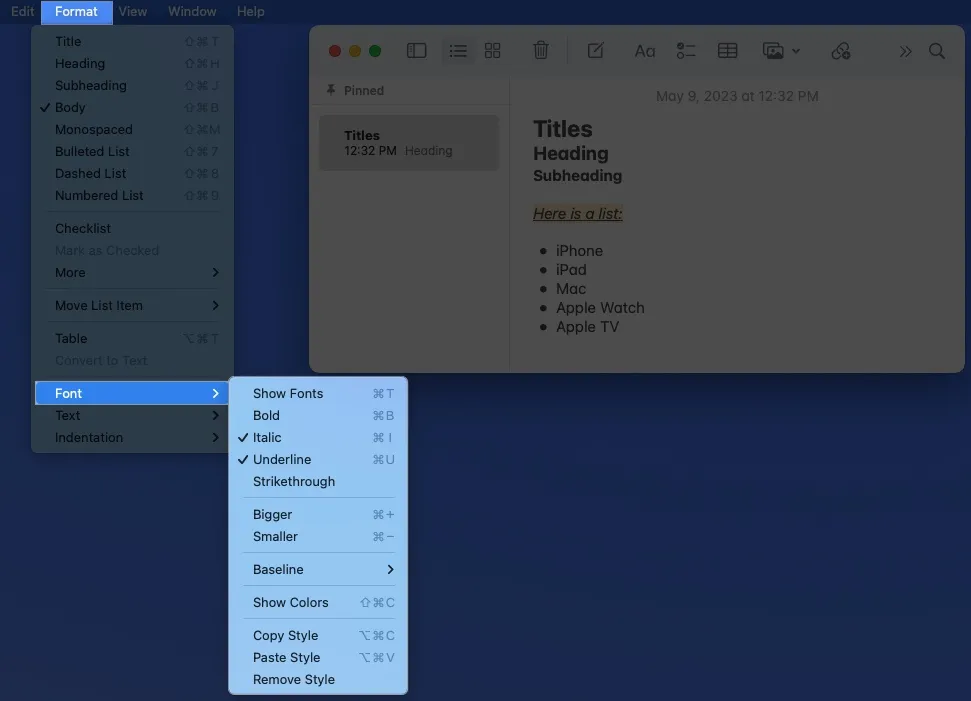
- Right-click, select Font, and then select a choice from the pop-out menu at the top.
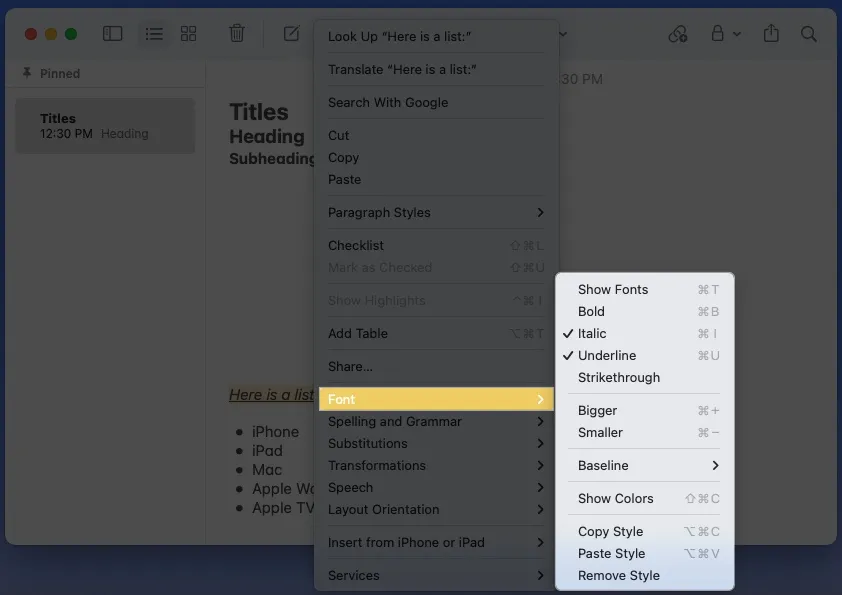
- Go to Font and select the format after choosing Format from the navigation bar.
For new notes, alter the default style and font size
San Francisco (SF) and New York are the system typefaces that come standard with the Apple platform (NY). And although though Apple intends for these typefaces to be easily readable, you might simply prefer something else.
As of this writing, Apple Notes does not allow you to alter the default font style. For starting new notes, you can alter the default size as well as the paragraph style.
- Get your Mac’s Notes application open.
- On the menu bar, choose Notes Settings.
- If you wish to modify the default style, Title, open the New notes start with drop-down box.
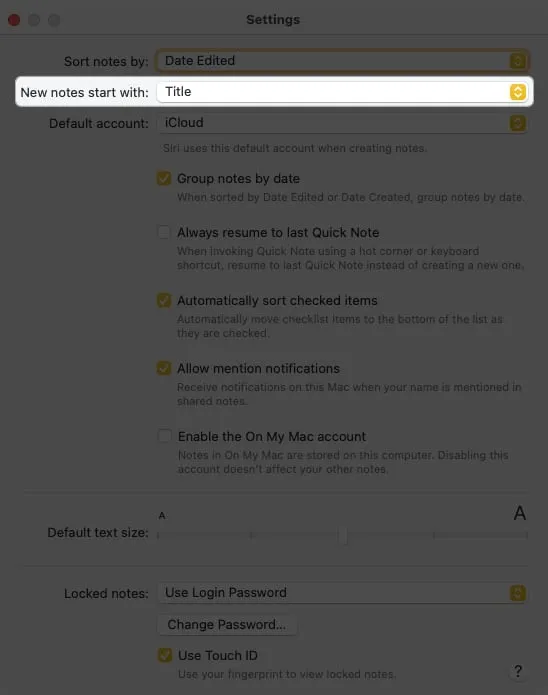
- Header, Subheading, or Body are your options.

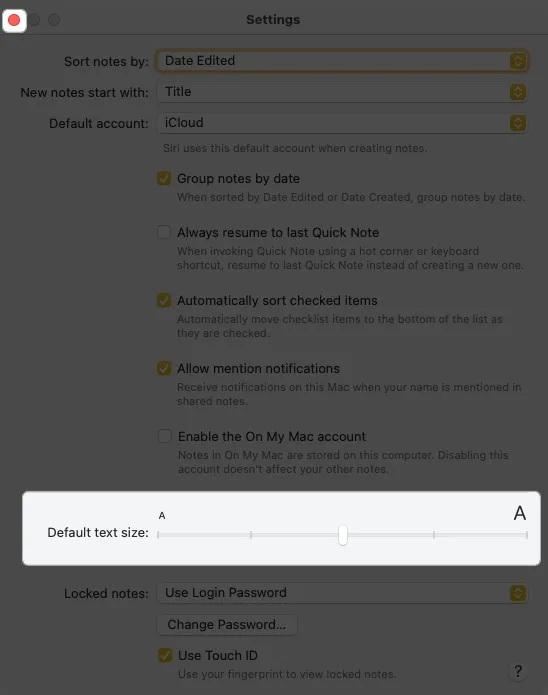
- To change the font size, use the slider labeled “Default text size” near the bottom.
- Use the X in the upper left corner to close the Settings after you’re done.
You will automatically see your chosen paragraph style and font size in all future notes that you make. Simply follow the preceding instructions if you wish to alter that look.
Alter the font color and style all in one message
While the default font style and color cannot be changed, you can choose a different font for text in individual notes. This enables you to use a specific style or color for a note’s full contents or just a portion of it.
- Select the text you want to format differently. For all text in a note, use the keyboard shortcut Command (⌘)+ A.
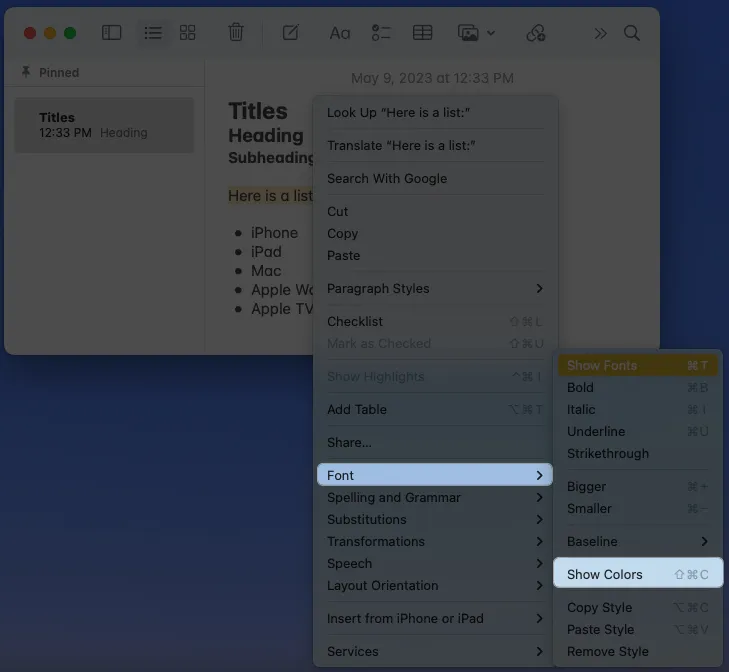
- Then, right-click, move down to Font in the shortcut menu, and do one of the following:
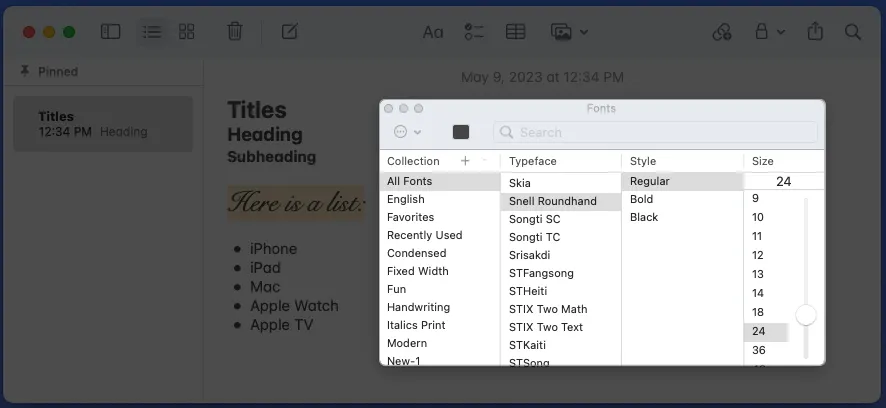
- Choose Show Fonts to change the style, format, size, and color. You’ll see the Fonts window appear and can choose from the various options. You’ll see your font update immediately.
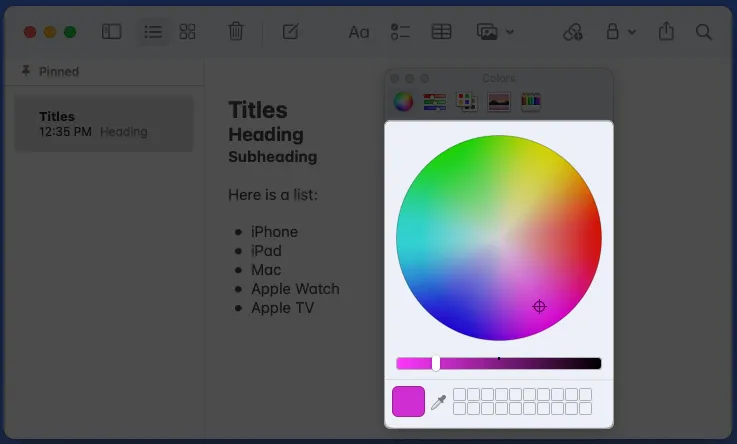
- Choose Show Colors to only change the color of the font.
- Use the Color Wheel, Color Sliders, Color Palettes, Image Palettes, or Pencils to pick the color you want to use. Again, you’ll see your font update right away.
- Choose Show Fonts to change the style, format, size, and color. You’ll see the Fonts window appear and can choose from the various options. You’ll see your font update immediately.
You can arrange the font in the Notes app to make it stand out, simpler to read, or more aesthetically pleasing by making a few little adjustments. While reading or sharing your notes, any style or format can make a significant difference while taking up little time.
Will you experiment with a different Notes style or format? Do you believe that a typeface or formatting feature is lacking? Inform us!
Leave a Reply