How to configure several audio output speakers for distinct Mac apps
Discover how to customize the audio output settings for particular Mac apps so you may enjoy your music and movies the way you want to.

On your Mac, you can play music or videos and choose a speaker by clicking the speaker icon in the top menu bar and choosing an output. Nothing major.
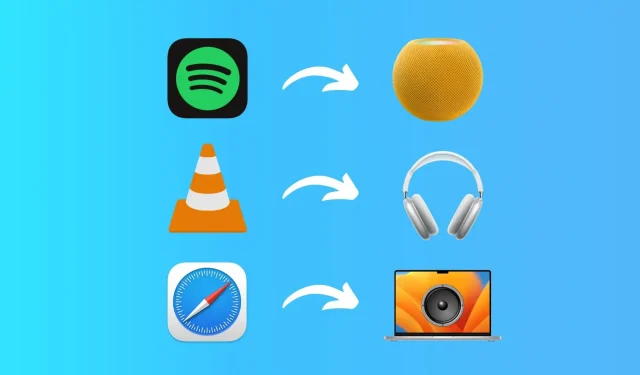
But what if you want to specify particular guidelines for particular applications and just want the audio from them to play through a particular speaker? For instance, you could wish to constantly play Spotify on your Mac-connected HomePod. Similarly, you might want audio from VLC to always be played through the built-in speaker on your Mac and YouTube to always be played through your AirPods.
You can do this very easily on a Windows Computer thanks to the integrated operating system. But macOS doesn’t have this capability. You will therefore need to rely on third-party programs.
You can specify output pathways and choose the speaker for each Mac app using a software like Audio Hijack. How to achieve that is demonstrated in this lesson.
On a Mac, select the appropriate audio output speaker for each individual app
Step 1: Modify your Mac’s security settings
You must lower your Mac’s default security level in order to use the Audio Hijack application. To do this, select Reduced Security from the Recovery menu on your Mac rather than the default Full Security. On Apple Support for Apple silicon and Intel Macs with Apple T2 Security Chip, you can find out more information about it.

Step 2: Choose various speakers for each Mac app’s audio output.
1) Open the website for Audio Hijack and select Free Download. If the zip file hasn’t opened yet, double-click it to do so.
The Audio Hijack program should then be launched on your Computer. You might need to restart your Mac a few times and pay attention to various System Settings alerts.
Install ACE, its audio handling component, the first time you open it. Finish the quick app tour after that to get to the home screen.
2) Click New Session from the bottom left.

3) Click Blank twice.

4) When the left panel is empty, drag the Application option from the Sources heading and drop it there.

5) Select the desired application by clicking Select an App on the Application tile. I went with Spotify.

6) Now drop Output Device onto the left canvas by dragging it there.

7) Select the desired output speaker by clicking the Output Device tile > Default System Output. The number of speakers that are currently connected to your Mac will determine how many will show up in this list. Built-in speakers, monitor speakers, Bluetooth AirPods, and HomePod with AirPlay functionality will all be included. Choose a name from the list.

8) Other customization options are optional and include the output volume, left and right channels, etc. Additionally, you can name it by selecting the Info tab.

You will be taken to the Session List screen when you click the red close button in the top left corner. To create more rules, simply repeat the previous procedures.
9) Next to each of the rules, click Run.

10) Now launch the relevant app (such as Spotify) and start listening to music. The speaker you selected for it will play it. Open a different application, such as VLC, and start playing a file. Once more, you’ll see that this program exclusively routes sound through the speaker you choose.

Step 3: Marvel at the app
I launched the three programs (Spotify, Firefox, and VLC), established three rules, and then played a song in each of them:
- Spotify sound was output only through my HomePod;
- The media played in VLC only sounded through my monitor speakers;
- The audio for YouTube videos played in Firefox only came through my AirPods (with a slight video-audio lag).
In this manner, I could run three programs simultaneously on my Mac while having each program’s audio output to a different set of speakers.

Step 4: Purchase a license
Audio Hijack’s trial version, which is available for free, only allows you to install and use the application. The free version is useless for meaningful listening because it adds more noise after 10 minutes of use. However, if you try out the app and enjoy its features, visit the website and upgrade to the pro version ($76) to get rid of the noise watermark.

Leave a Reply