How to lock notes on an iPad or iPhone
Discover how to password-protect and hide your private, sensitive, and significant notes on your iPhone and iPad so that no one can access them.
1. Make sure your iPhone has a passcode configured
Choose a strong Lock Screen password and keep it to yourself if you want to safeguard your notes, texts, images, apps, app data, and everything else on your iPhone. In the unlikely event that you don’t already use one, go to the Settings app > Touch ID/Face ID & Passcode and create one.
2. In the Apple Notes app, lock the memo
Using the Notes app that comes pre-installed on your iPhone, iPad, and Mac is one of the finest ways to safeguard your private notes. Your message can be typed, along with a web link, image, table, or to-do list, before being locked. The note is password protected by your mobile passcode, Face ID, and Touch ID once it has been locked.

3. To obfuscate and PIN-lock notes, use third-party programs
The simplicity of use and increased level of discretion offered by third-party apps are their key advantages. If someone were to decide to check through your iPhone for private notes, they would probably start with the obvious Notes app and might not consider any third-party apps with names that don’t sound like note-taking apps.
These apps allow you to make many notes, every of which will be protected by a unique password. Changing the app’s icon and passing it off as something else, such as a calculator, can further complicate matters.
For iPhone and iPad, follow these steps to secure your private notes with a password:
1) Get the Vault app from the App Store for nothing.
2) Launch the application and enter the passcode you want to use to lock it.
5) After you’re done, tap Done.

Touch & hold the tile of the note you want to erase in the My Notes section, then select Yes from the Delete popup.
6) To close and reopen this app, swipe up or touch the Home button. You’ll observe that it requires the pin before granting you access.
7) To change the app’s settings, select Settings from the menu that appears in the top right corner of the Home tab.
8) From this point, you can select to use Face ID, enable Dark Mode, modify the app icon, and even make a backup.

You can try the following iPhone apps in addition to Vault to generate private notes that are secured behind a pin. All of these apps are financed by in-app advertisements and are free to download.
- App Lock
- SPV
- Calc+
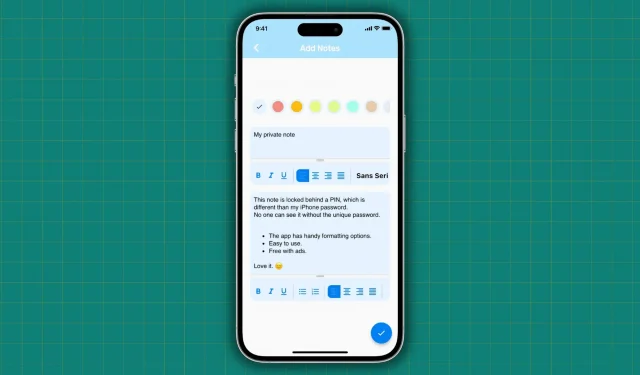
- Calculator Lock (The top image of this article shows this app.)
4. Create a password for your note and add it to the Pages app
Unless you deleted it to save up space, your iPhone and iPad come pre-installed with the free Apple app Pages. You can add a lengthy note and secure it with a password while also include all kinds of assets, such as charts, shapes, and images. If the right password is not entered, nobody else will be able to see that note.

5. Make a PDF of your note that is password-protected
Password-protected PDFs can be created using the Pages software. You may access the note whenever you want to by going to the Files or Pages apps, tapping the PDF, and entering the password.

6. Your message should be turned into a PDF, added to Google Drive, and locked
If you want to password-protect many PDFs, it can be difficult to remember various passwords unless you use the same one across all of them.
To avoid this, you can use the Pages app to create normal PDFs, save them to the Google Drive application, then secure the Google Drive application with Face ID:
1) Download the Google Drive app for your iPhone and configure it using your Google/Gmail login information.
2) Choose Settings > Privacy Screen by tapping the menu symbol in the upper left corner.
3) Turn on the Privacy Screen switch, then use Touch ID or Face ID to confirm your identity.

4) Now open the Pages app and select the + icon to add a new document.
5) After you’ve finished writing your note, select Export > PDF by tapping the More button in the top right corner.
6) Choose Drive from the list of applications. Make sure Drive can appear in the iOS Sharing Sheet if you can’t see it.
7) Press Upload.

Your message and the File have now been saved to Google Drive, which requires Face ID validation to access. Now that this note has been saved and locked in Google Drive, you can go back to the Pages app and remove the document you generated.
Leave a Reply