Fixing Battlefield 2042 Error 2002G Unable to Load Save Data Error
Although the launch of Battlefield 2042 wasn’t the smoothest launch in franchise history, it got off to a decent start nonetheless. However, the game suffers from bugs and bugs.
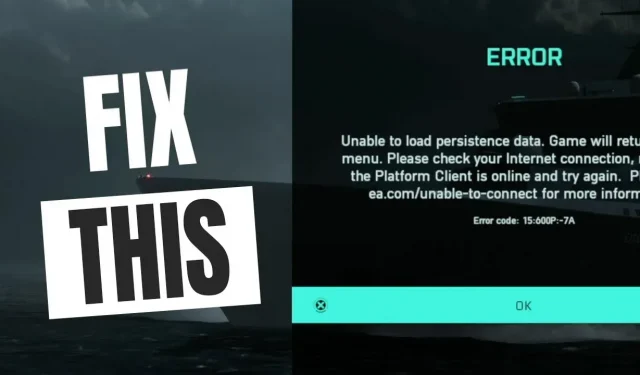
It has a number of strange phenomena such as error code 15-7A and “floating in the sky”. Also, a rather nasty error message regularly brings players back to the menu after they’ve logged out of the game. For players trying to enjoy the destructive frenzy, the message “Unable to load save data”often appears. If you are also experiencing this error, then continue reading this article.
Here’s how to fix Battlefield 2042 error code 2002G unable to load save data.
Content:
- 1 Fixing Battlefield 2042 Error Code 2002G Unable to Load Save Data
- 1.1 Checking the integrity of game files
- 1.2 Disable crossplay
- 1.3 Disable Crossplay on Xbox One / Xbox Series X
- 1.4 Disable crossplay on PC and Playstation
- 1.5 Power Cycling Console
- 1.6 Power off Xbox One and Xbox Series X
- 1.7 Turn off and turn off Playstation 4
- 1.8 Power off Playstation 5
- 1.9 Clear Steam Download Cache
- 1.10 Port Forwarding
- 1.11 Change DNS to Google equivalents
- 1.12 Change Default DNS on PC
- 1.13 Change default DNS on PlayStation 4
- 1.14 Change default DNS on PlayStation 5
- 1.15 Change Default DNS on Xbox One/Xbox Series X
- 1.16 Use a VPN
- 1.17 Checking the server status
- 1.18 Final words
Fix Battlefield Error Code 2042 2002G Unable to Load Save Data
The error codes associated with this error usually vary by platform and type of NAT.
And although Dice and EA have confirmed they are working on a fix. However, the problem has not yet been resolved.
However, there are a few workarounds that you can use to temporarily fix the problem. Thus, you can fix the problem by making some changes.
Here are some fixes that are generally considered effective by other affected users:
Changing the Current DNS: Turns out an inconsistent DNS range can be the root cause of this particular issue.
And this problem can be solved by moving your current DNS range to the range provided by Google, depending on your ISP.
Crossplay Enabled: Since the launch of the Early Access program for Battlefield 2042, EA has had many major matchmaking issues.
As such, you’ll probably be better off disabling crossplay entirely unless you’re explicitly using it.
Clear temporary files: Try turning your console on and off again if disabling crossplay integration doesn’t work.
However, keep in mind that each console requires a slightly different set of steps.
Forward the ports used by BattleField 2042: It is likely that the connection to the EA servers will be broken if you are using an older router that does not support UPnP.
So UPnP may be enabled or ports need to be forwarded manually to resolve this issue.
Eliminate Node 3 ISP Interference: Network inconsistencies on your ISP’s side can block your console or PC from connecting to EA servers if you are using Tier 3 nodes. Filtering the connection through the VPN should help in this case.
So, we discussed all possible ways to solve this issue. Now let’s look at how to fix the “Unable to load save data”error for Battlefield 2042:
Checking the integrity of game files
Multiple startup, crash, graphics and server connection issues can be fixed simply by checking that the game files are intact.
Follow these steps:
1. First, launch Steam. Then select “Library”.
2. Now in the list of installed games, right-click Battlefield 2042.
3. Then click the Properties tab. And go to the “Local Files”section.
4. Now click the “Verify Integrity of Game Files”button. And the process will take some time to complete.
Then restart your computer when you’re done. And check if the problem exists.
Disable crossplay
Some of these issues are the result of an industry push to allow PC, Xbox and Playstation games to play on the same servers.
Although in theory it’s a good idea. However, there are many issues with crossplay integration.
As such, you can avoid many of these issues by disabling crossplay in the game settings.
You can do this on any console or PC. But for Xbox One and Xbox Series X, the instructions are slightly different.
So, we have listed instructions for each here.
Disable Crossplay on Xbox One/Xbox Series X
On the Xbox console, it doesn’t look like you can just turn off cross-platform integration in the game’s settings.
However, there are still other users that are matched with people from other platforms. Even though crossplay integration is disabled.
So, you need to disable CrossPlay at the console level to avoid this issue.
Here’s what you need to do:
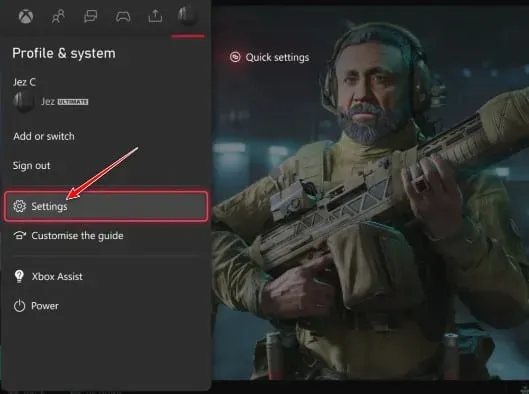
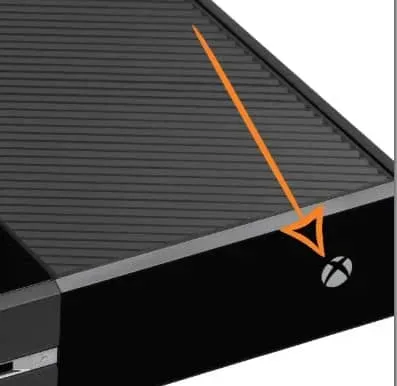
1. Press the Xbox button on your controller to open the Xbox Guide menu.
2. Then enter the “Settings”menu from the side menu once it appears.
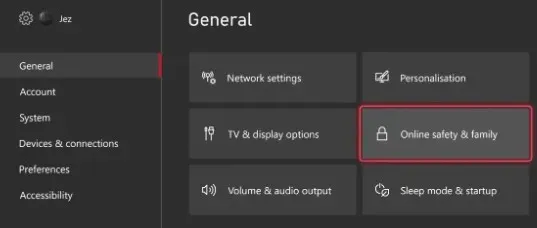
3. Now select the “General”tab which is in the menu on the left when you are in the “Settings”menu. Then select Internet safety and family.
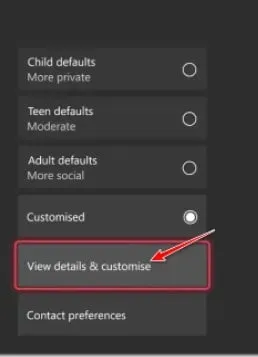
4. Then select the “Internet Privacy and Security”option from the next menu. Now, from the list of options, select Xbox Privacy.
5. Then select View Details & Customize from the menu on the left.
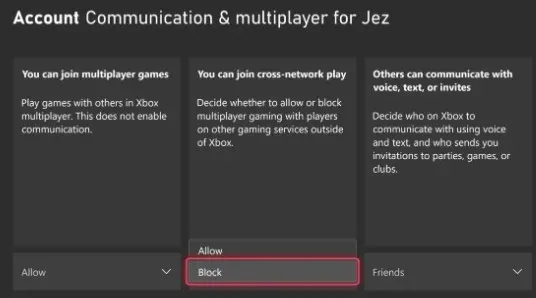
6. Now select “Communication & Multiplayer”from the next menu. And, once the changes are saved, change the “You can join cross-network play”toggle to “Block”.
Reboot your console after you’ve completed these steps before restarting Battlefield 2042. And check if the issue is resolved.
Disable crossplay on PC and Playstation
Depending on which platform you’re playing on, you might be able to fix the issue simply by enabling Cross-Play integration in the game’s settings.
Then, in order to make sure that the game does not overlap with other games, you still have to reboot the system.
Here’s how to disable PC and Playstation crossplay integration for Battlefield 2042:
1. Start the game in normal mode. And let it go through the initial login screen.
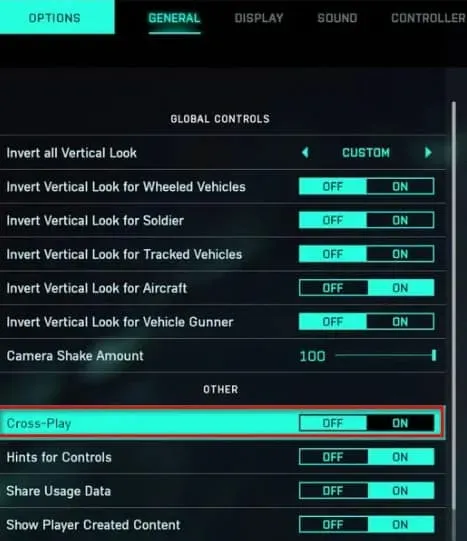
2. Then in the lower left corner, click the “Options”menu.
3. And select the General tab from the vertical menu at the top once you’re in the Options menu.
4. Then select the “Other”section in the “General”tab. And turn off the Cross-Play switch.
5. Now make your changes and save them. Then. close the game.
Now restart it and check if the same error occurs.
Power Cycling Console
Xbox Series X and Xbox One were the most common platforms where this fix was reported to work. You can also turn your PlayStation 4 or PlayStation 5 console off and on again if needed.
And, depending on the console you are using, follow the appropriate guide:
Power off your Xbox One and Xbox Series X
Unlike most other consoles, starting a power cycle on Xbox One is different. And it will take at least 10 seconds to start a power cycle, because the button must be held for at least this time.
To do this, follow the instructions below:
1. Turn on your console and make sure it is fully charged. Next, press the power button.
2. Now for about 10 seconds or until the front LED flashes intermittently, you must keep pressing the button.
3. Then, when you give the power capacitors enough time to discharge, you can try to start the console in normal mode after a minute.
Note. It will be helpful if you physically unplug the power cord while you wait.
4. Then restart the console. And check if the animation sequence is longer. Now you will see if turning off the power worked.
5. Then launch Battlefield 2042 after reloading the console. And check if the issue is resolved.
Power off Playstation 4
Giving the power capacitors enough time to self-clean is an important part of shutting down and powering down the PlayStation 4 console.
So, follow the instructions below to make sure everything is done correctly:
1. First, press and hold the power button on your Playstation 4 console when it is fully turned on.
Then keep pressing the console’s power button until you hear the fans turn off.

2. Now unplug the power cord once the console is completely turned off and no sound is coming out of it.
And let the power capacitors discharge for about a minute before letting them fully discharge.
3. Then reconnect the console after this period. And restart your console normally.
Now launch Battlefield 2042 again after the next launch is complete. And check if the same error code appears when the game tries to connect to the EA servers.
Power off Playstation 5
You can turn your Playstation 5 console on and off more easily than most other similar devices.
It’s as simple as pressing and holding the power button until the console turns off completely.
And you only need to unplug the power cable to discharge the power capacitors.
Do the following:
1. If your Playstation 5 is off, press and hold the power button. And you have to keep pressing it until the sounds from the machine stop coming.
Note. If you briefly press the power button, a sleep cycle will occur instead. Therefore, be sure to hold this button.

2. Now unplug the power cable after the power light stops blinking. And let the system discharge its capacitors for 20 minutes this way.
3. Then reconnect the power cable after this time has elapsed. And after rebooting the system, check if the problem is fixed.
Now that your console boots up again, launch Battlefield 2042 again. And check if the issue is resolved.
Clear Steam Download Cache
Some connection issues can also be resolved by clearing the Steam download cache in the Steam client itself.
So, follow these steps:
1. First, launch Steam. Then select Steam in the top left corner.
2. Now select the “Settings”tab. And go to the “Downloads”section.
3. Then click the Clear Download Cache button. And click OK when prompted.
4. Now click OK to save your changes. And then restart Steam.
Forward ports
There is also a possibility that the game is trying to use unopened ports, resulting in a “Load save data”error. Thus, you cannot connect to the game server.
If UPnP is supported by your router and enabled, the ports needed for games are usually handled automatically.
But, if you have an older router model that does not support UPnP, you will have to manually forward the ports.
Here are the steps to follow for this:
1. Launch the browser of your choice. And enter one of the following addresses in the top navigation bar. Then press Enter to access the router settings:
- 192.168.0.1
- 192.168.1.1
2. Now enter your login details to access your router settings once you reach the initial login screen.
Note. You can log in to your router using admin as the username and 1234 as the password, unless you set up your own login credentials.
So, click “Forgot Password”if these generic alternatives don’t work. And here you can either recover the login credentials for the router settings or search the web for the credentials for your specific router model.
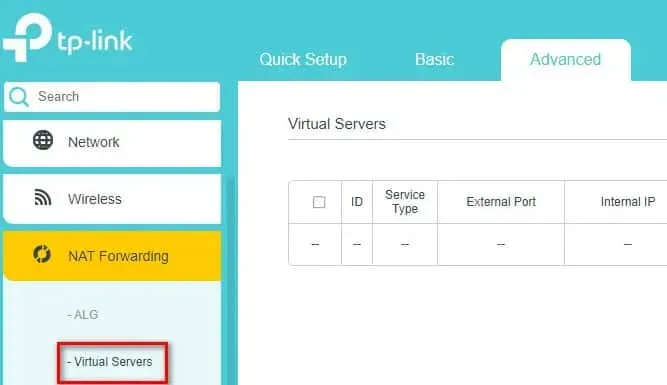
3. Expand the Advanced/Expert menu once you enter the router settings. Then select “Port Forwarding/NAT Forwarding”from the list.
Note. Depending on the specific router model, the specific menu may be completely different from the screenshots shown here.
4. You can now manually forward Battlefield 2042 ports based on the platform you are using by finding the option that allows you to do so.
Xbox One and Xbox Series X|S
- TKP: 3074
- UDP: 88, 500, 3074, 3544, 4500
PC
- TCP: 5222, 9988, 17502, 20000-20100, 22990, 42127
- UDP: 3659, 14000-14016, 22990-23006, 25200-25300
PS4 and PS5
- TCP: 1935, 3478-3480
- UDP: 3074, 3478-3479, 3659, 14000-14016
5. After forwarding the necessary ports, save the changes. And after restarting your router, launch Battlefield 2042 again. The issue should now be resolved.
You can jump down to the last potential fix below if the same issue still occurs after port spoofing.
Change DNS to Google Equivalents
Failure to load save data can be caused by an inconsistent DNS range, which is one of the most common causes. And, when trying to connect to the game server, it becomes harder than it should be.
However, you can easily get rid of this problem if it affects you. Communication problem between PC and EA consoles.
And this can be done by changing the default DNS range to the range provided by Google.
So, if you want to change to the Google DNS range, please refer to the guide below.
Change Default DNS on PC
You can change the default DNS range on a PC by opening the Network Connections window through the Control Panel menu. Then assign the appropriate DNS range to the network you are currently connected to.
And, in addition to setting custom DNS values for IPV6, you will also need to do this for IPV6.
Here are the steps to change the default DNS on your PC to the Google equivalents:
1. Press the Windows key + R to open the Run dialog box.
2. Then enter the ncpa.cpl command. Now select “Network Connections”from the drop-down menu.

Note. To grant administrative privileges, click Yes when prompted by User Account Control (UAC).
3. Now on the Network Connections tab, find the connection you are currently using to access the Internet.
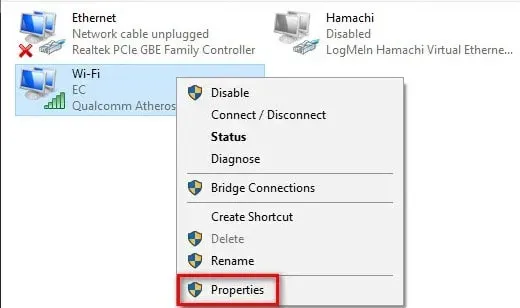
4. Then right click this connection after you have identified it. And use the context menu to select Properties.
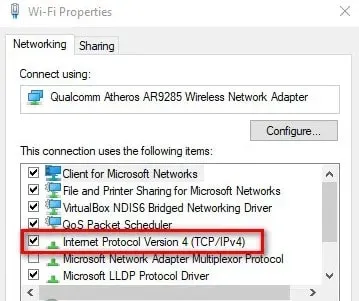
5. Now go to the Network tab on the properties screen of your Wi-Fi or Ethernet connection. And then look at the items under This connection uses the following items.
6. Then select Internet Protocol (TCP/IP4). And select Properties.
7. Now click on the General tab when you reach the next page of settings. And make sure the switch Use the following DNS server address is checked.
Then enter the following values instead of Preferred DNS Server and Alternate DNS Server:
- 8.8.8.8
- 8.8.4.4
8. And after IPv4 has been changed, it’s time to change IPv6. So, click on the previous menu to get started. Then you can go to properties for IPv6 (TCP/IPv6).
9. Now change your preferred DNS server and alternate DNS server to:
- 2001:4860:4860::8888
- 2001:4860:4860::8844
Then. save your changes.
Now, before trying to start Battlefield 2042 again, restart your computer and router. Perhaps the error has been fixed.
Change Default DNS on PlayStation 4
You will not be able to change DNS when using the PlayStation operating system unless you set up a new internet connection. Then select Custom when asked if you want to use automatic settings.
And you can easily change the default DNS settings to the equivalent settings from Google by following these steps:
1. First, go to “Settings”by scrolling through the vertical menu at the top of the main screen of the PlayStation 4.
2. Then, from the list of available options on the settings screen, open the Network menu.
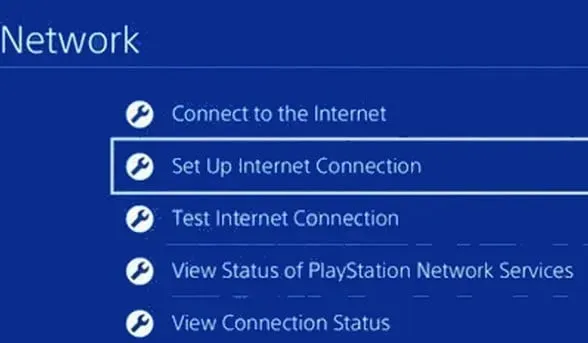
3. Now in the network settings, select “Set up Internet connection”.
4. Then choose between Wi-Fi and LAN. And select “Custom”to prevent default DNS assignment.
5. Then select “Automatic”when prompted for the desired address.
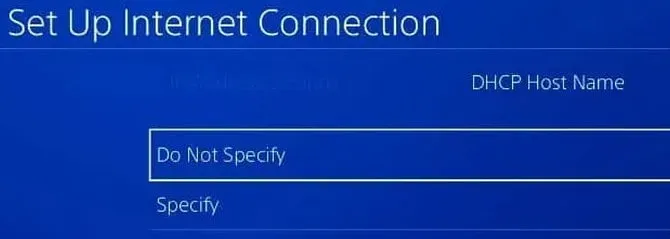
6. Now at the next prompt, click Don’t Specify a DHCP Host Name.
7. When you get to the “DNS Settings”prompt, select “Manual”. Then change the primary DNS to 8.8.8.8. And replace the secondary DNS with 8.8.4.4.
But if you prefer IPV6, you should use these values:
- Primary DNS – 208.67.222.222
- Secondary DNS – 208.67.220.220
Make your changes and save them. And check if the issue is resolved by restarting your console and router.
Change Default DNS on PlayStation 5
You will need to change your DNS settings in the Settings menu on your Playstation 5 if you experience this issue.
You can also create a new Internet connection by changing your network settings.
Please follow the instructions below for complete instructions:
1. Select the “Settings”icon on the PS5 home screen. Then enter the settings by pressing the X button.
2. Now enter the network settings from the settings menu. And select “Settings”again.
3. Then select “Set Up Internet Connection”from the next menu. And select “Configure manually”from the following group of options.
4. Now select the Wi-Fi or LAN cable. And select DNS.
5. Now, when you are asked to enter values, enter 8.8.8.8. And enter 8.8.4.4 as the secondary DNS. Then click Save to save your changes.
Now launch Battlefield 2042 after reconnecting and changing DNS. And check if the problem persists.
Change Default DNS on Xbox One/Xbox Series X
The instructions for changing the default DNS are almost identical whether you’re using the latest generation Xbox One or the next generation Xbox.
Advanced settings for your current network can be found in the menu you are currently using. And you can also manually configure DNS.
Here are the steps you need to take:
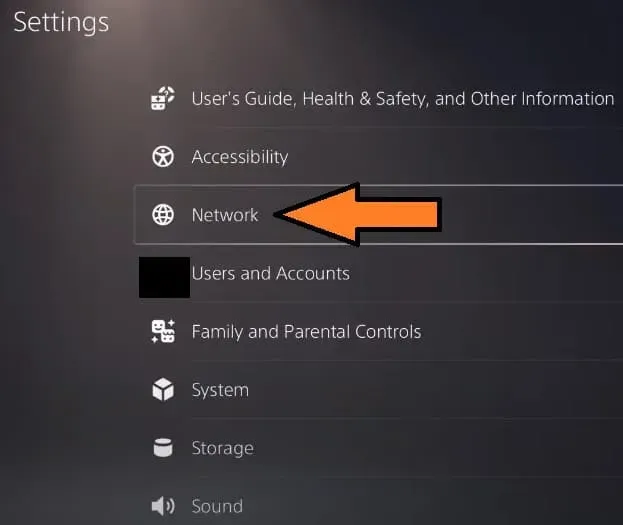
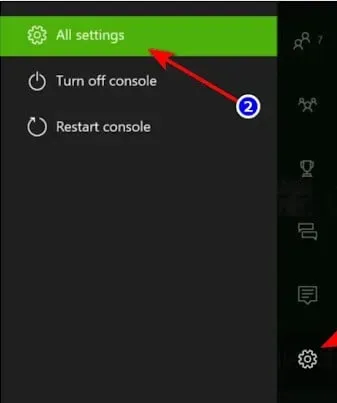
1. First, make sure you are in the Xbox One Dashboard. Then select the guide menu.
2. Now select “All Settings”from the side menu that just appeared.
3. Then select “Network”from the “Settings”menu. And press A to open network settings.
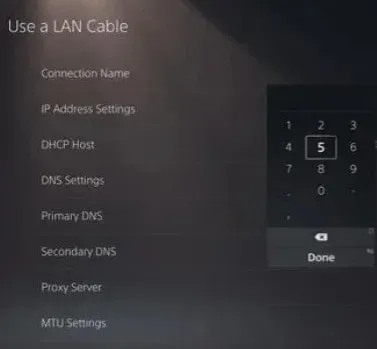
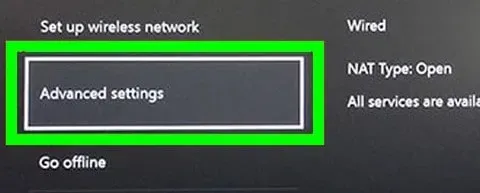
4. Then click “Advanced Settings”in the “Network”menu.
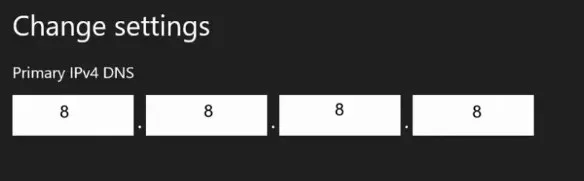
5. Now select your DNS settings from the next menu. Then, in the next set of menus, select Manual.
6. Then set Primary DNS to 8.8.8.8. And set secondary DNS to 8.8.4.4. Then click Save.
7. Last but not least, save your changes before restarting your Xbox and router.
Now launch Battlefield 2042 again after your console boots up and connects to the internet. And check if the error “Unable to load save data”is resolved.
Use a VPN
Another thing you can try to resolve a potential connection issue is to install and use a VPN. There may be cases where the connection to the EA server is broken by an ISP node at the third level.
Thus, in this case, you can solve the connection problem by installing a VPN client. This is especially true if you are constantly running into a problem.
Check server status
You should also visit the Down Detector website to see the status of the Battlefield 2042 server. Many players are currently affected by this error.
So, sometimes there can be errors due to server issues. And there is a good chance that you will not be able to do anything on your part in this scenario.
Final words
That’s all about how to fix Battlefield 2042 error code 2002G cannot load save data. We hope that your error will be fixed now. We have listed all possible fixes for this error. So, keep trying them and comment which one worked for you.
Leave a Reply