How to Add Pages and Page Numbers in Microsoft Word

Microsoft Word is one of the most famous document editing programs. We all make different documents that include different types of information. All of these documents can be important and related to our studies, office, work, books, etc. To make documents look more effective and grab readers’ attention, various types of customization are available in Microsoft Word.
Many users create documents with many pages. Now they are considering making it more effective for readers to make a good impression. Sometimes, when preparing documents, they try to add a page to a Word File, but do not know how. Here we are with a guide where we will tell you how to add pages and page numbers in Microsoft Word. So let’s start with it.
How to add a page in Microsoft Word
Microsoft Word allows us to create a Word document with many pages. You can add the next page whenever you want. However, when you are working on a Word document, then at this time, once you reach the end of the page, another page will be added to the document itself. We know that this is an automatic process. But what if you want to add a page to the end of the current page, or the page is not automatically added when you reach the end? We know that you will feel uncomfortable filling out the document you are working on.
Adding pages to Microsoft Word is a simple job that you don’t have to worry about. The developers also made sure that the page is automatically added before the end of the current page. In any case, if the page does not load automatically, then you can easily add it using the steps that are listed below.
- Open the document you are working on.
- Move the cursor to the word from where you should add the page.
- Click on the word where your cursor is.
- After that, you need to press CTRL + Enter.
- A new page will be added to the Word document.
Users who want to make their document more impressive to readers can try adding page numbers for certain pages and all pages by which readers can find out about the beginning and end of the document through the page. In addition, it will be easy for them to remember where they left the reading. So it will be very good if you are creating a document for the purpose of a project, office, books, or something else. We have added the steps below that you need to follow to add page numbers in Microsoft Word. So let’s check it out.
How to add page numbers in Microsoft Word
Users don’t have to worry about adding page numbers to Microsoft Word. Page numbers can be added to the header and footer of a document. When reading books, you will see the page number at the top or bottom. This is because users can easily check page numbers without issue. Also, when you add a page number at the top or bottom, it will be helpful for users or readers to find the page number they are.
- First of all, open a Word document to which you must add page numbers.
- After that, go to the “Insert”option.
- Select Page Numbers.

- You will see two different options for adding page numbers: at the top of the page and at the bottom of the page.
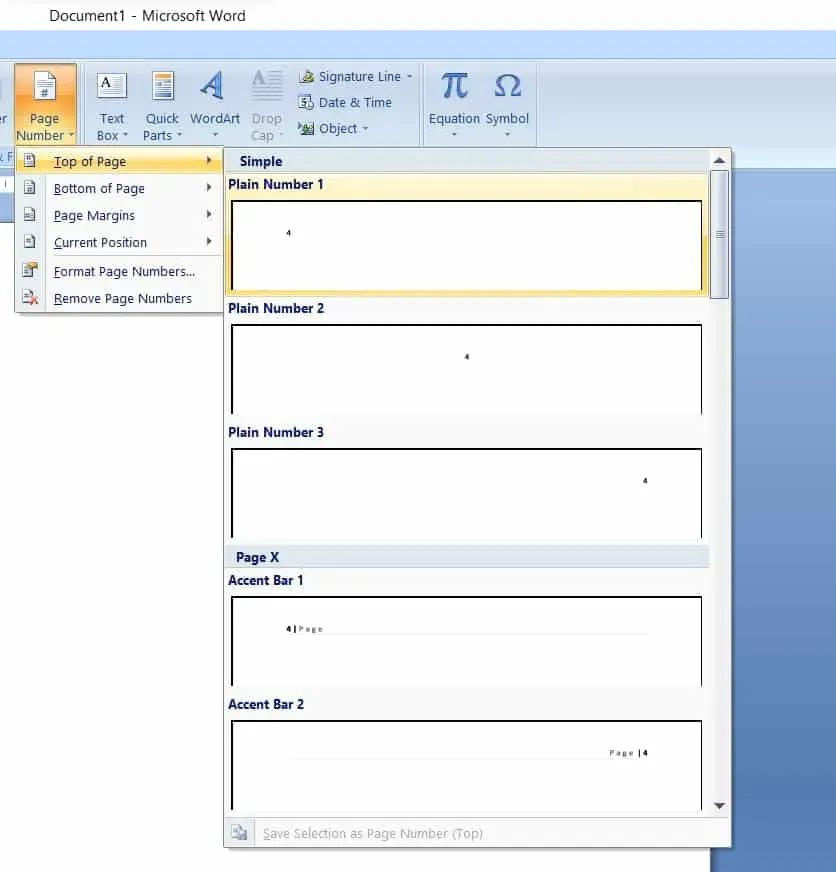
- Choose any of them. Now select any of the styles you want to add to the desired document. That’s all. Page numbers will be added to the document.
How to add page numbers in Microsoft Word from a specific page
We hope you have learned how to add page numbers in Microsoft Word. But what if you add a page number from a specific page? Do you know how you can do it? There are many situations where users must add page numbers after the introduction, index, and content page. However, users cannot understand how they can do this. Here are the steps you must follow to add page numbers in Microsoft Word after certain pages.
- Open the document in Microsoft Word.
- After that, go to the “Insert”option.
- Select Page Numbers.

- Select any of the options: Top of Page and Bottom of Page.

- After that, you need to select another page to start the page number and then go to the “Design”option.
- Choose a different first page title.

- Now click on the “Page Number”option.
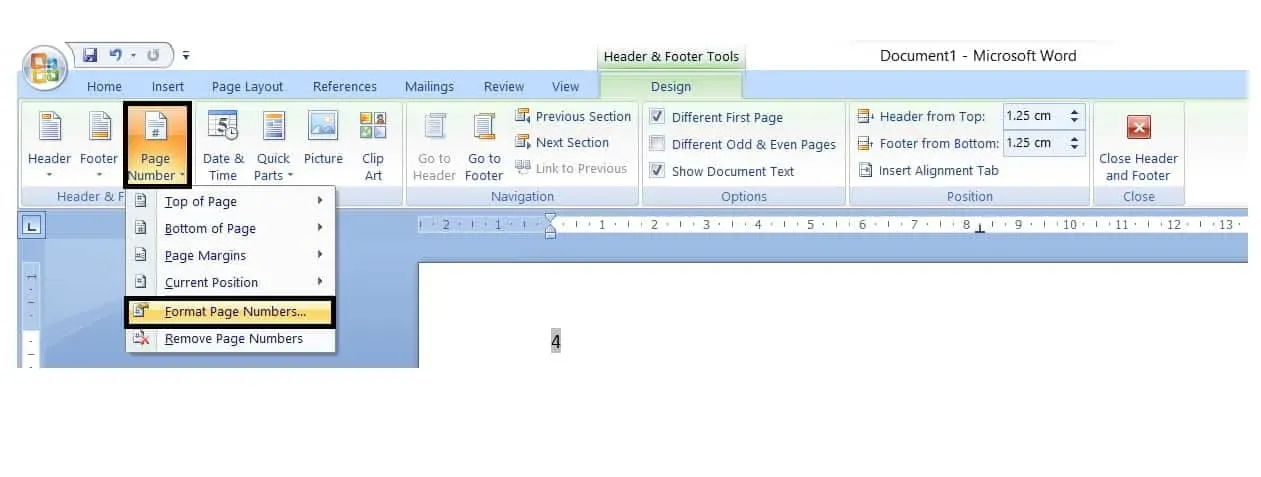
- Select Page Number Format.
- Set the Start value to 0.
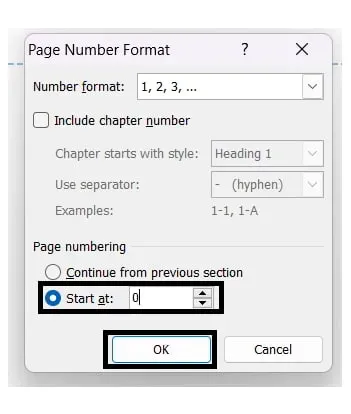
- Select OK.
How to Format Page Numbers in Microsoft Word
If you’ve correctly added page numbers to your document, but want to customize it to your liking, follow the steps listed below.
- First, add page numbers to your document in Microsoft Word.
- Now go to the Design tab.
- Select a page number.
- From the menu, choose Page Number Format.
How to remove page numbers in Microsoft Word
We hope you were able to add page numbers to your document using the steps listed above. Now we will explain the steps to remove page numbers in Microsoft Word without any hassle. So let’s check them out.
- We assume that you have added page numbers to the document.
- Go to the “Design”tab.
- Select a page number.
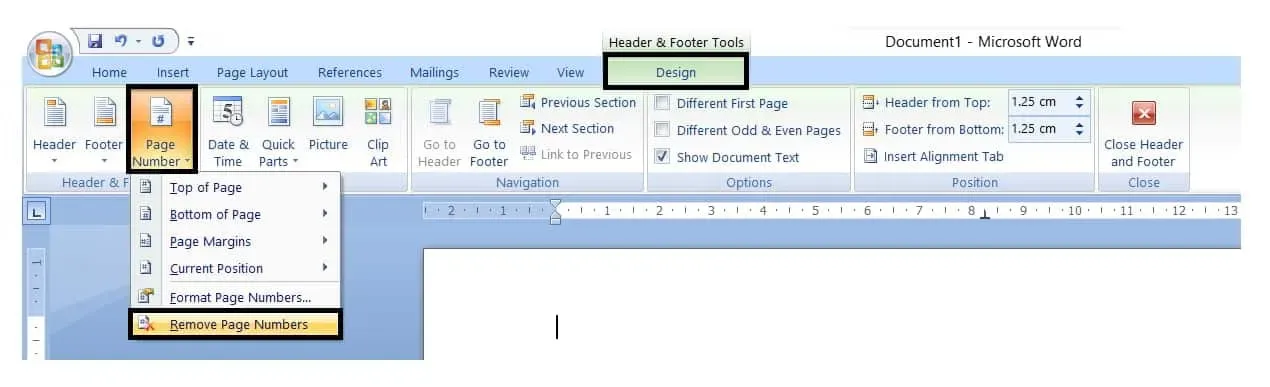
- Select Remove Page Numbers from the menu.
Summarizing
There are many users who have been looking for ways to add page numbers to their documents. We hope that with this tutorial you will now be able to add page numbers for all pages and individual pages. We have also listed the steps to remove and format page numbers. That’s all for this guide. If you have any doubts, please let us know in the comments section below.
Leave a Reply