How to Change AirPods or AirPods Pro Settings on iPhone or iPad
Apple has been successful with its strategy of ditching the headphone jack and introducing AirPods at the same time. AirPods have become a source of multi-million dollar revenue for Apple. And that’s because AirPods are the essence of convenience.
Wire problems are eliminated without loss of functionality. You can tap on AirPods to answer a call and double tap to skip a track. In addition, you can also customize these settings. Read on to find out how to change your AirPods and AirPods Pro settings through your iPhone or iPad.
How to Access AirPods Settings on iPhone
In iOS 16, getting to AirPods settings is very easy. The steps to navigate to AirPods settings on iOS 16 and iOS 15 are described below.
In iOS 16
- Open “Settings”on your iPhone.
- Select the option that displays connected AirPods directly below your Apple ID.
In iOS 15
- Open “Settings”→ tap “Bluetooth”.
- Click on the i icon in the MY DEVICES section.
Rename your AirPods and AirPods Pro
- Go to “Settings”→ “Bluetooth”. (For iOS 16, you can go to Settings → AirPods.)
- Tap the Name option.
- Rename your AirPods and click Done.
If you’re facing an issue where you can’t rename your AirPods from AirPods X to just AirPods, we’ve got an article to help resolve the issue.
Set one AirPod as active microphone
The user can choose which of the AirPod microphones will work as the audio input source, left or right.
- Go to your AirPods settings.
- Scroll down and click Microphone.
- Choose one of the three available options. (I recommend that you keep this setting to automatically switch AirPods)
Note. AirPods Max is the only device in the current AirPods line that does not support this option.
Turn off automatic ear detection on AirPods or AirPods Pro.
AirPods automatically pause media playback whenever you take them out of your ears. If this setting is not enabled for you, or if you want to disable this setting, read on.
- Go to your AirPods settings.
- Turn on or off the automatic ear/head detection switch according to your needs.
Enable Live Listen on AirPods or AirPods Pro
Live listening allows users to listen to audio recorded by their iPhone’s microphones. For example, you can leave your iPhone in a room and listen to the conversations of the people in the room right on your AirPods. The only condition is that you must be in range of Bluetooth.
People may use the Live Listen feature for several reasons, and I recommend not using this feature to spy on people. With that said, here is a step by step guide to help you enable Live Listen on your AirPods.
Change double-tap actions on AirPods (1st and 2nd generation)
- Go to your AirPods settings.
- Tap the Left/Right option under DOUBLE-Press AIRPOD.
- You can select Siri, Play/Pause, Next Track, Previous Track, or Disable Double Tap Action.
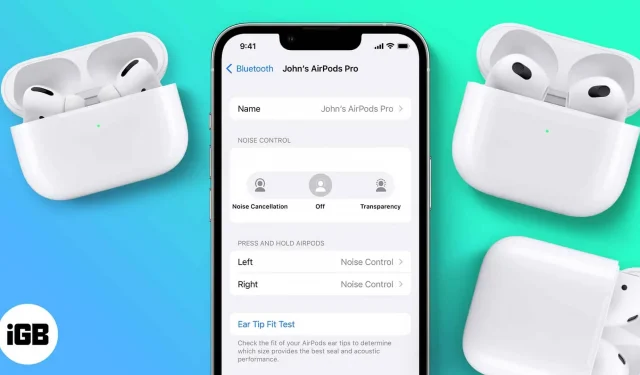
Changing press and hold actions on AirPods Pro
While you can’t change the single, double, or triple tap gestures for AirPods Pro (1st and 2nd generation) and AirPods 3, you can certainly change the tap and hold actions. Here’s how to do it:
- Go to your AirPods settings.
- Select Left/Right under Press and Hold AirPods.
- You can select each of the AirPods to activate Siri or switch between noise canceling modes.
Note. AirPods Pro and AirPods 3 share the same stem design, but AirPods 3 does not support ANC. So, the noise canceling mode is only available on AirPods Pro; You can use the steps above to toggle between Active Noise Cancellation and Transparency Mode and turn them off.
Enable Spatial Audio on AirPods Pro and AirPods Max
Before we continue, be sure to enable Spatial Audio with Dolby Atmos in Apple Music.
- Go to your AirPods settings.
- Select Spatial Audio.
- On the next screen, select the Spatial Audio option.
- Click Done.
In iOS 16, you can set up personalized spatial audio; here’s how:
- Go to your AirPods settings.
- Select Personalized Spatial Audio under Spatial Audio.
- Click Set Up Personalized Spatial Audio.
- Read the details and click Continue.
- Follow the on-screen instructions to set up the feature.
* Spatial Audio is available on AirPods Pro, AirPods Pro 2nd Generation, AirPods 3 and AirPods Max.
Accessibility settings for AirPods
Starting with iOS 16, Apple consolidated the AirPods accessibility settings into a dedicated AirPods section. Hence, you no longer have to go into accessibility settings to access and change some AirPods settings such as press speed, press duration, etc. And here is how to change the available settings:
- Open “Settings”on iPhone.
- Go to your AirPods settings.
- Scroll down and select Accessibility.
- You can now adjust the speed required for the duration of the Press Speed. Available options are Default, Slower, and Slowest.
- You can also adjust the duration of the press and hold. Available options are Default, Shorter, and Shortest.
- Since AirPods Pro 2nd generation supports gesture controls for volume control, you can also change the timeout between each touch. Available options are Default, Longer, and Longest.
Note. This option is not available on AirPods (1st and 2nd generation).
Turn on noise cancellation with one AirPod
Active noise cancellation in AirPods Pro is unparalleled, and AirPods Pro 2nd Gen takes it to the next level. However, ANC was only available when you were wearing both AirPods. Now that’s changed and you can use the active noise cancellation found on the AirPods Pro series even if you’re only wearing one AirPod. Follow the steps below to enable it.
- Open “Settings”on iPhone.
- Go to your AirPods settings.
- Scroll down and select Accessibility.
- Turn on noise cancellation with one AirPod option under Noise Control.
AirPods Max needs no introduction. It’s a solid pair of headphones with the convenience of the Apple ecosystem and amazing sound quality. While they do have some drawbacks, the AirPods Max’s transparency mode is one of the best headphones on the market. Here are some of the settings you can change on AirPods Max.
Change the rotation direction of the Digital Crown on AirPods Max.
Rotating the Digital Crown on AirPods Max helps you increase or decrease the volume based on the movement of the rotation. If you want to invert the default rotation, read on.
- Go to your AirPods settings.
- Click “Digital Crown”.
- In the Rotate Volume Up section, select Back Forward or Front to Back according to your preference.
As I said, AirPods Max has one of the best active noise cancellation and transparency modes. A button on the right headphone module helps you switch between the three settings.
- Go to your AirPods settings.
- In the Button Cycle Between section, select one of the three options and the button will cycle through the selected options.
I hope this guide has helped you resolve your AirPods issues. By the way, do you think AirPods have the best sound quality in their price range? Let me know in the comments below.
Leave a Reply