How to change the Outlook inbox view on desktop or web
Jobs become interesting when the look and feel of traditional software changes to something new. Microsoft Office has a similar user interface throughout the Office suite software, and sometimes it can be boring to open the Office software and view the same thing over and over again. Many people, including professionals, use Microsoft Outlook to access and manage their email, which looks just like other Outlook software.
If you’re tired of seeing the same Outlook view all the time, you can change it. Microsoft Outlook has a built-in option to customize the outlook view by changing the layout and font. Alternatively, you can also create your own view from scratch if you don’t want to customize the existing look and feel of Outlook. If you want to change your Outlook view but don’t know how, we are here to help you. Here is a step by step guide to change Outlook view.
Content:
- 1 Change the view of incoming Outlook messages on the desktop or on the web
- 2 Change Outlook view
- 3 Delete custom view
- 4 Switch to the default view in Outlook
Change Outlook Inbox View on Desktop or Web
If you want to completely change your Outlook view and create a new view, you can do so by following these steps:
- Press the Windows key on your keyboard and search for Outlook . Click the Outlook icon to open it.
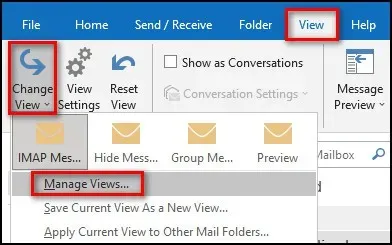
- Here, click on the View tab in the Outlook window.
- Now click “Change View” and then click “Manage Views “.

- In the Manage All Views window , click the New button .

- In the New View Name section, enter the name of the new view you want to create.
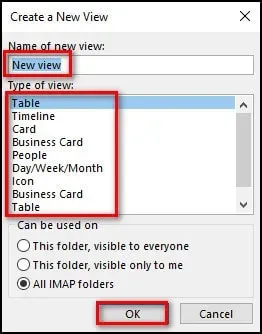
- Next, you will need to select a view type . This will include various options, including – Table , Timeline , Card , Business Card , People , Icon , Day/Week/Month .
- Once you have finished entering the view name and selected the view type, click OK .
- This will create a new view in Outlook.
Change Outlook View
If you want to change the look and feel of Outlook that already exists, you also have the option to do so. You can add and remove elements to change the view.
Changing the layout
To change the Outlook layout, follow these steps:
- On the View tab , select the Folder Panel option . You will now see various options for customizing the folders panel.
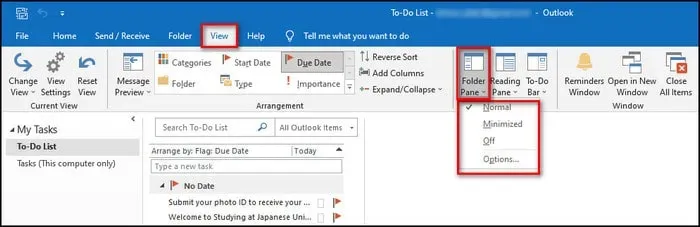
- Normal – the folders panel will remain on the left.
- Collapse − This will collapse the folders panel.
- Off _ – This option will remove the folders panel.
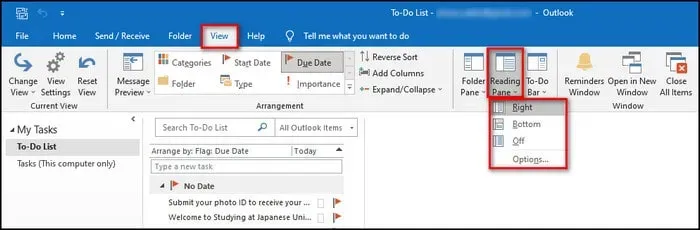
- Right − This will shift the reading pane to the right.
- Bottom – The reading bar will move down.
- Off _ This will remove the reading pane from Outlook.
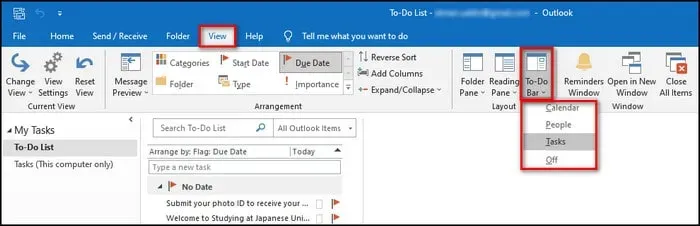
- Calendar − This will add a calendar to the to-do bar.
- People − This will add people to the to-do list.
- Tasks – This option will add tasks to the to-do bar.
- Off- This will remove the to-do bar.
Changing the font in the message list
If you want to change the font in the message list, follow these steps:
- On the View tab in the Outlook window, click View Options .
- Then click” More Settings “.
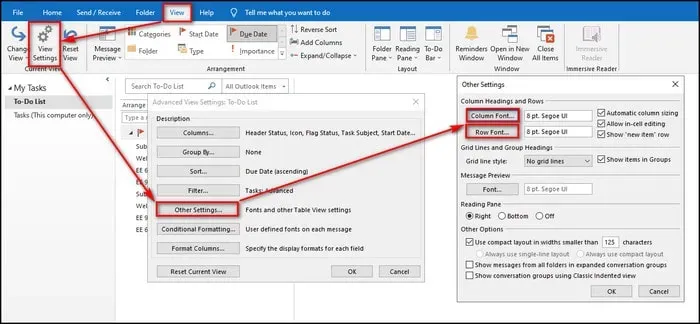
- You will see two options: Colum Font and Raw Font . Click the Column Font button .
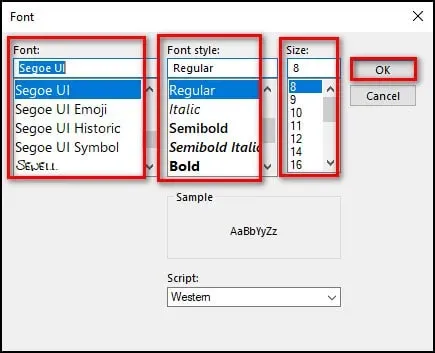
- Next, you will need to select the Font , Font Style , and Size . After that click OK .
- Set the Raw Font in the same way .
Changing the font for messages (composing, replying, and forwarding messages)
If you want to change the font for messages when composing, replying to, or forwarding a message, you can follow the steps below:
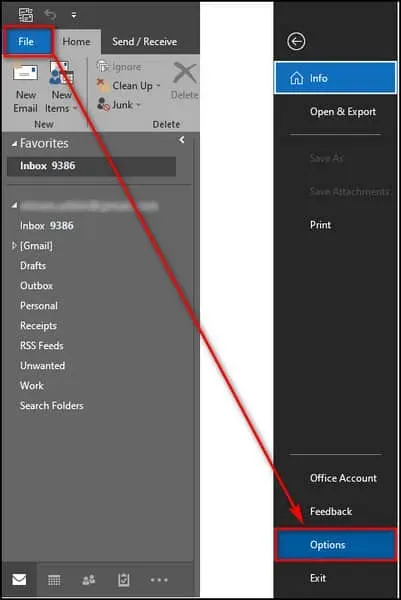
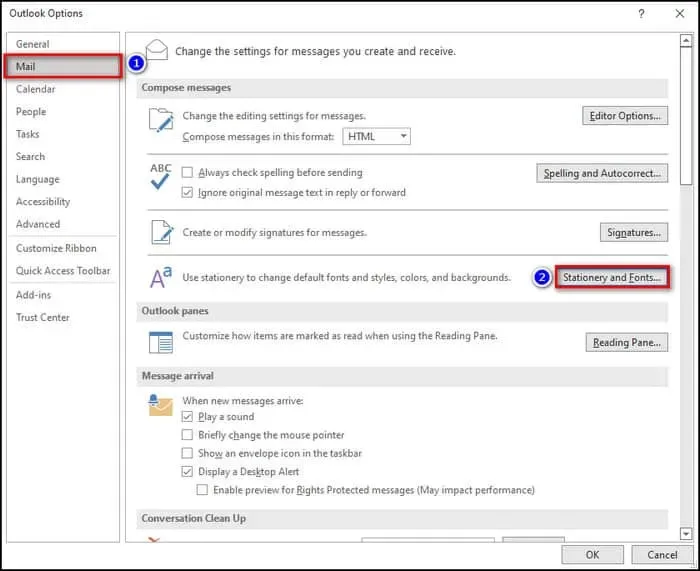
- In the Outlook window, select the File option and then click Options .
- In the Outlook Options window , click the Mail tab in the left sidebar.
- Then, in the Compose Messages section , click the Stationery and Fonts button .
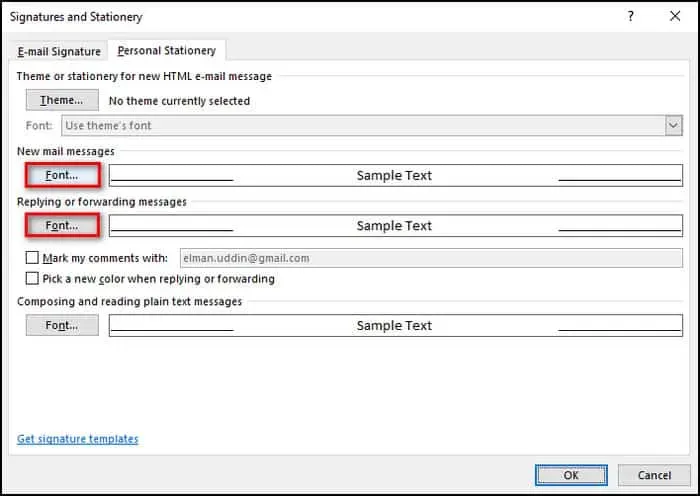
- Click the Font button in the New Mail Messages section .
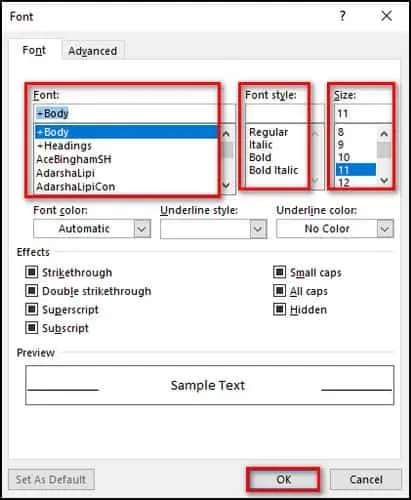
- Now adjust the font , font style and size. Having done this, click the OK button .
- Then click the Font button under Reply or Forward Messages and adjust the font in the same way.
Delete custom view
If you want to delete a custom view that you have created in Outlook, you can do so by following these steps:
- Click the Start icon and search for Outlook . Open the Outlook app from the search results.
- On the View tab, click Change View and then Manage Views .
- In the Manage All Views window , select the view you want to delete and click the Delete button .
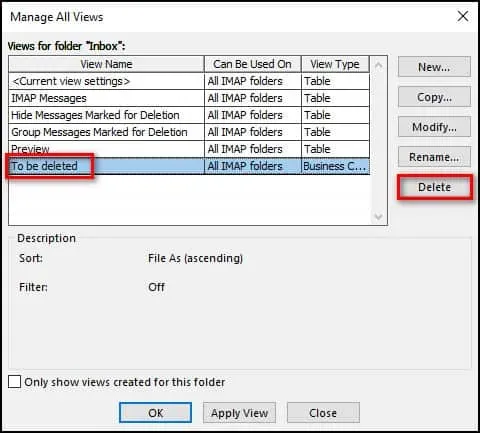
- You will be prompted to confirm the deletion of the view; click Yes to confirm.
Switch to default view in Outlook
If you don’t like the new view you’ve created, you can also revert to the default view. Following are the steps to switch to the default view in Outlook.
- Click on the View tab in the Outlook application window .
- Here, click on the View Settings option .
- In the Advanced View Options window, click Reset Current View .
- Click Yes to confirm resetting the current view. You will return to the default view in Outlook.
Final words
There were several steps above to change the look of Outlook. We have discussed the steps to add a new Outlook view, change the current Outlook view, revert to the default view, or even delete the view you created in Outlook. We hope this article will help you change your Outlook view.
Leave a Reply