How to Convert Photos to PDF on iPhone and iPad (4 Ways)
The images stored on your iPhone are most likely in various file types (such as HEIC, JPEG, PNG, etc.). Most of these file formats are compatible with all major platforms. However, you may need to save photos in PDF format for paper documentation, class work, or other specific purposes.
In this guide, I will show you 4 ways to convert photo to pdf on iPhone and iPad.
- How to Convert Image to PDF on iPhone Using Printer Options
- Save photos as PDF on iPhone and iPad with the Files app.
- How to Convert Images to PDF on iPhone with PDF Scanner App
- Video: Convert Photos to PDFs with the Shortcuts App
How to Convert Image to PDF on iPhone Using Printer Options
- Open Photos on iPhone and tap Albums. Now click “Select”and select one or more images.
- Tap Share.
- Select “Print”on the shared sheet.
- Using two fingers on the photo preview, pinch outward to save the photo as a PDF.
- Select photos and click “Share”.
- Click “Books”on the shared sheet. If necessary, swipe horizontally across the row of app icons.
- The photos are automatically converted to a PDF file and opened in Books. There it will be saved.
- Tap the screen and then tap the back arrow to go back.
- Then click “More”(three dots).
You can learn more about books in our complete guide.
Save photos as PDF on iPhone and iPad with the Files app.
Files allows you to quickly create PDF files. However, the photo must be saved in the Files folder. So, if you already have images, move on to the next steps. If they’re in Drive, Dropbox, One Drive, etc., you can see how to enable these third-party cloud services inside Files.
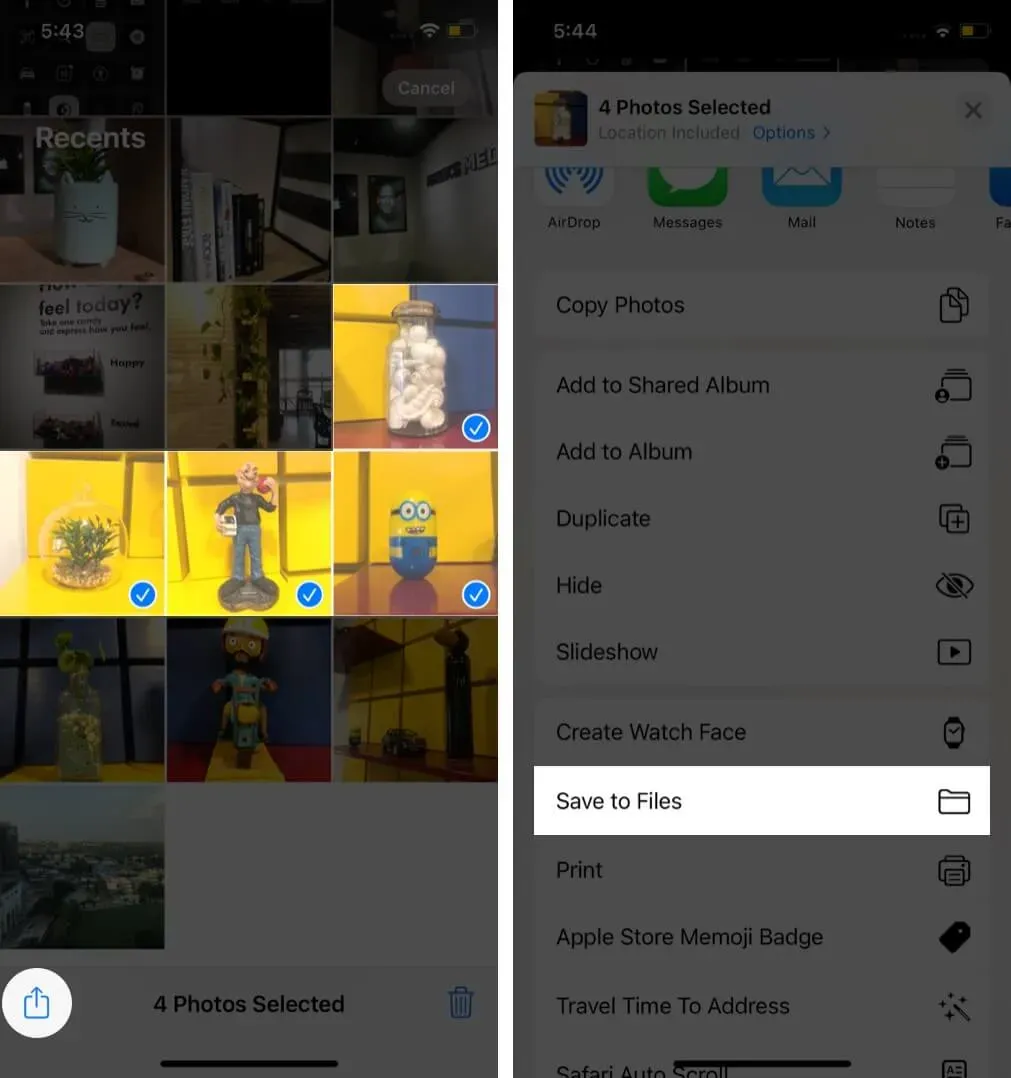
Or, to copy images from photos to files: select images in photos → click the Share button → Save to Files.
Once it’s not, here are the steps to create PDF from photos on iPhone.
- Open files and find the image.
- To convert a single image to PDF: Press and hold on an image and select “Create PDF”.
- To convert multiple images to PDF: Click “More”(three dots inside a circle) in the top right corner and click “Select”.
- Now touch multiple photos. After that, click “More”in the lower right corner and select “Create PDF”.
The files will make a PDF from those images. It will be saved in the same location as the original images. You can check out our full guide on using files to copy, move or share this PDF.
How to Convert Images to PDF on iPhone with PDF Scanner App
Another great way to convert an image to a PDF file is through a third-party PDF editing application. The advantage of Scanner App – PDF Editor is that it is a PDF editor, scanner and converter in one device. So you can do more than just convert files.
So here I will show you how to use PDF Scanner app to convert photo to PDF:
- Open the Scanner – PDF Editor app on your iPhone.
- Click on the Plus + button.
- Select the Scan with Camera option to scan or upload images from the Photos app on iPhone. Or select the Import from Sources option to import images from the cloud or the Files app.
- Your uploaded image is now automatically saved in the app as a PDF file.
- You can now edit the file with tools such as Rotate, OCR, Signature, Crop, and Filters.
- To email, send a message, or share the PDF you just created, click the Upload/Share icon.
You can also digitally sign, merge PDFs, extract text using OCR, and more. So install Scanner App – PDF Editor to convert image to PDF and vice versa.
Video: Convert Photos to PDFs with the Shortcuts App
We hope this guide helped you convert photos to PDF on your iPhone or iPad. All three methods are equally effective, but my favorite involves using the Books app. With this method, a PDF file is created quickly and stored securely for future use.
You can also use third party apps like PDF Expert (image to PDF conversion is a Pro feature).
Leave a Reply