How to Downgrade iOS 16 Beta to iOS 15 or Restore iPadOS 16 Beta to iPadOS 15
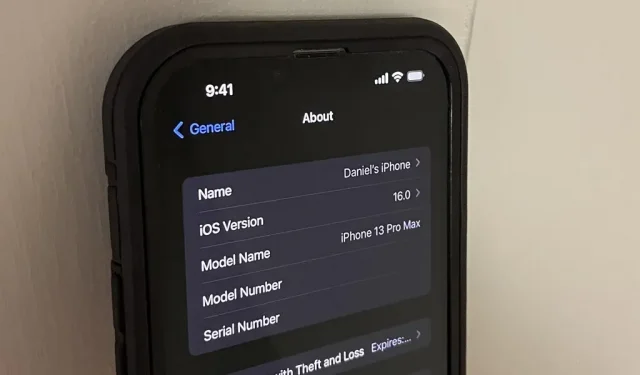
Beta software can be exciting because you can experience cool new features earlier than most other people. But it can have unintended consequences such as bugs, UI crashes, and terrible battery life that will make you wish you never installed it. If this sounds like you with iOS 16 beta or iPadOS 16 beta, you can upgrade to iOS 15.5 or iPadOS 15.5 for a more stable user experience.
Reverting your iPhone or iPad to the latest stable iOS 15 or iPadOS 15 update is relatively easy, but not the fastest. However, it’s definitely worth it if you backed up iOS 15.5 or iPadOS 15.5 before updating to the developer beta (public beta is not out yet), or if you still have an iOS or iPadOS 15 backup. which was not overwritten by the beta version. If you don’t have the zipped update, it might still be worth it if you’re fine with setting it up as a new device.
What you need to know before recovery
- You can’t use an iCloud backup of iOS beta or iPadOS 16 when restoring to iOS or iPadOS 15.5.
- You also cannot use an iOS or iPadOS 16 beta backup made on your computer when restoring to iOS or iPadOS 15.5.
- You can sync most of your data to iCloud before downgrading if you want to keep new content. (See Step 2 below.)
- You can’t downgrade by removing your beta profile and waiting for the next stable iOS or iPadOS update, unless you want to wait until the fall when iOS and iPadOS 16 are released to everyone. A new iOS or iPadOS 15 update will not downgrade.
- You can download the recovery image manually for a failover downgrade, or you can let the computer do the job in recovery mode.
Boot the operating system (optional)
Before doing anything else, I recommend downloading the firmware, also called the operating system or recovery image, as this can take more than a few minutes depending on the download speed.
You can skip this step and use the Finder (macOS) or iTunes (Windows) to download the recovery image right before installing the OS. However, downloading the file now can save you time, be a little easier, and be less likely to be interrupted during the recovery process. If you want Finder or iTunes to do all the work for you later, skip to Step 2 now.
You can use one of the links below to download the correct firmware for your iPhone model. These are for the latest stable releases of iOS 15.5 and iPadOS 15.5 (build number 19F77) that Apple is still signing off. Apple no longer signs iOS and iPadOS 15.4.1 or earlier, so you won’t be able to install either.
- iPhone SE (3rd generation)
- iPhone 13 Pro Max
- iPhone 13 Pro
- iPhone 13 mini
- iPhone 13
- iPhone 12 Pro Max
- iPhone 12 Pro
- iPhone 12 mini
- iPhone 12
- iPhone SE (2nd generation)
- iPhone 11 Pro Max
- iPhone 11 Pro
- iPhone 11
- iPhone XR
- iPhone XS Max
- iPhone XS
- iPhone X
- iPhone 8 Plus
- iPhone 8
- iPad Air (5th generation)
- iPad mini (6th generation)
- 10.2-in. iPad (9th generation)
- 12.9-in. iPad Pro (5th generation)
- 11-in. iPad Pro (3rd generation)
- iPad Air (4th generation)
- 10.2-inch iPad (8th generation)
- 12.9-in. iPad Pro (3rd and 4th generations)
- 11-in. iPad Pro (1st and 2nd generations)
- 12.9-in. iPad Pro (2nd generation)
- 10.5-in. iPad Pro (1st generation)
- iPad (6th generation)
- iPad (5th generation)
- iPad Air (3rd generation)
- iPad mini (5th generation)
- 10.2-in. iPad (7th generation)
- 9.7-in. iPad Pro (1st generation)
- 12.9-in. iPad Pro (1st generation)
All of the links above come directly from Apple’s servers, so you can trust the integrity of the file. If you have a developer account, you can find the same. These are the same links used by the famous website IPSW.me.
Back up important files (optional)
An iOS 16 or iPadOS 16 beta backup won’t do you any good when you revert to iOS 15 or iPadOS 15. Therefore, creating an iCloud backup or a backup on your computer for the beta isn’t required unless you plan to reinstall the beta soon. future.
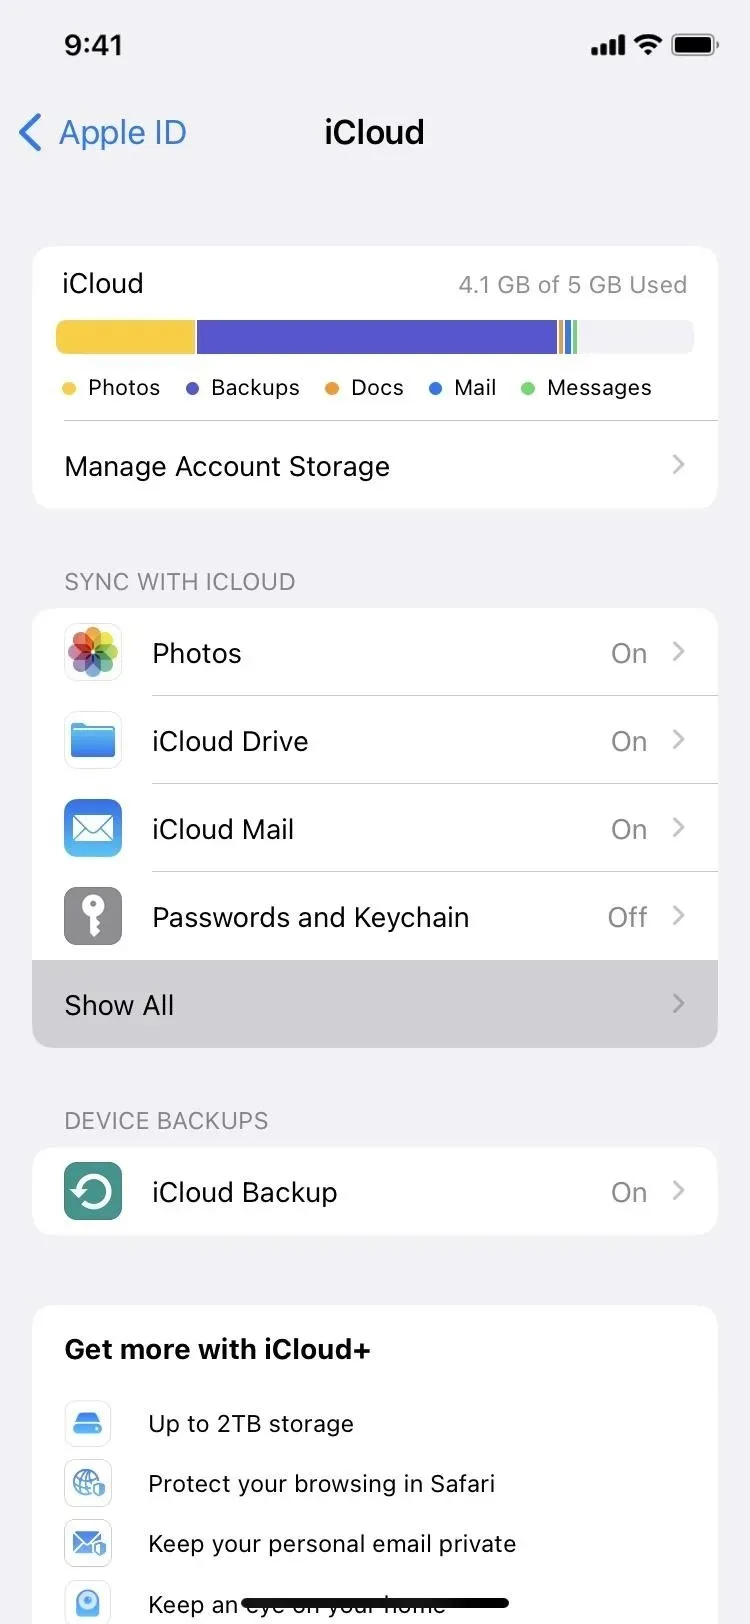
If you forgot to back up iOS 15.5 or iPadOS 15.5 before updating to the iOS 16 or iPadOS 16 beta, and if the beta overwrites your latest iOS or iPadOS 15 backup, you can sync all your important files. with iCloud, so they’re available on all your iCloud-connected devices, including the iPhone or iPad you’re about to revert to the latest stable version. You might want to do this if you’ve been using the iOS beta or iPadOS 16 for a while.
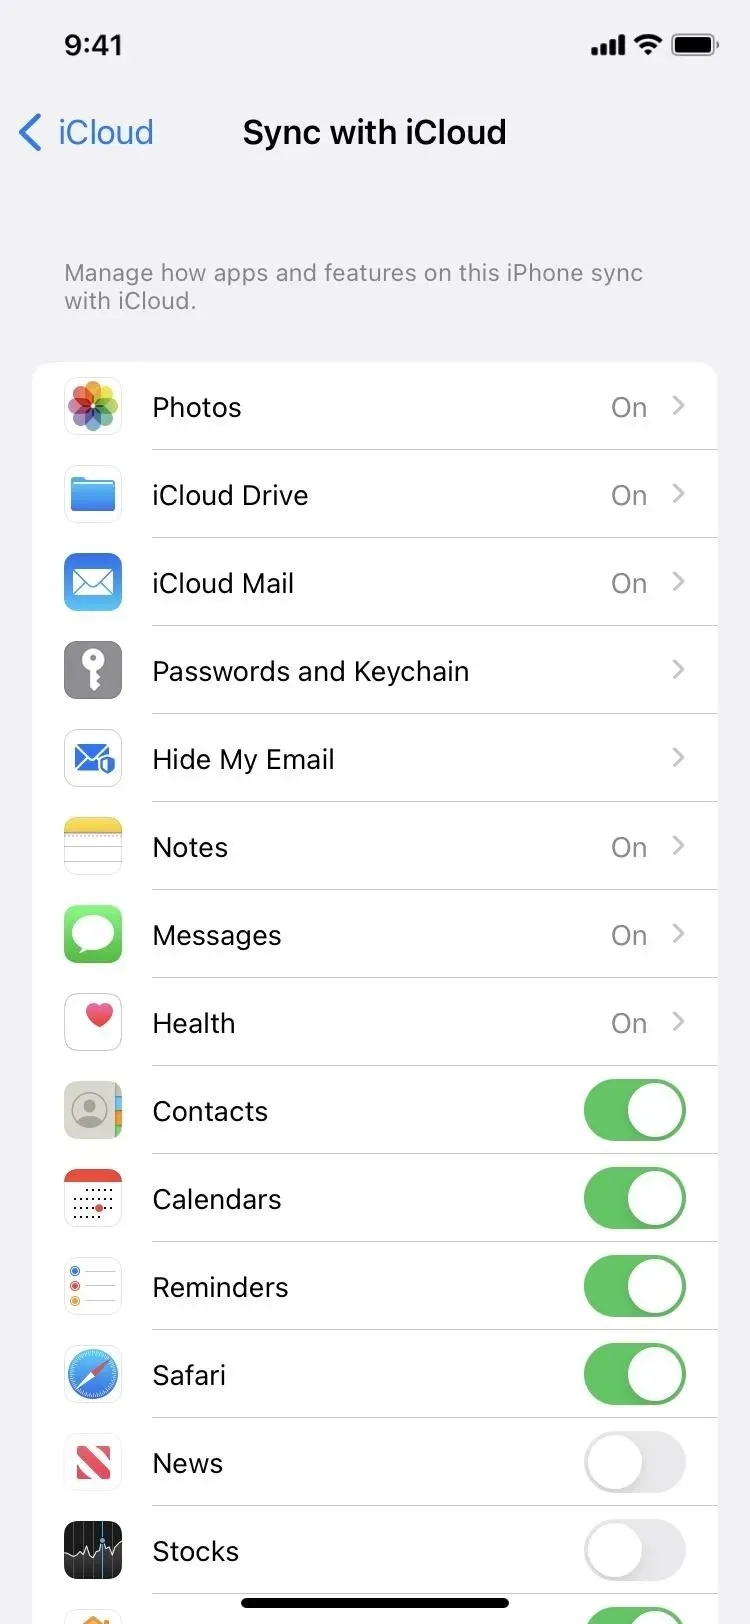
Tap your name at the top of the Settings app, select iCloud, then select Show All. From here, you can sync a large amount of information to iCloud. Just include whatever you don’t want to lose. Here are all the Apple apps you can sync:
- Books
- Contacts
- Calendars
- game center
- Fitness+
- Health
- House
- iCloud Drive (including call history)
- iCloud mail
- Cards
- Messages
- Music recognition
- News
- Notes
- Passwords and keychain
- Photos (private and shared)
- Reminders
- Safari (bookmarks)
- Labels
- Siri
- Stock
- Voice notes
- Wallet (pass through, not Apple Pay)
- Look
- Weather
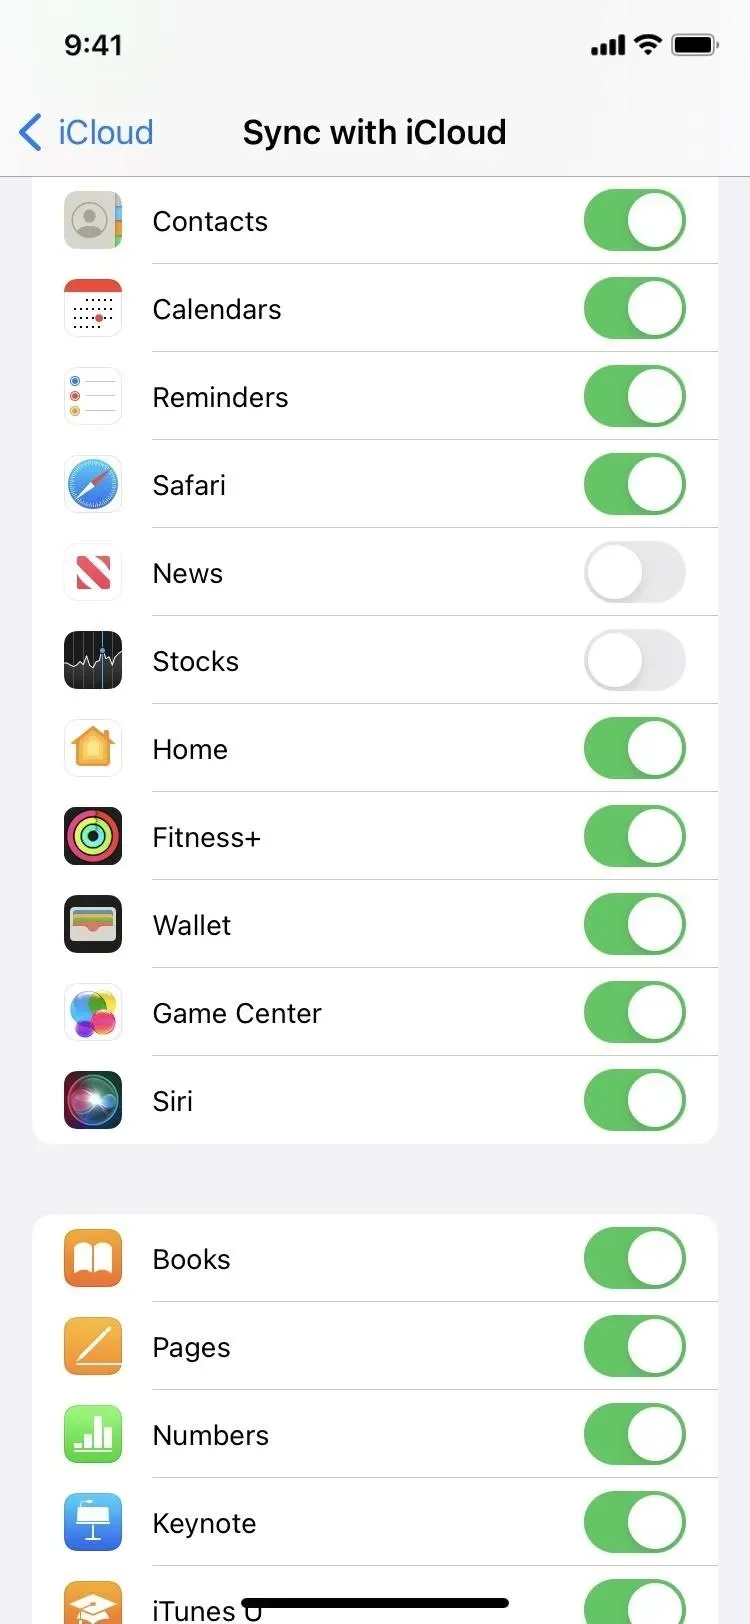
You can also sync some data to iCloud from additional apps, including other Apple apps such as Pages, Numbers, Keynote, GarageBand, iMovie, Clips, iTunesU, Music Memos, Support, and Trailers. Many third-party apps also let you sync certain types of information with iCloud.
Before you continue, make sure all content has enough time to sync to iCloud. For example, if you just turned on iCloud Photos and you have about 200GB of content, wait until Photos runs out before reverting to the iOS or iPadOS 16 beta.
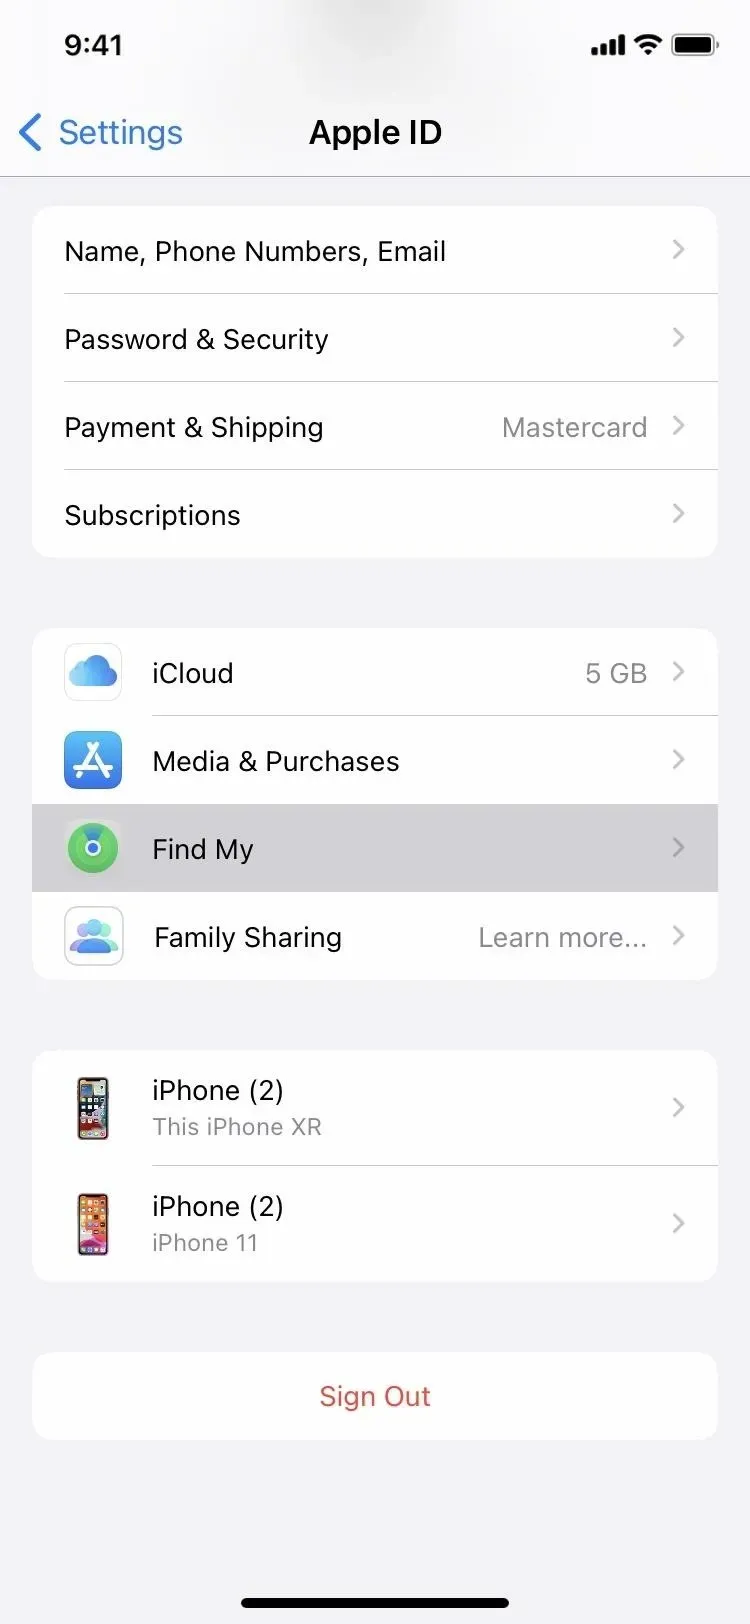
Disable the “Find”feature (optional)
Later in this guide, Apple may automatically prompt you to disable Find My on your iPhone or iPad. If this is not the case and Activation Lock is enabled, you will need to enter your Apple ID and password after restoring your device when the message “iPhone [or iPad] is owner locked”appears.
However, you can take care of it right now to prevent possible crashes if something goes wrong. You may have had to complete this step before if you’ve ever taken your iPhone or iPad to an Apple Store for a replacement or repair.
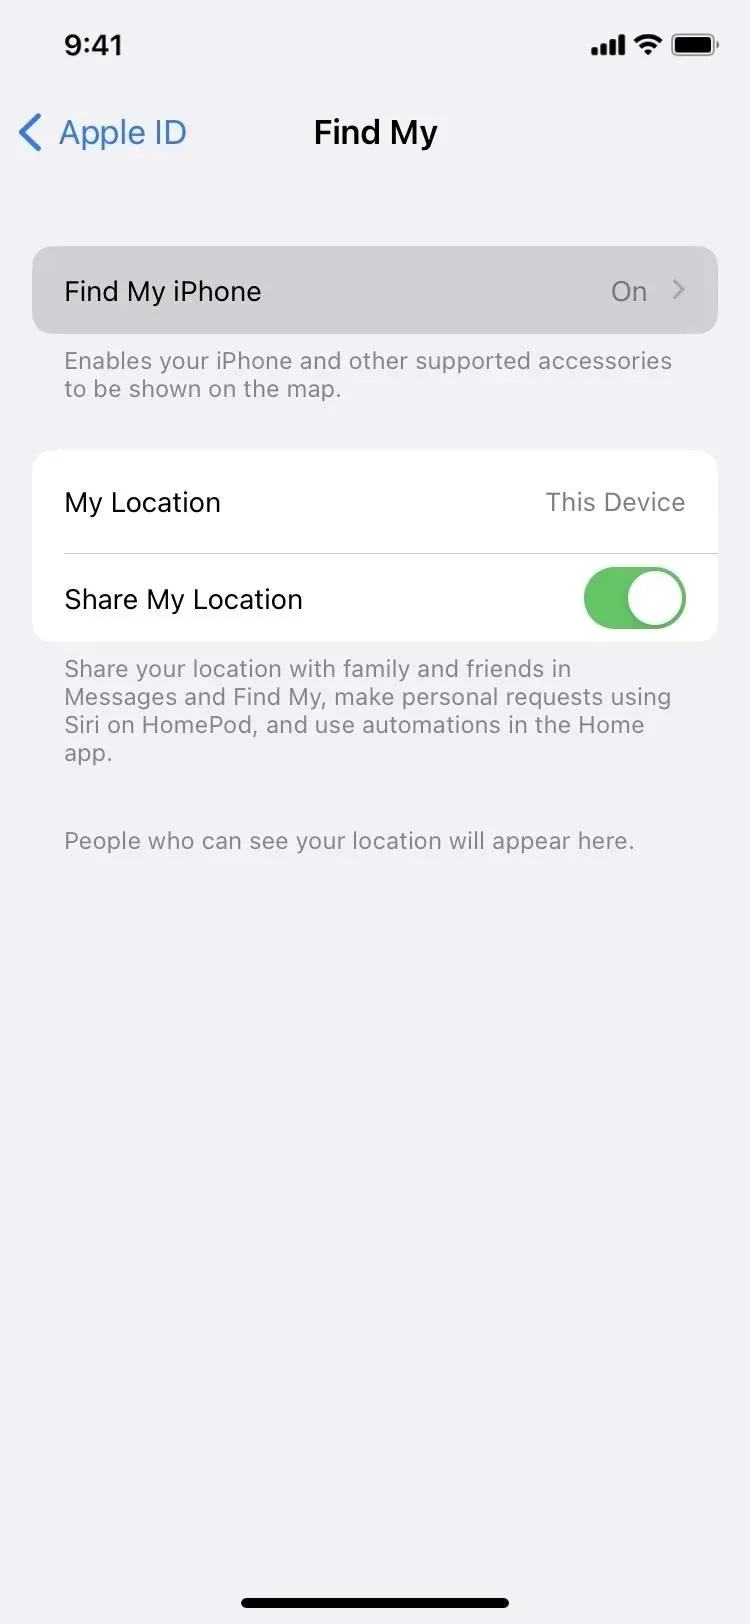
Go to “Settings”-> [your name] -> “Find”-> “Find iPhone”or “Find iPad”. Then turn off the toggle for Find My iPhone or Find My iPad and enter your Apple ID password to disable the feature.

Connect your iPhone to your computer
Finally, connect your iPhone or iPad to your computer and trust the device. Make sure you are using a genuine or high quality USB-C to Lightning, USB-A to Lightning, USB-C to USB-A, or USB-C cable, as a damaged, counterfeit, or non-certified Lightning cable can interfere with or even stop the downgrade process. Below are a few recommended cables if you need them.
If you’re using the DFU mode method to downgrade your iPhone or iPad, you may not want to use an Apple USB-C cable. Apple is rumored to have disabled the ability to enter DFU mode for some of its USB-C cables. So you can use a third party cable or an Apple cable that doesn’t have a USB-C connector if you run into problems.
USB-C to Lightning cables:
- Anker Powerline III: 6ft ($26.99) or 3ft ($21.95) – Favorite
- Belkin BoostCharge Pro Flex: 6.6′ ($29.99) or 10′ ($34.99)
- Apple: 6.6 feet ($29) or 3.3 feet ($19)
USB-A to Lightning cables:
- Anker Powerline II: 6ft ($13.99) or 3ft ($13.99)
- BoostCharge Pro Flex: Belkin 10ft ($29.99) or 6.6ft ($24.99)
- Apple: 6.6 feet ($24.99) or 3.3 feet ($15.99)
USB-C cables for iPad:
- Anker Powerline III: 6ft ($16.99)
- Apple: 6.6 feet ($19) or 3.3 feet ($19)
USB-C to USB-A cables for iPad:
- Anker Powerline II: 3ft ($19.99)
- Mophie: 3.3 feet ($11.99) or 6.6 feet ($15.99)
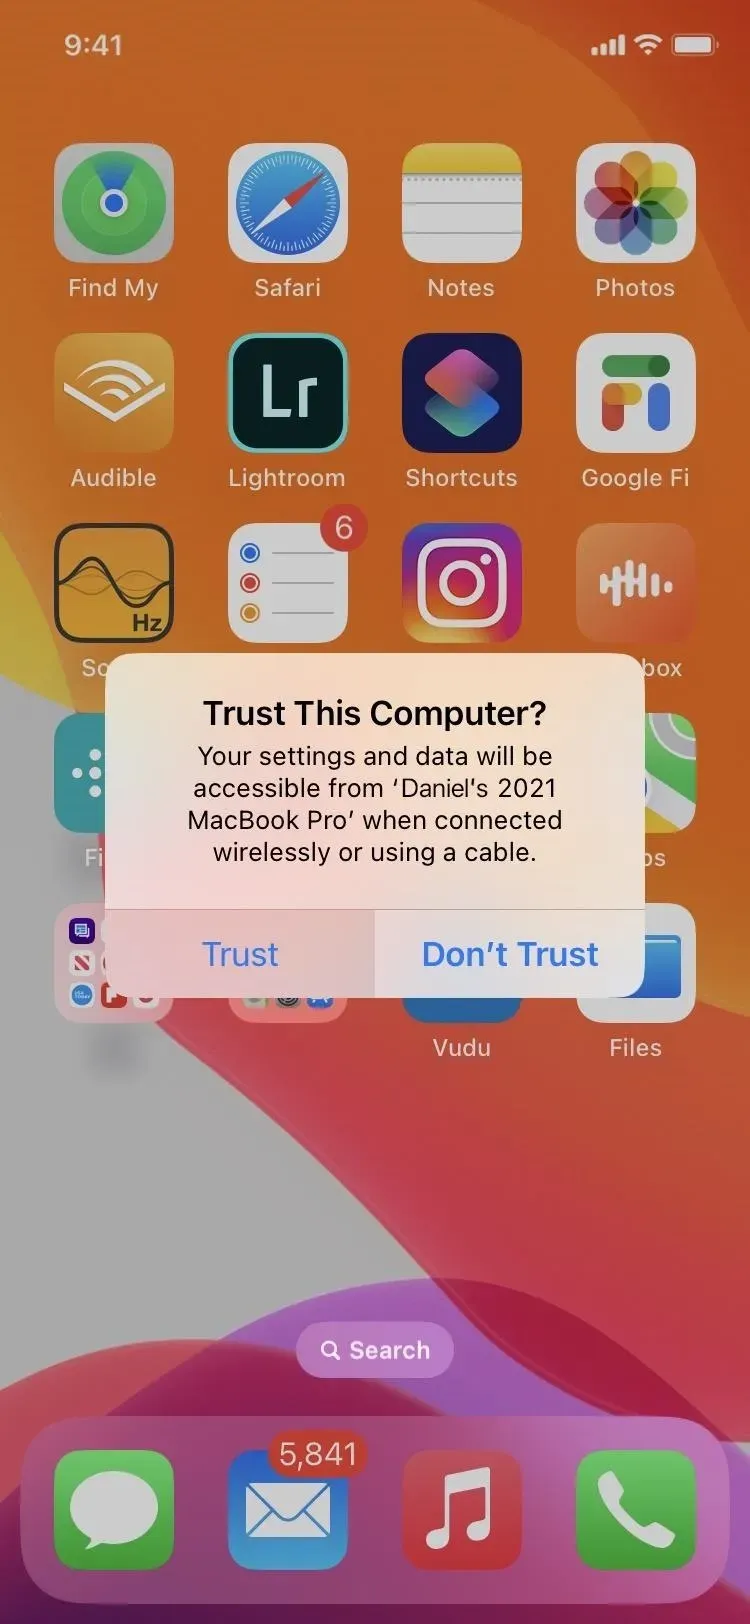
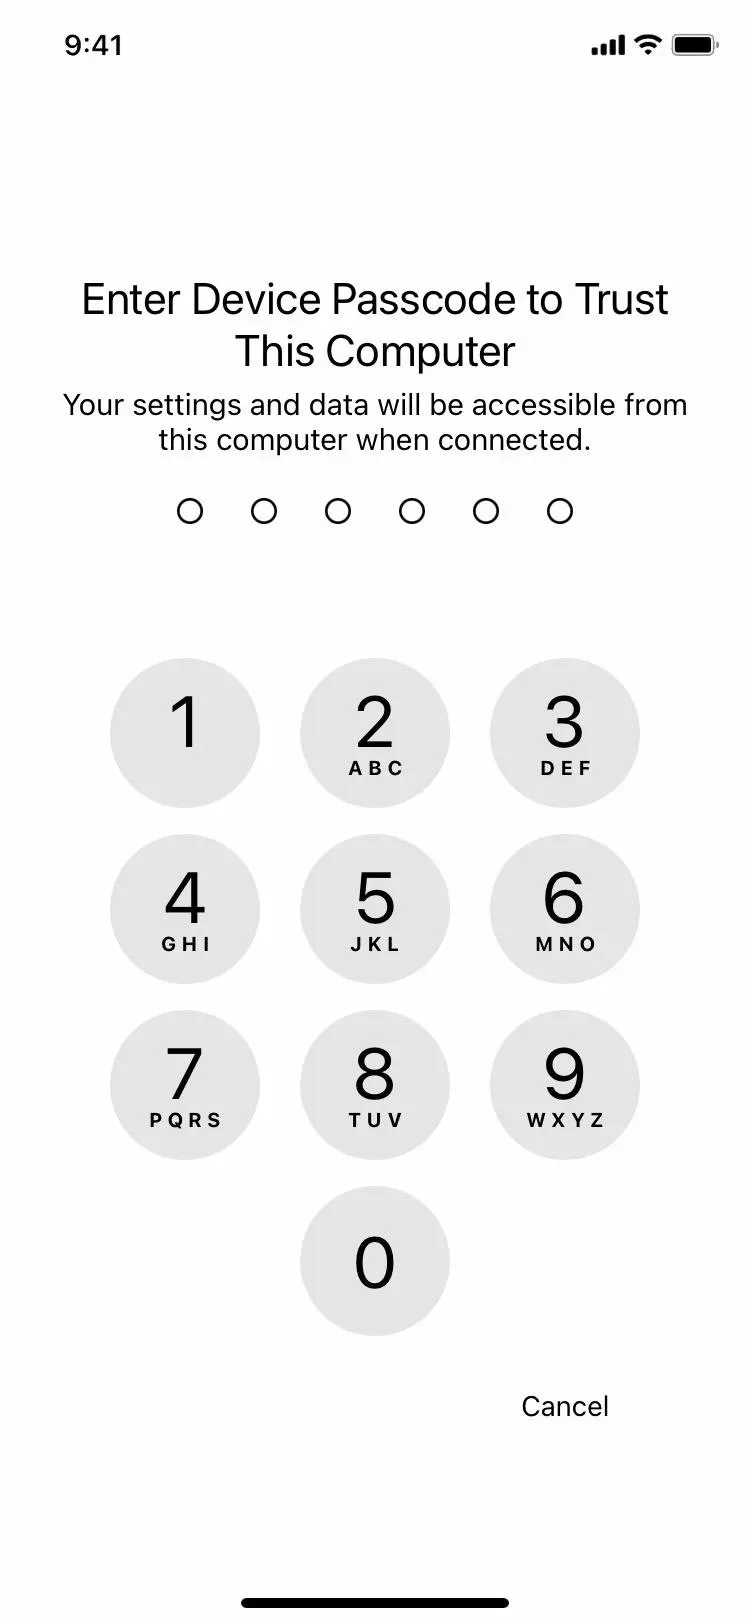
When your computer detects your iPhone or iPad, you need to trust it. On macOS, select your device model in the Finder sidebar and click Trust. On Windows, select your device in iTunes and do the same.
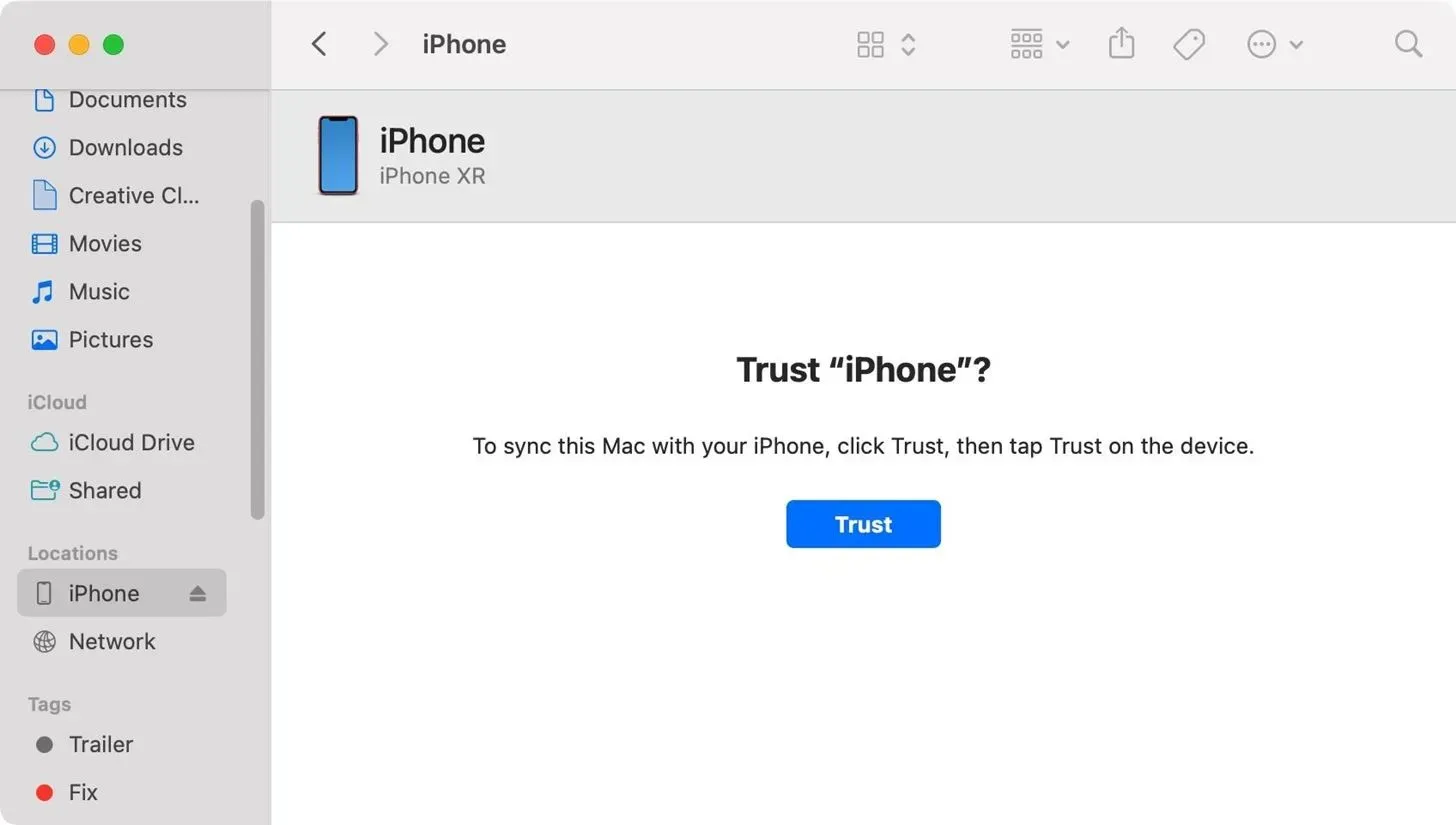
Then unlock your iPhone or iPad, click Trust, and enter your iPhone or iPad passcode.
Put your iPhone into recovery or DFU mode.
There are two ways to restore your iPhone or iPad to the latest stable software: using recovery or DFU mode. The recovery option is the easiest method that Apple recommends. This can be helpful if your computer cannot recognize your device or your device is stuck on the Apple logo. However, it only factory resets your device to the latest stable version of the software.
DFU, or a device firmware update, can also help in these situations, but it does restore from a deeper part of your iPhone or iPad. This can give you better results and it can help if your device has a corrupted bootloader as it installs everything from scratch.
Another plus of DFU mode over recovery mode is that it can downgrade your device to a lower stable version, while recovery mode only uses the latest stable version. For example, if you want to upgrade to iOS 15.5 but Apple releases iOS 15.5.1, you can upgrade to iOS 15.5 while Apple is still signing it.
DFU mode is more difficult to start than recovery mode.
Use recovery mode
To put your iPhone or iPad into recovery mode, use the button combination below for your specific iPhone or iPad model.
- iPhone: Quickly press the volume up button, quickly press the volume down button, and then press and hold the side button until the recovery mode screen with a picture of a cable to your computer appears, which will be after the screen with the Apple logo.
- iPad with Face ID: Quickly press the volume button closest to the top button, quickly press the other volume button, and then press and hold the top button until you see the recovery mode screen with a picture of a cable to your computer, which will be after the screen with the Apple logo.
- iPad with Home button: Press and hold the Top and Home buttons at the same time until you see the Recovery Mode screen with a picture of a cable to your computer, which will be after the screen with the Apple logo.
When you see the recovery screen on your iPhone or iPad, a Finder window should appear with the device already selected, and you should see a “There’s a problem…”prompt. Click “Restore”here.
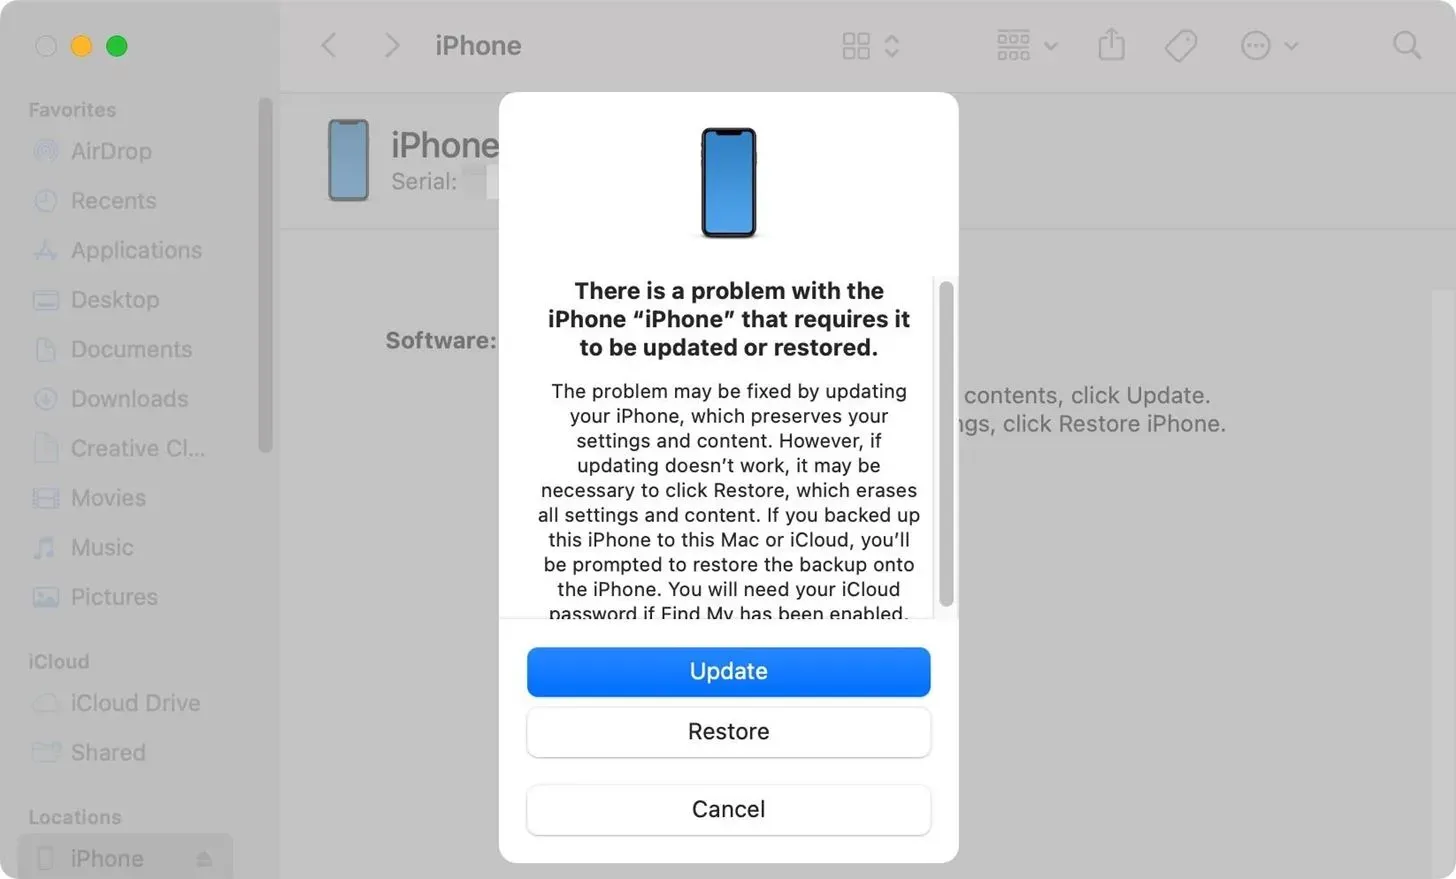
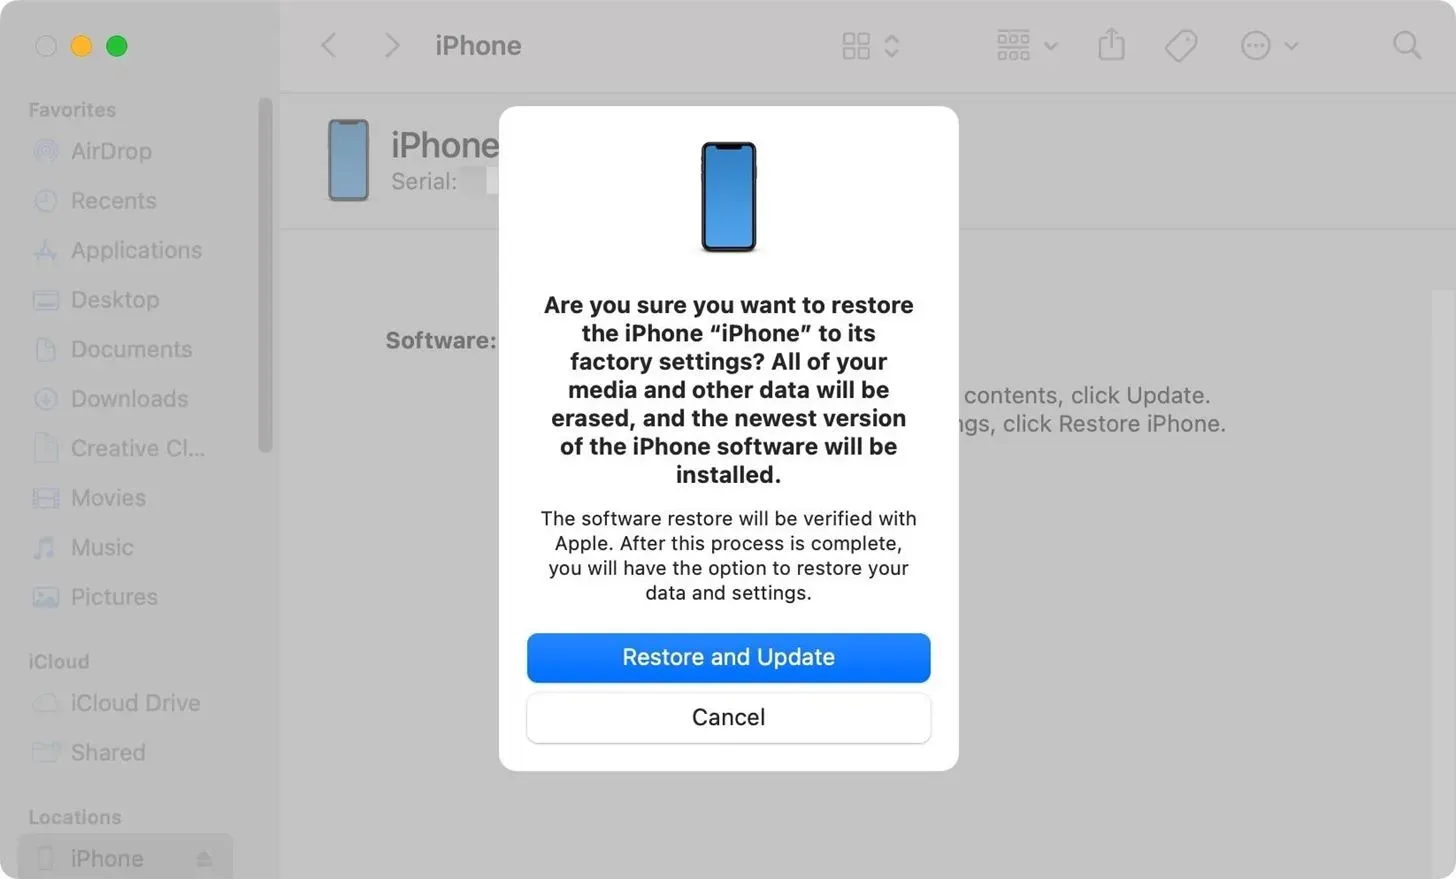
It will then ask you if you are sure you want to factory reset your device. Click “Restore and Update”.
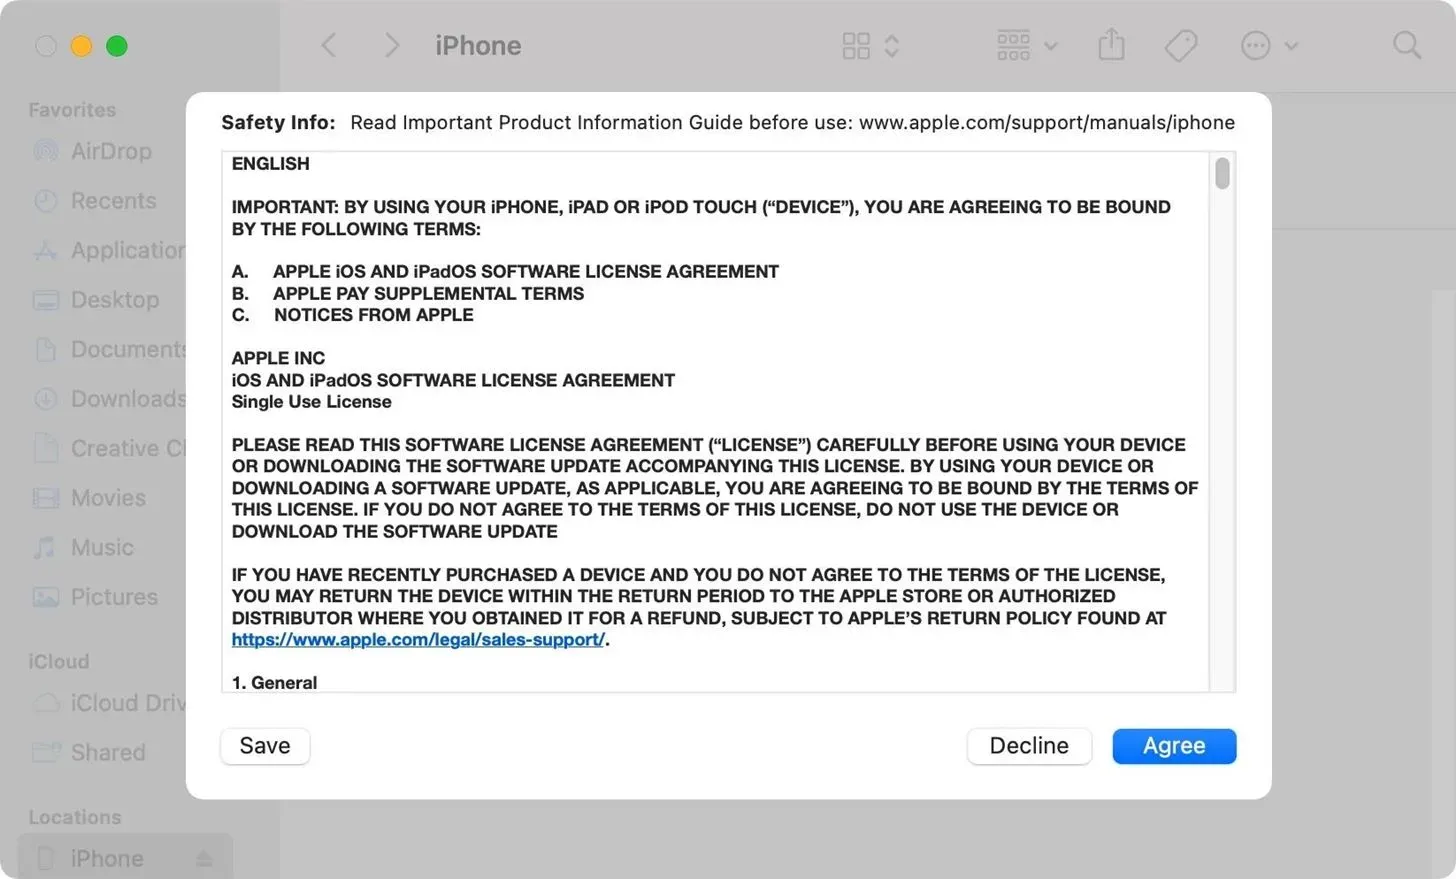
If you see the iOS 15.5 or iPadOS 15.5 New Features screen, click Next.

Then click Agree when the terms appear.
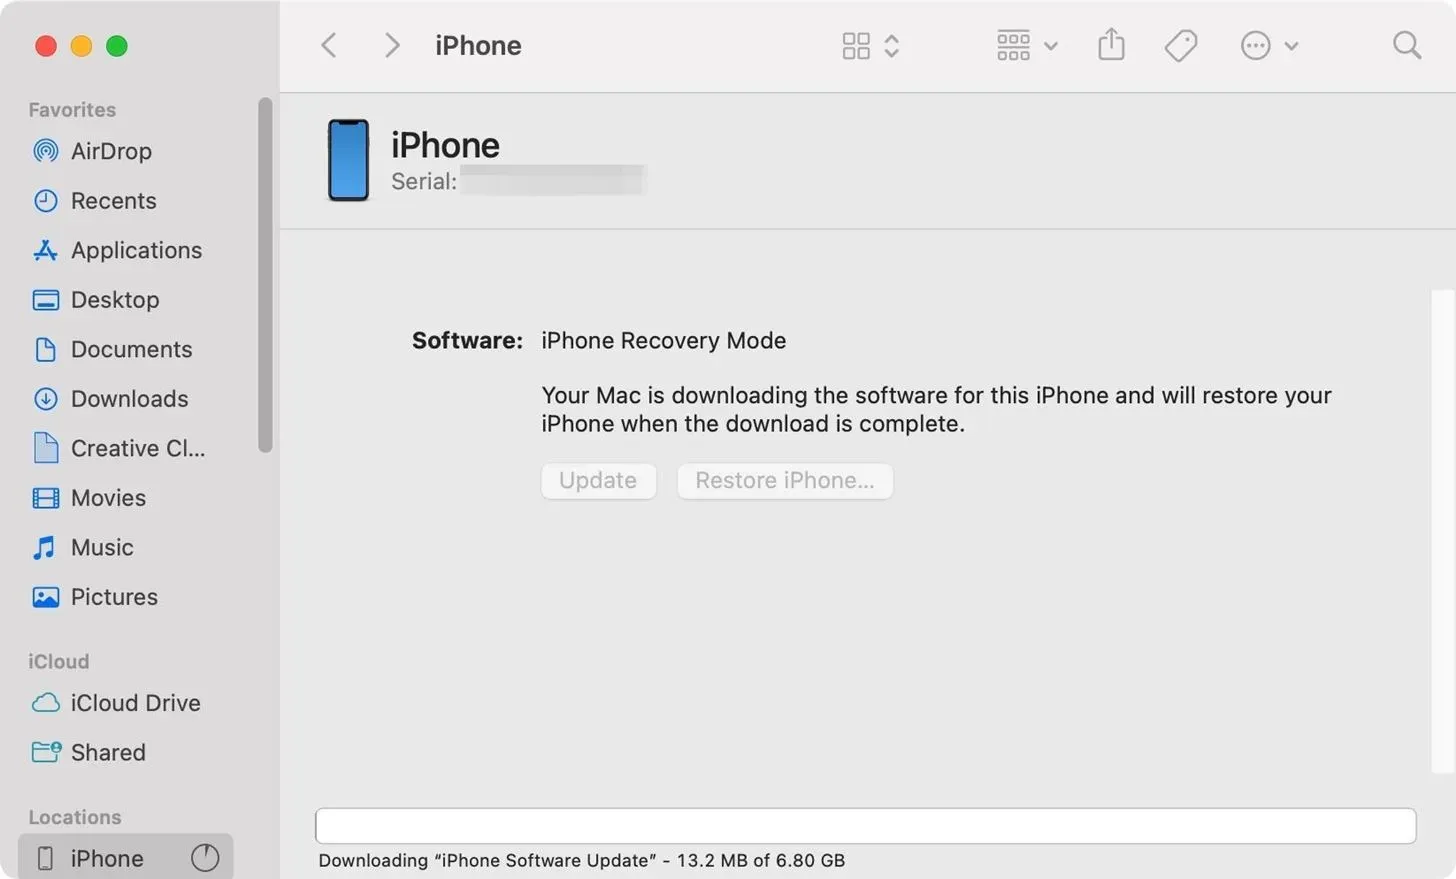
Your computer will start downloading the latest stable version of iOS or iPadOS and install it automatically. If it takes more than 15 minutes and your device exits the recovery screen, you will have to enter recovery mode as before and try again.
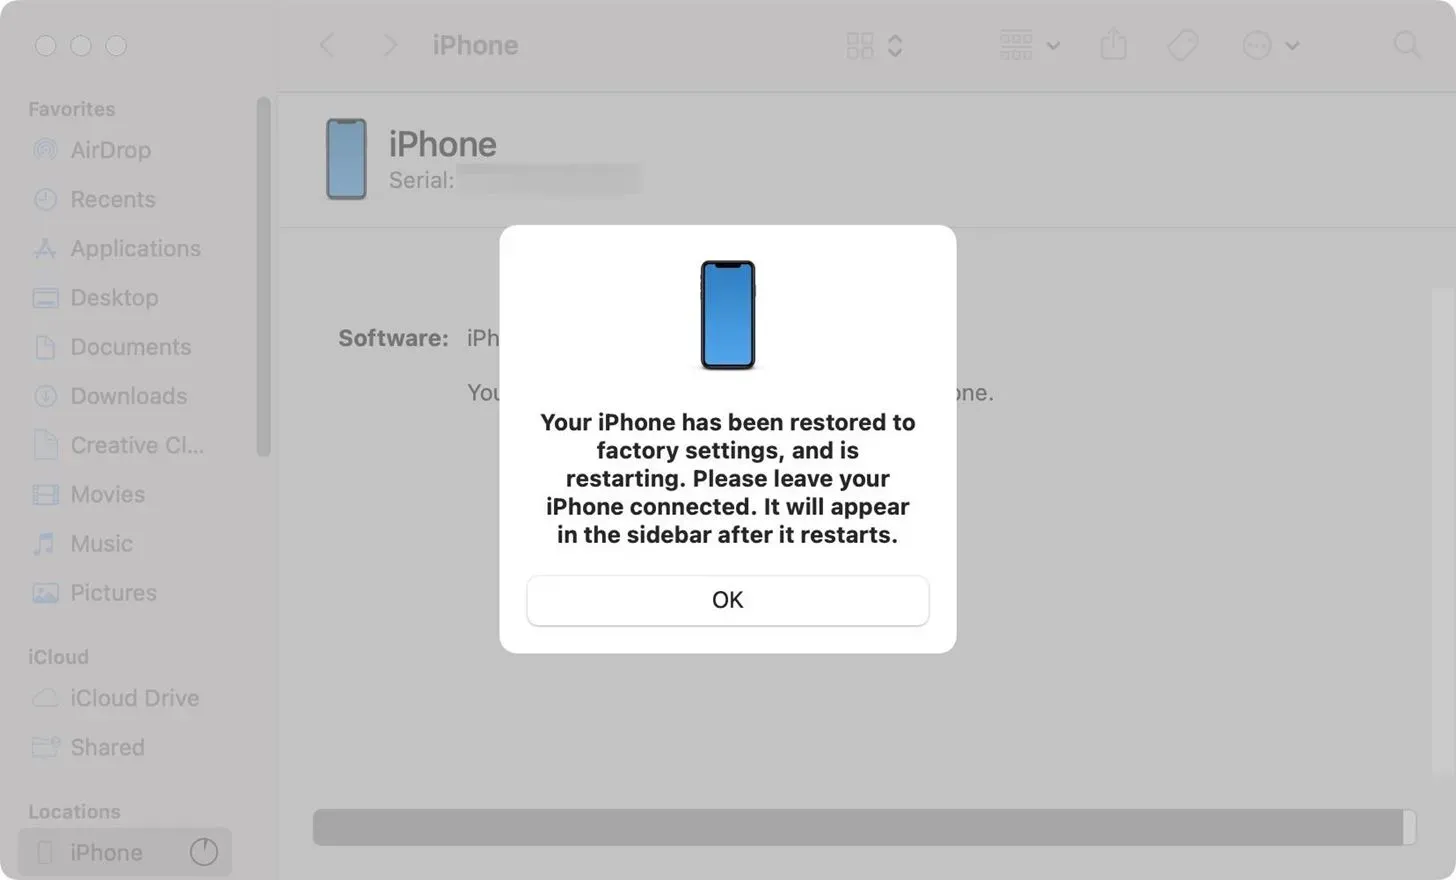
You should be notified in Finder that the restore was successful. Skip to step 6 below to set up your iPhone or iPad.
Use DFU mode
To put your iPhone or iPad into DFU mode, use the button combination below for your specific iPhone or iPad model. However, first make sure your iPhone or iPad is showing up in Finder or iTunes to make sure you have a good connection.
- iPhone: Quickly press the volume up button, quickly press the volume down button, and then press and hold the side button until the screen goes black. Then release the side button and immediately press and hold the side button and volume down button together for five seconds. Then release the side button and keep holding the volume down button.
- iPad with Face ID: Quickly press the volume button closest to the top button, then press the other volume button, then press and hold the top button until the screen goes black. Then release the top button and immediately press and hold both the top button and the volume button furthest away from the top button together for five seconds. Then release the top button and keep holding the volume button.
- iPad with Home button: Press and hold the top button and the Home button at the same time for 8-10 seconds, then release the top button and continue holding the Home button.
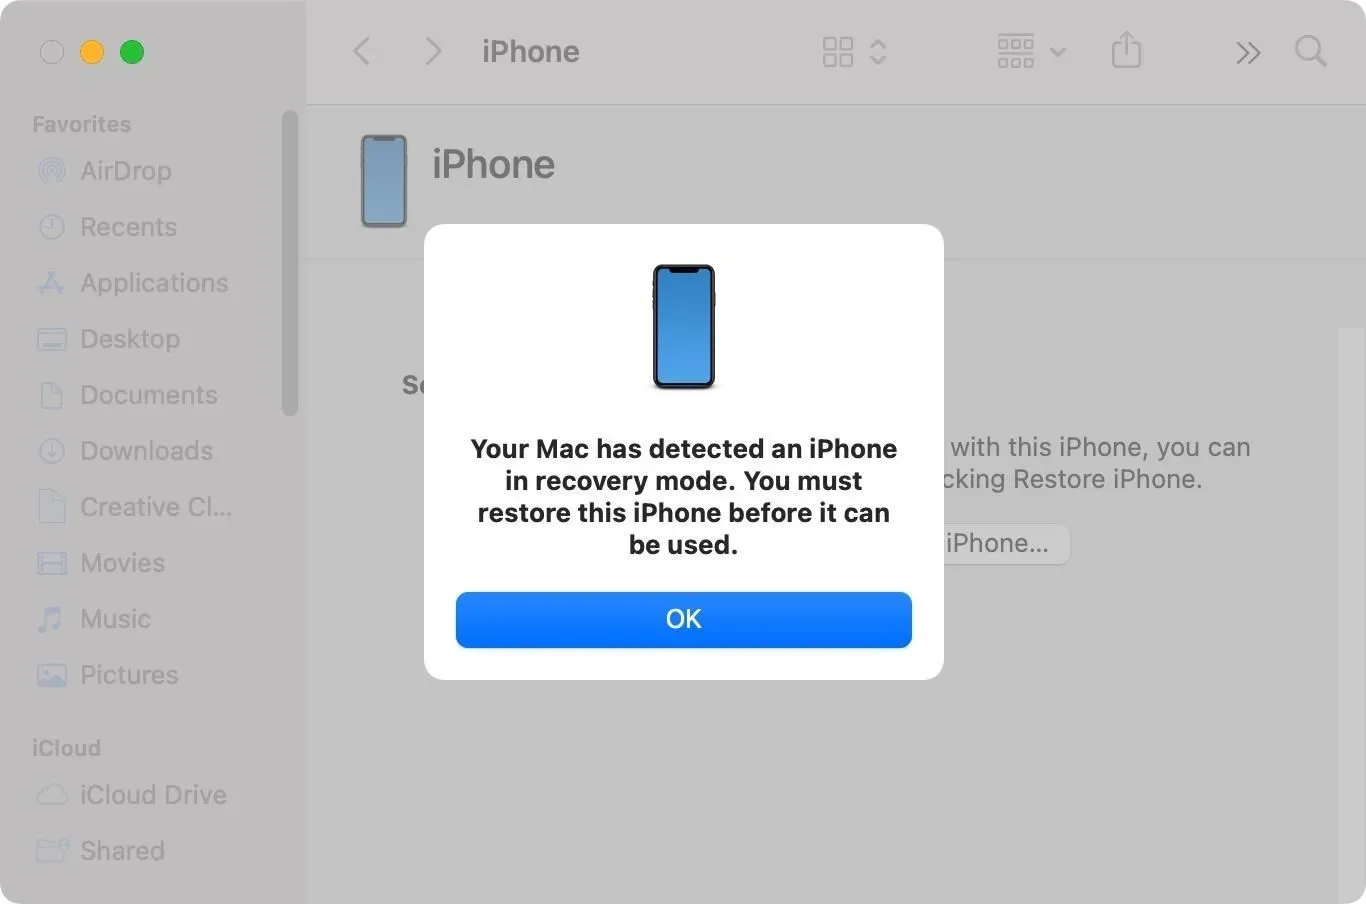
Release the button when you see “Your Mac has detected an iPhone [or iPad] in recovery mode”in Finder or iTunes. Unlike recovery mode, your iPhone or iPad screen will remain black. If you see the Apple logo, try again or try a different cable.
Click “OK”when you see the prompt and you’ll see the recovery mode screen in Finder or iTunes.
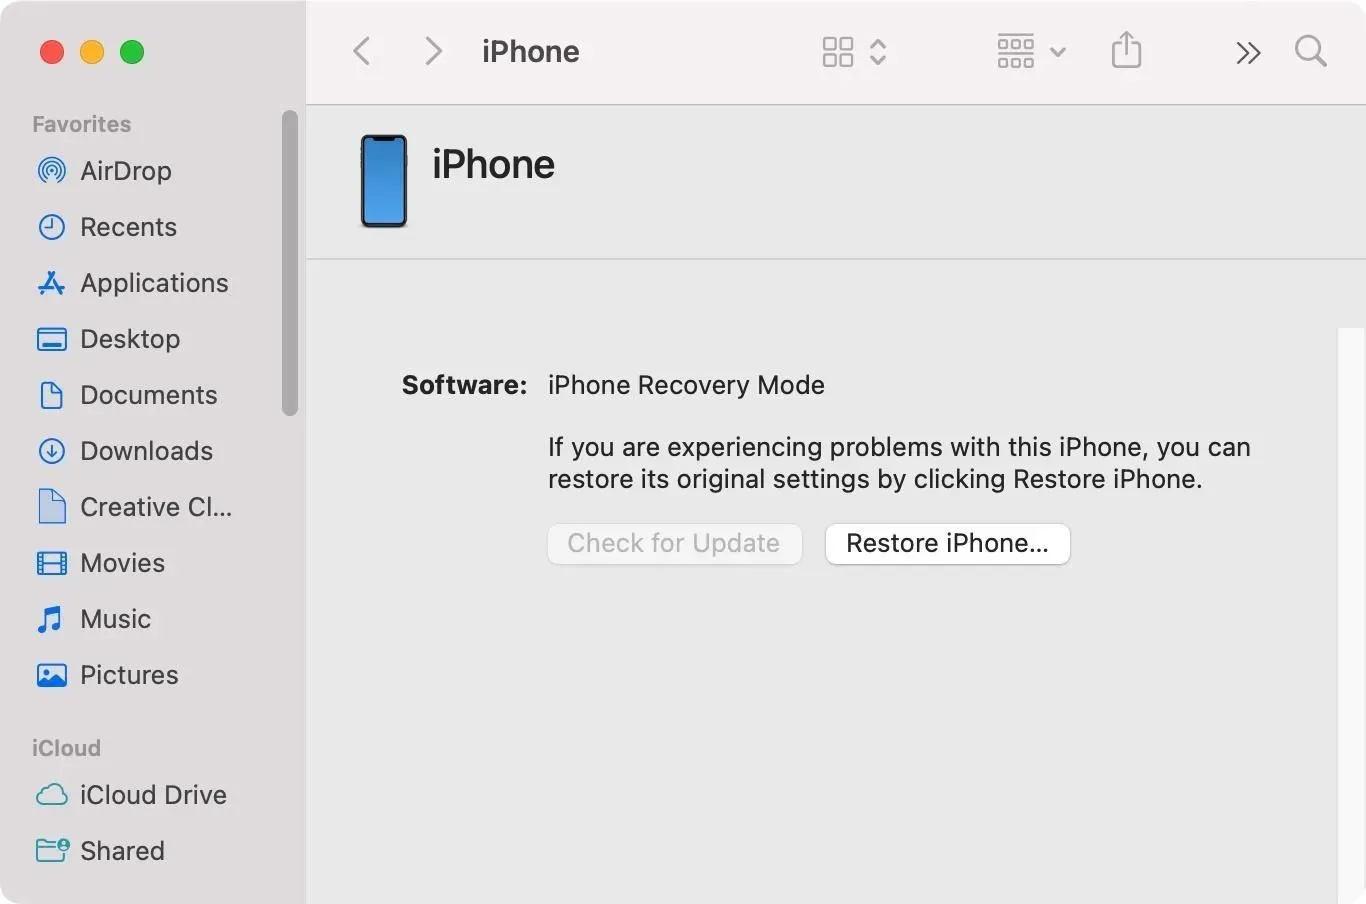
From here, you can click “Restore iPhone”or “Restore iPad”and you can follow the above recovery mode instructions from the moment you click “Restore and Update”.
However, if you downloaded the recovery image from step 1, you will need to hold down the Option (on Mac) or Shift (Windows) key while clicking Restore iPhone or Restore iPad. When the file picker appears, select the recovery image you downloaded in step 1 and click Open.
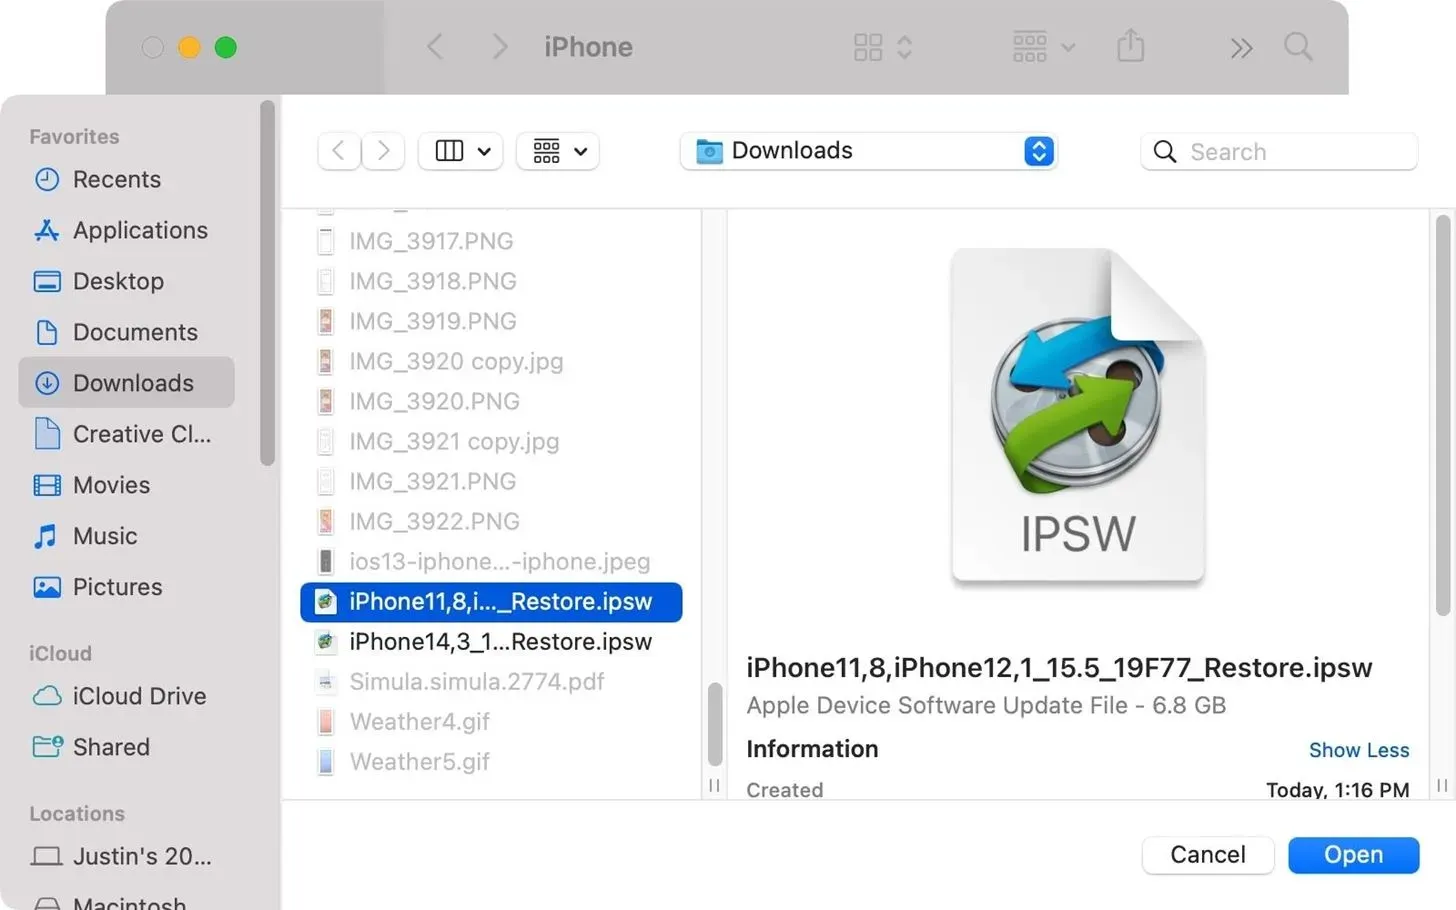
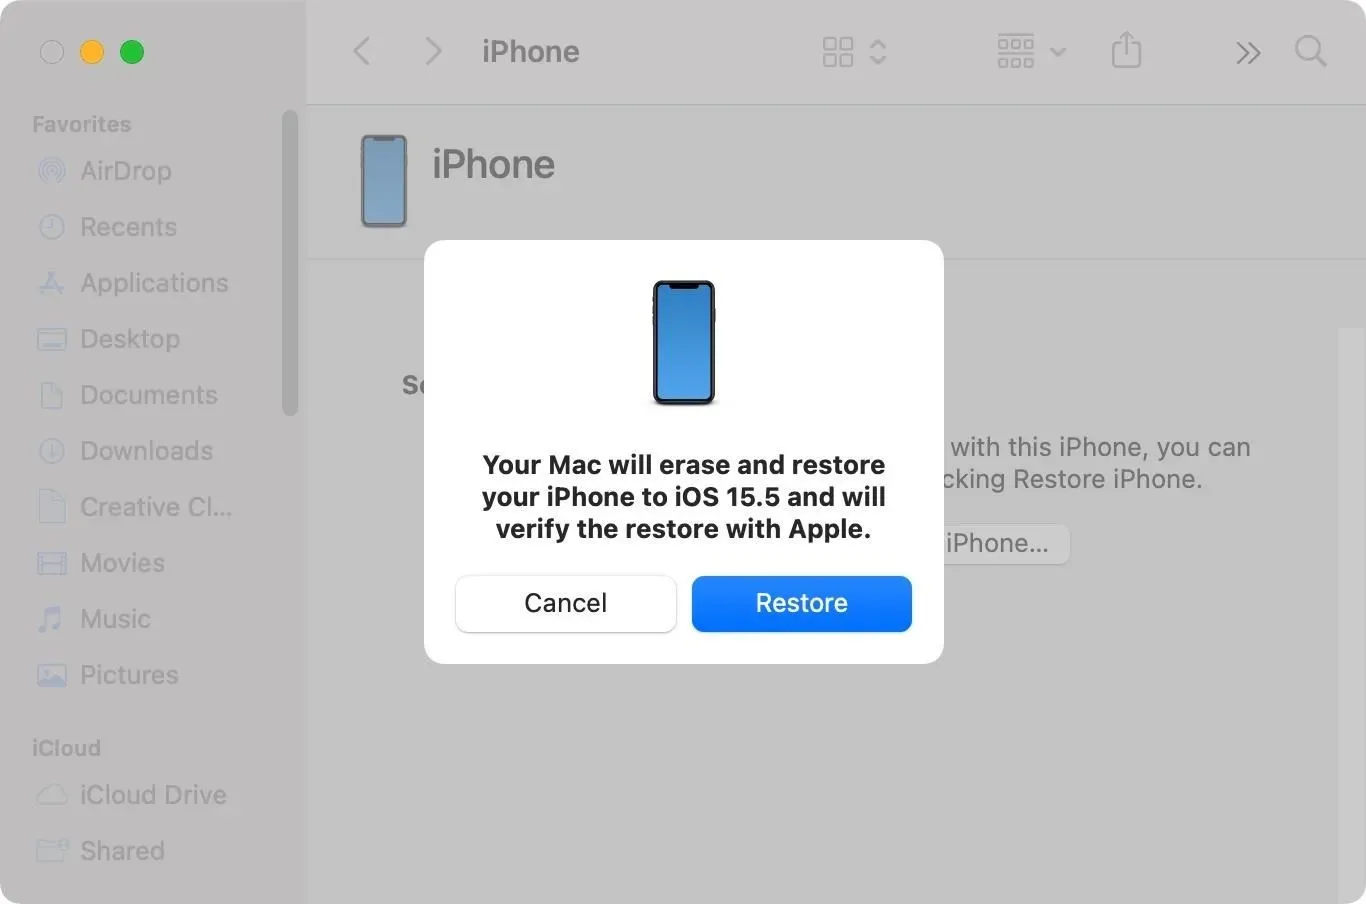
It will then warn you that your device will be wiped and restored to your chosen iOS or iPadOS version. Click “Restore”to start the process.
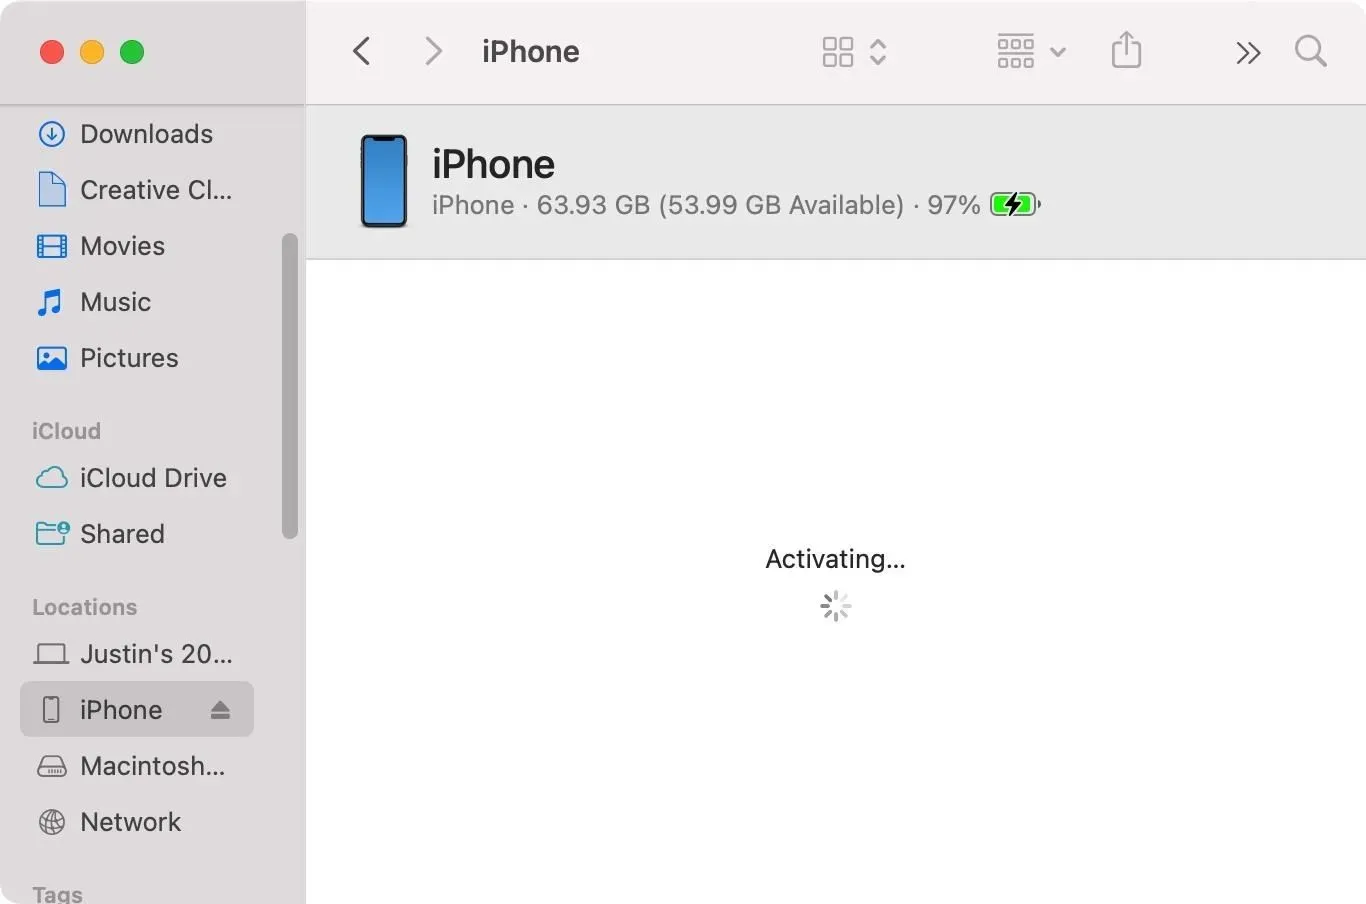
It will extract the software from the IPSW file, prepare your iPhone or iPad for the software, and then restore your device. During the process, you should see the Apple logo on your iPhone or iPad.

You may not be notified in the Finder that the recovery was successful, as you would in normal recovery mode. However, your iPhone or iPad must be turned on and you can select your device again in Finder or iTunes. Skip to step 6 below to set up your iPhone or iPad.
Set up your iPhone or iPad
With your iPhone or iPad back up with iOS or iPadOS 15.5 software, it’s time to set it up. This step should be familiar to you because it will be very similar to when you bought your device.
A little trick I learned when setting up cellular devices is that when it asks you to enter your Wi-Fi password, scroll down and click “Use Cellular Data”(if you have enough data). This saves you from manually entering your Wi-Fi password, and when you sign in to your iCloud account on your device, it should remember your Wi-Fi password while you synced Keychain Access to iCloud.
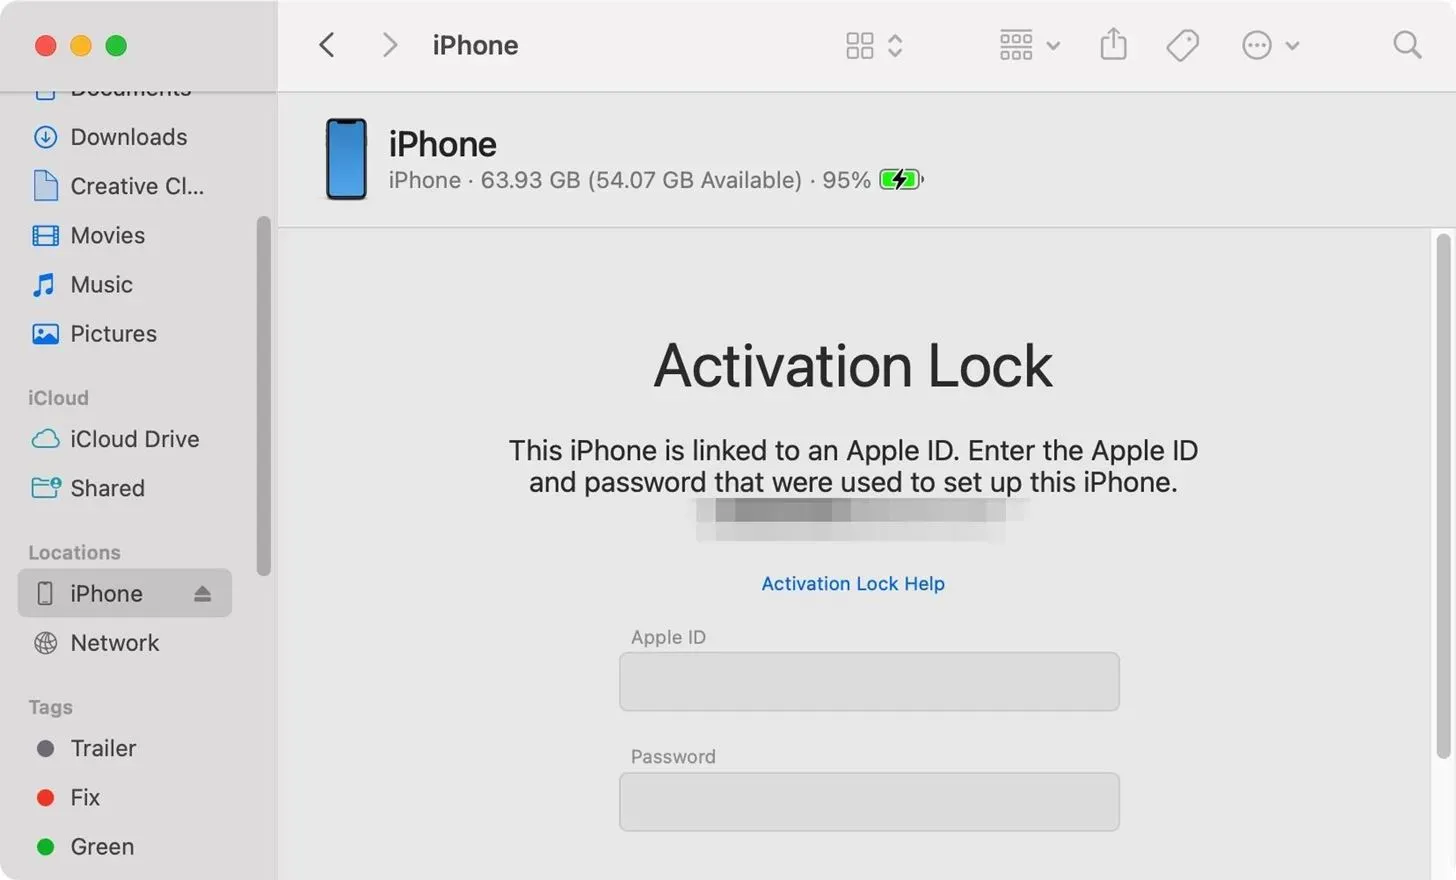
If you didn’t turn off Find My in step 3, Activation Lock may still be enabled and you’ll need to enter your Apple ID and password after restoring your device when the “iPhone [or iPad] is owner locked”message appears. You can then enter your credentials in Finder, iTunes, or on your iPhone or iPad.
When it asks how you want to transfer apps and data, you can choose:
- “Restore from iCloud Backup”if you have an iOS or iPadOS 15.5 backup but not beta. If you turned off iCloud backup before installing the beta, you might have a good backup.
- “Restore from Mac or PC”if you have an archived iOS or iPadOS 15.5 backup or a backup that hasn’t been overwritten by the beta.
- “Transfer directly from iPhone [or iPad]”if you have another device on which you would like to try the Quick Launch process.
- “Don’t transfer apps and data”for a clean slate or if you don’t have a good backup or other device to use Quick Start.
When you complete the rest of the steps, you will be back to the latest public software. Congratulations!
Leave a Reply