How to Check Chromebook Specs, CPU Usage, and More

Unless you’re a frequent ChromeOS user, determining the specs of a Chromebook in hand can be tricky. Many Chromebook users find it easy enough to use their computers to browse the web and therefore don’t often need to check things like the processor model or memory usage. As a result, this information may seem a bit hidden.
But sometimes you want to know how much RAM a Chromebook is using, what kind of processor it has, whether it’s maxing out its cores, or how much memory is left. Whether you’re troubleshooting a slower Chromebook, telling someone about their ChromeOS device, wondering if a Chromebook can support Steam, or just want to get to know a Chromebook better, here are the easiest ways to take a look at a Chromebook’s main hardware specs.
How to Check Your Chromebook’s CPU Usage
If your Chromebook is running slowly, it can be helpful to check your CPU usage to see how processor intensive it is and what apps it’s using that are the most burdensome.
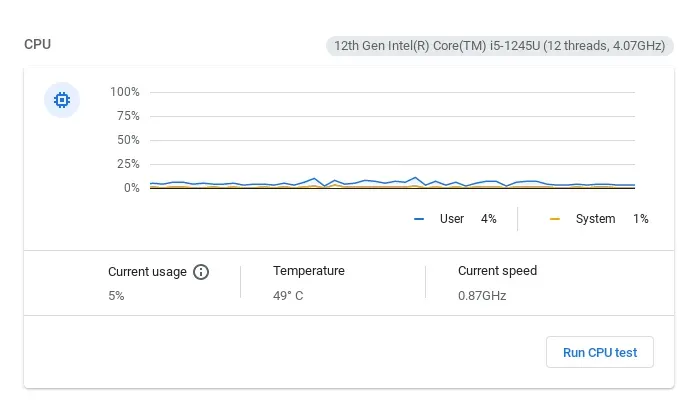
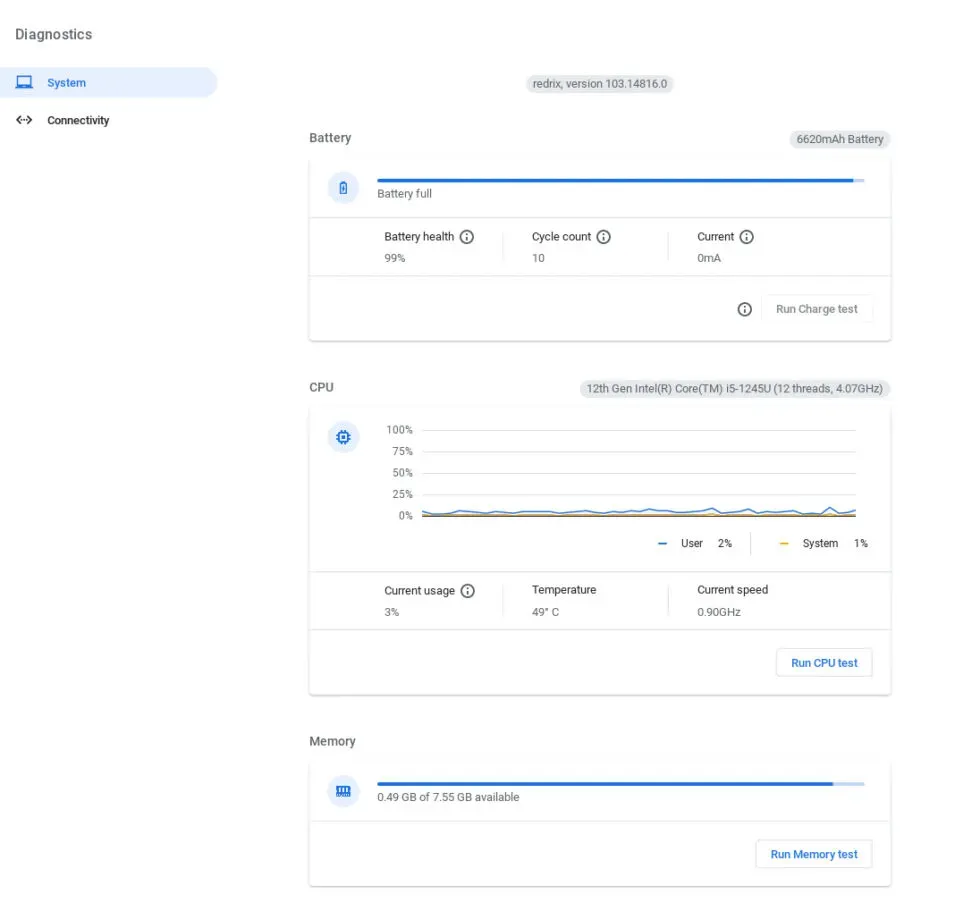
One of the easiest ways to do this is to go to the Diagnostics page in Settings. You can easily find it by typing “Diagnostics”in the ChromeOS search bar and opening the settings section that appears. Once there, you’ll see a live graph showing CPU usage, as well as temperature and current speed.
You can also check the CPU usage by going to the ChromeOS Task Manager. To access Task Manager, press Search + Esc.
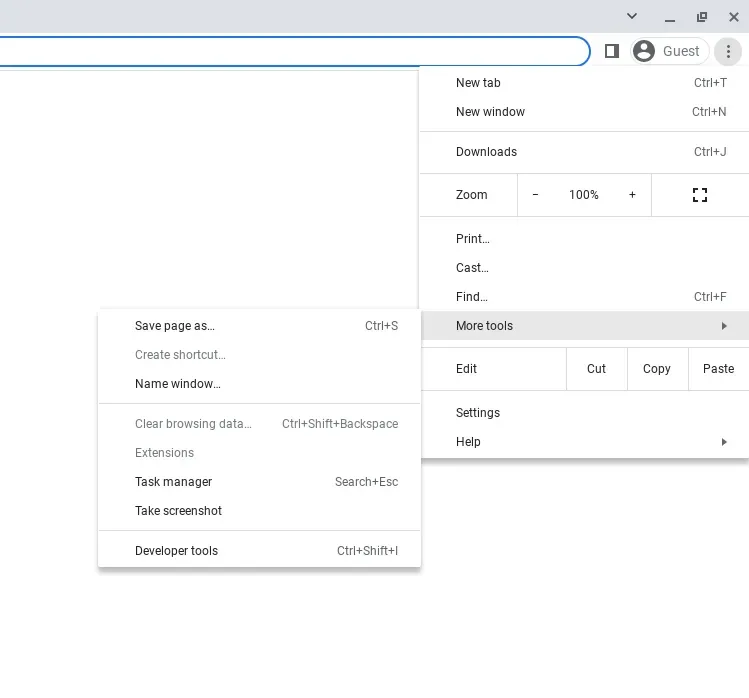
If you have forgotten this keyboard shortcut, you can also access the Task Manager via Google Chrome by clicking on the three dots in the top right corner and then selecting More Tools -> Task Manager.
Task Manager has a large amount of information about the device, including information about CPU usage, as well as memory and network usage.

How to Enable Hyper-Threading on a Chromebook
Not all Chromebooks have an Intel processor with Hyper-Threading support, but even if you do, there’s a good chance the feature is disabled by default. Google started disabling Intel Hyper-threading on Chromebooks in 2019 due to concerns about Micro Architectural Data Sampling (MDS) vulnerabilities. “If Chrome processes are attacked, this sensitive data may include website content, as well as passwords, credit card numbers, or cookies. The vulnerabilities could also be exploited to read host memory from within a virtual machine, or for an Android application to read privileged process memory (such as a master key),”the Google Chromium page says. As of May 2019, Google has stated that it is not aware of any active MDS exploit. You can search Google’
If you’ve determined it’s worth the risk involved (and if the Chromebook is a work device, in accordance with your IT department’s policies), here’s how to enable Hyper-threading on a supported Chromebook with an Intel processor:
First, make sure you’re running Chrome OS 74 or later.
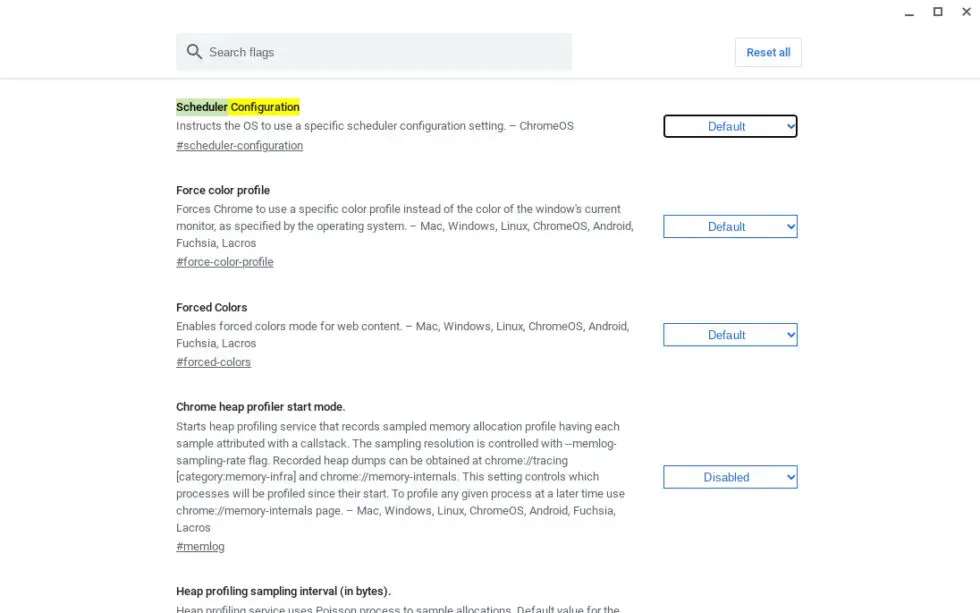
Then type “chrome://flags#scheduler-configuration”in your Chromebook’s Chrome browser and press Enter.
A window with “Scheduler Configurator”will appear at the top. There you can enable or disable Hyper-threading or restore the default settings.
After you change the setting, you will have to restart your Chromebook for the setting to take effect.
The Google Chromium page also says that IT leaders can set an organization’s Hyper-threading policy using the “SchedulerConfiguration”corporate policy.
How to Enable GPU Rasterization on Chromebook
Your Chromebook’s CPU likely has the GPU Rasterization feature, which offloads some of the machine’s workload from the CPU to the GPU to free up CPU resources, is disabled. According to PC reviews and the Laptop news site, Google is doing this to improve battery life.
If you’d rather risk a shorter battery life for GPU rasterization, type “chrome://flags”in your Chromebook’s Chrome browser and press Enter.
Search for “GPU Rasterization”on the page that appears (you can search in the bar at the top of the page).
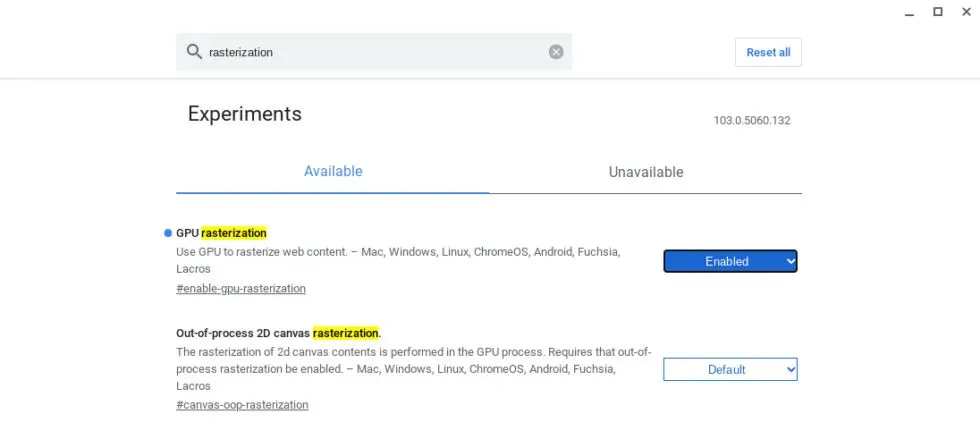
Once there, you can enable, disable GPU rasterization, or restore the feature’s default settings.
What processor does my Chromebook have?
If you’re troubleshooting a ChromeOS device for a less tech-savvy family member or friend and asking them about the machine’s processor, there’s a good chance you’ll be met with a blank stare.
There are two options we would like to use to check the Chromebook’s processor. One of the easiest ways to do this is to go to the Diagnostics page in Settings, which we talked about earlier. Again, the quickest way to get to the diagnostics page is to type “Diagnostics”into the ChromeOS search bar and open the settings section that appears.
Alternatively, you can go to Settings -> About ChromeOS -> Diagnostics. You will then get a page with information about the Chromebook’s processor, including the processor model name and the number of threads.
Another way to get the processor name of a Chromebook is to type “chrome://system”into the Chrome browser’s address bar and press Enter. You will see a page that looks like this:
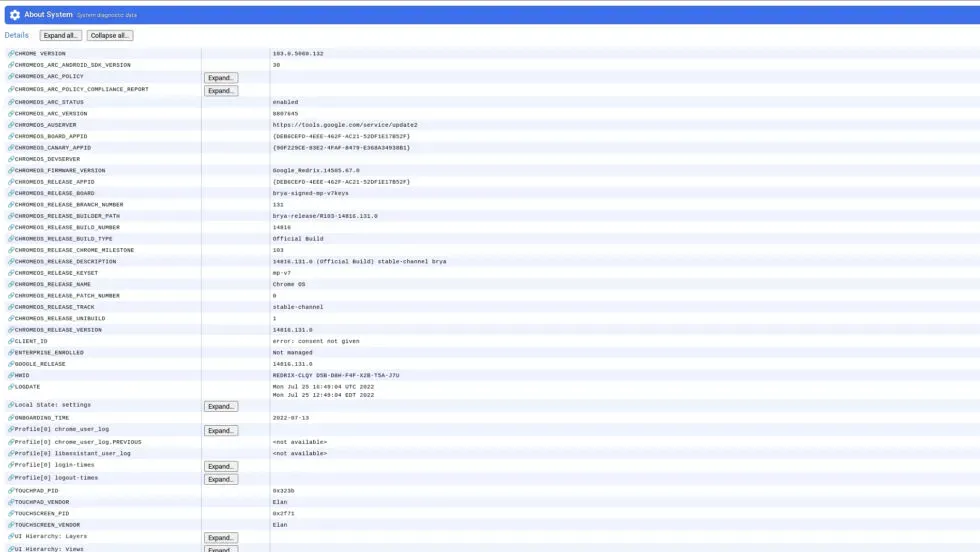
Scroll down alphabetically until you find “cpuinfo”. Once there, click on the “Expand…” button. You will then be able to see the name of the Chromebook’s processor and other information such as cache size.

How to Check Your Chromebook’s RAM Usage
You can also check your current memory usage by visiting the Task Manager. Again, the fastest way to invoke this is to press Search + Esc. The Task Manager lets you view the amount of memory each process has, and there are also options to view information about other components, such as GPU memory.
Because of their browser-based nature, tabs fold easily on a Chromebook. If you’re troubleshooting your Chromebook’s tab storage, or you’re one yourself, you might want to consider a browser extension that manages Chrome tabs to conserve memory, such as OneTab, which is recommended by a laptop, pauses unused browser tabs, and offers a list of paused pages for easy retrieval. There’s also The Great Suspender, which we’ve seen has been recommended by Ars readers and can automatically suspend tabs after a certain amount of time. Of course, be sure to carefully test the applications before installing them on the machine.
How much RAM does my Chromebook have?
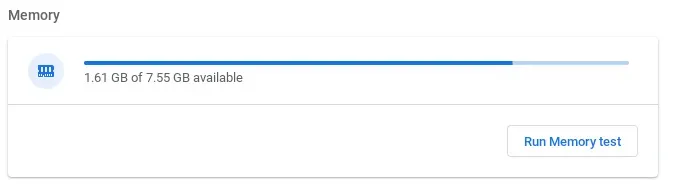
Our preferred way to check your Chromebook’s total RAM (and how much is left) is to visit the Diagnostics page. The quickest way to do this is to type “Diagnostics”in the ChromeOS search bar and then click “Diagnostics”on the page that appears. Once there, at the bottom you will see information about the RAM.
How much memory does my Chromebook have?
As with any laptop, Chromebook storage varies, and options ranging from PCIe 4.0 SSD to eMMC storage are common on modern Chromebooks.
If you’d like to learn more about Chromebook storage, we recommend visiting the About page. Again, to get to the About section, simply type “chrome://system/”into the Chrome address bar and press Enter.
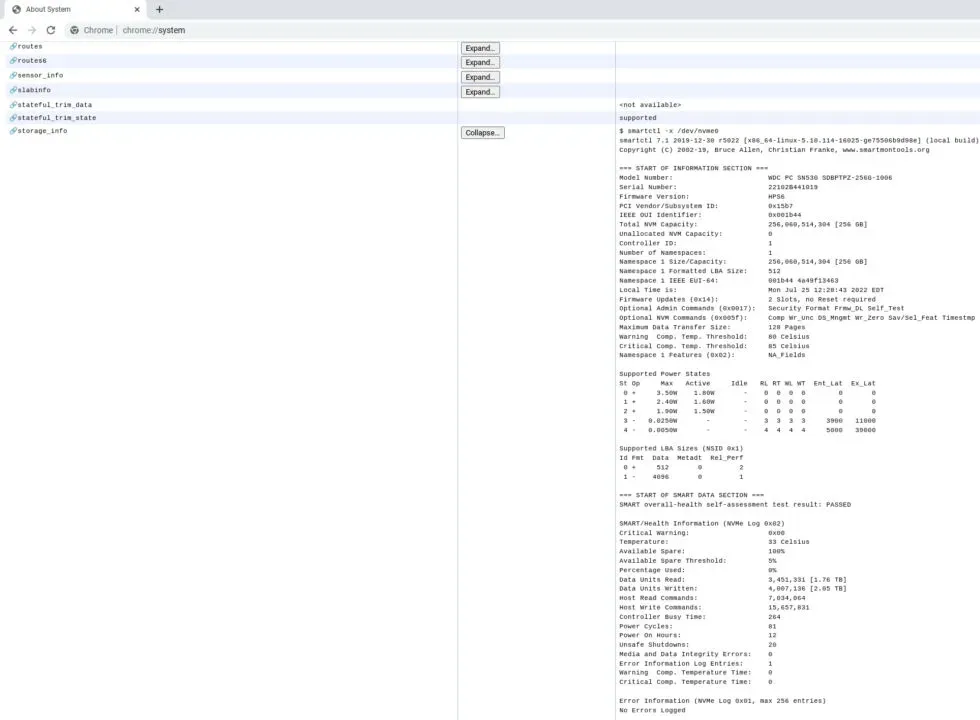
When the page loads, scroll down to “storage_info”and click “Expand…”.
Here you will find other information about the storage, such as the name of the storage model and the maximum capacity.
How much memory is in my Chromebook?
While some Chromebook users may primarily rely on Google Cloud for their files, there are also good reasons to store documents, photos, and other data on the device, and you may also need storage information before downloading the next app.
Memory is one of the easiest pieces of information to find on a Chromebook, but if you’re having trouble, here’s the easiest way to find out how much memory the Chromebook in question has.
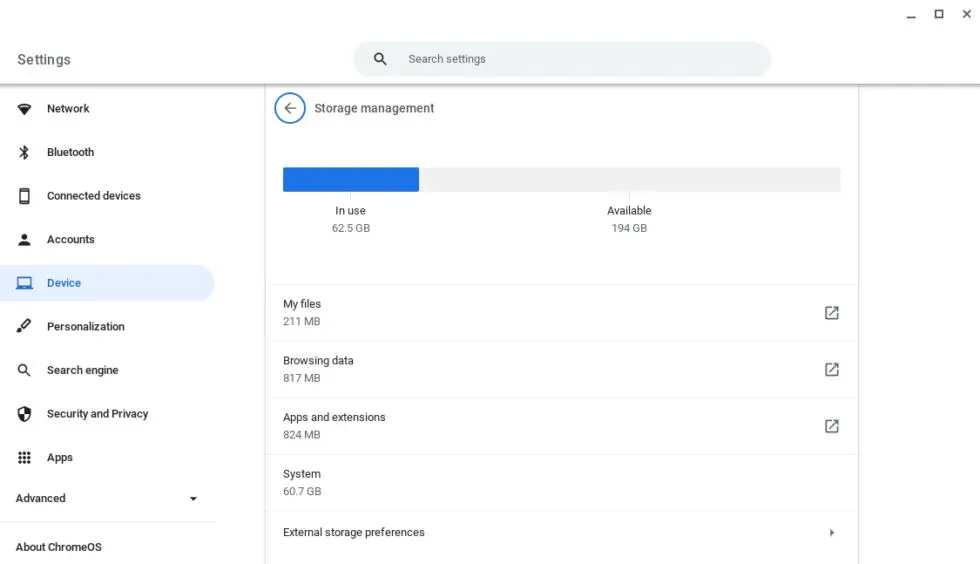
Click the Chromebook’s search button to open the ChromeOS search bar, then type “storage.”An option called “Manage storage”will appear. Click on it.
Alternatively, you can go to “Settings”-> “Device”-> “Manage Storage”.
By going to Manage Storage in ChromeOS settings, you can see how much memory your Chromebook is using and how much is left. This page also breaks down storage usage by type.
Leave a Reply