How to Make an AR Filter for Instagram on Mac or PC

Augmented reality (AR) filters have an immersive visual effect that makes almost anyone want to view them. Many create and use them to increase brand awareness. Unfortunately, most people don’t know how to create augmented reality filters for Instagram since Instagram doesn’t have a built-in feature.
However, I can vouch that it gets easier with practice. In this article, I’ll show you how to create a custom AR filter for your Instagram story on Mac or PC and publish it via Spark AR Hub so people can reuse it on Instagram. Hold on and have some coffee!
Which tool can be used to create an AR filter on Instagram?
The easiest and most official way to create an AR filter is to use Meta Spark AR Studio for Mac and Windows. To test your filters, pair the desktop app with the iOS version, AR Player; this allows you to see how your filter will look on mobile.
What does the Instagram AR filter do?
The Instagram AR filter allows you to create eye-catching augmented realistic visuals. For example, you can use it to disguise your face or mimic the real world if necessary. Typically, an augmented reality filter allows you to immerse the physical objects around you (including yourself) into an augmented visual experience.
Instagram’s augmented reality filters are interactive and don’t feel as overdone as avatars. For example, an AR face mask created with AR Studio will not only blend in with your face, but also move with your facial expression.
How does Meta Spark AR Studio work?
Spark AR Studio by Meta provides an easy to use platform where you can create various augmented reality effects. At the time of writing, it was available as a desktop application that provides all the utilities you need to create an augmented reality experience.
Any AR effect you post from the desktop app is sent to the Spark AR hub, posting it to your Instagram profile as a custom AR filter. Meta also provides a Spark AR Player test app that you can link to the desktop app to see how your filter looks on the mobile interface. You can install it from the App Store or Play Store.
However, Spark Studio has many features. But you don’t have to worry about them if you’re just starting out. However, I recommend taking the five-minute introductory lesson the first time you open the app.
From experience, people with experience in Blender and 3D or 2D graphic design will figure it out quickly. But even if you don’t have prior knowledge of graphic design, I’m sure you’ll still find it simple.
Spark AR Studio has immersive sound, occlusion and depth effects and offers high flexibility. You can add audio and even import 3D objects from modeling tools like Blender. Ultimately, you can publish your AR effect to the Spark AR Hub for people to reuse.
How to Create Your Own Augmented Reality Filter for Instagram on PC or Mac
To get started, download and install Spark AR Studio as well as Spark AR Player.
While this is not a rule of thumb, you may need to connect your iPhone to your PC or Mac. So if you’re using a PC, be sure to download and install a compatible version of iTunes from Apple Support. Now launch Spark AR Studio on your PC or Mac and authenticate with Facebook to sync your Instagram profile.
You can run many other augmented reality effects in Spark AR Studio. But for this tutorial, we will create a simple face mask from Spark AR Studio and sync it to your Instagram account by following these steps:
1. Load face assets
First, download the face assets by going to the Spark Face Reference Assets page and clicking the download link in the text.
So these face or mesh assets are reference guides for adding objects like tattoos or brand names to your face. Essentially, guides serve as templates, helping you place objects exactly where you want them to be. You don’t need them in the final output, as you’ll have to remove them, leaving the added objects behind.
2. Face design
This is where you will need some knowledge of graphic design as you will be using applications like Adobe Photoshop, Gimp or any other design tool to add objects to your face.
For this tutorial, we will download free PNG images that people often use as tattoos from free image sites like Pixabay or Pexels. You’re better off using PNGs since they don’t have a background.
Now unzip the face links folder you downloaded from Spark earlier. Then open it and go to the FaceAssets → Textures folder. Open the selected face mesh using a layer-based graphic design tool such as Gimp or Adobe Photoshop. In my case, I will be editing the faceMasculine mesh with Gimp.
Place the downloaded PNG images on the face grid of choice, resize, rotate and design them as you like.
Hint: you can write your brand name on the face mesh instead of putting PNG images on it as indicated.
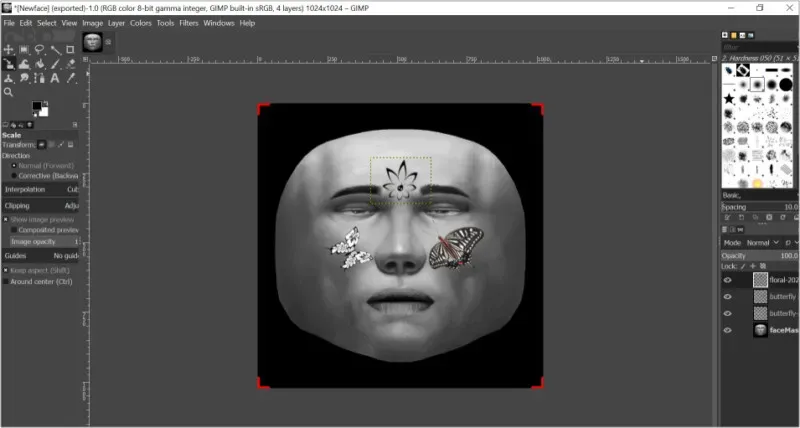
Then set the background (reference grid) to hidden to get the full PNG design. Your face tattoos are now in strategic positions. Export the result in PNG format.

3. Create an Instagram filter with Spark AR Studio.
After adding effects to your face, go back to Spark AR Studio and follow these steps to embed drawings on your face:
- Click “Create New”on the left sidebar.
- Select Share Experience. The AR Studio design interface opens with a preview window. Note. You can use an empty project, but AR Studio recommends sharing experiences for cutscenes and stories.
- Under the “Scene”sidebar, you’ll see a list of default scene objects.
- Then, in the Assets tab, click From Computer → select a face mesh design.

- Right click on this design → go to “Actions”→ select “Use as face mask”. You can close the patch editor for a better view.

You should see that the designs you added to the grid are now embedded in your face and move with it. That’s all for the Spart AR Studio part.
4. Test your augmented reality effects on your iPhone.
Now open Spark AR Player on your iPhone and follow these steps to transfer your design to your iPhone’s camera for testing:
- Connect iPhone to Mac or PC with a USB cable.
- Return to Spark AR Studio on your computer:
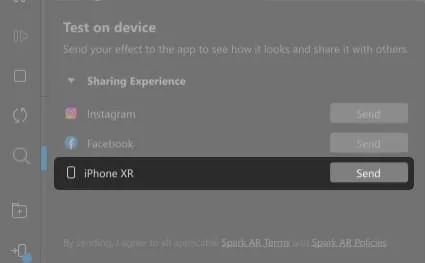
- In the thin sidebar on the left, navigate to the Phone icon (Verify on device icon).
- Click Submit next to your iPhone’s name.
- Optional: Click Submit next to the Instagram or Facebook Augmented Reality hub to submit there.
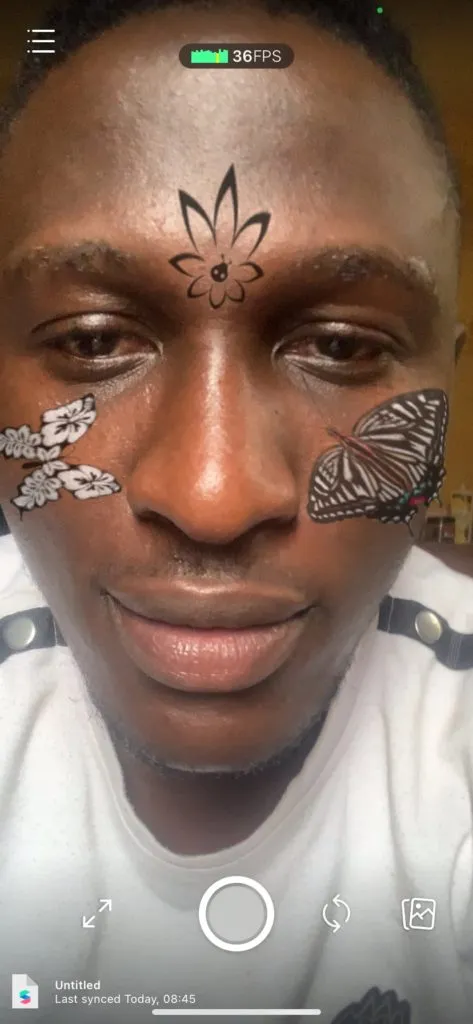
- You will now see the patterns on your face through your iPhone camera.
- Press and hold the shutter button to take a video, or tap to take a photo.
Spark AR Player saves videos or photos taken during testing to your iPhone’s camera roll. So, if you want to limit the use to only yourself, you can upload the videos or images you have saved to your videos or stories right after testing. But people won’t be able to reuse it that way.
To make your AR effect reusable and more engaging, you need to publish it to the Spark AR Hub; this is the core value of Spark AR Studio.
In the next section, I’ll show you how to publish your effect to Spark AR Hub.
5. Publish your AR effects to Spark AR Hub.
After testing the effects on your iPhone, the next step is to publish them to Spark AR Hub. Uploading your Instagram AR filter to Spark AR Hub increases its visibility and engagement as people can reuse it in their Instagram videos and stories.
To publish an augmented reality effect to Spark AR Hub:
- In Spark AR Studio, click “Publish”in the bottom left corner.
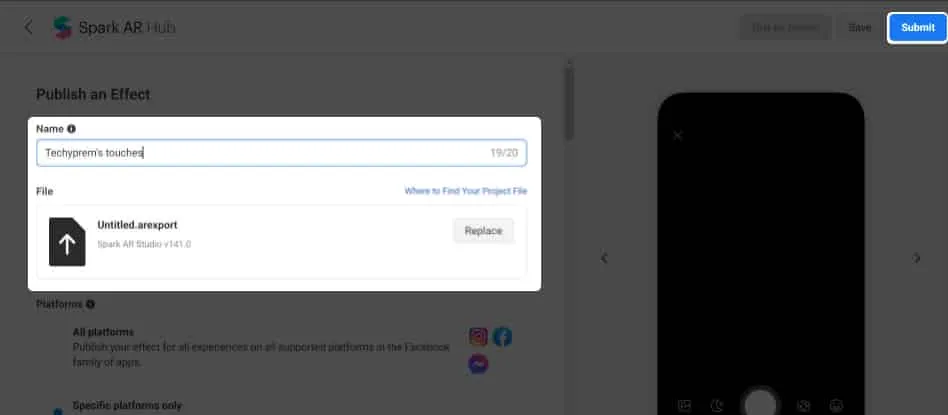
- Then click “Download”. Spark AR Studio will open Spark AR Hub in your browser.
- Fill in all required fields and upload your effects.
- Now click Submit in the top right corner.
- You will have to wait for Meta to review your effect; in some cases it may take up to five days.
Once your application has been validated by Spark AR Hub, a filter tag will appear on your profile. The AR filter tag is located next to the video icon (represented by three stars) below your profile information. You and others can view your AR filters by going to your profile and clicking on the filter label (three stars).
In order for other people to reuse your AR filter in their Instagram videos, stories, or live streams, all they have to do is visit your profile, select the filter they want to use, and hit Try. You can even become an augmented reality filter provider by creating multiple filters.
FAQ
At the time of this writing, Spark AR Studio is still the easiest way to create AR filters for Instagram as it requires no code and offers easy integration with Instagram and Facebook via Spark AR Hub. However, other augmented reality interaction platforms are available, including Apple ARKit and Google ARCore. But most of them are complex and require coding.
Generally, you won’t get paid to create augmented reality filters for Instagram. But you can approach companies and charge them to create augmented reality filters for their brands.
Instagram offers many built-in filters. You can use them when creating videos or images for your videos or stories. But nothing beats custom augmented reality filters. To use Instagram’s built-in filters on iPhone, tap the “+”icon in the top right corner → swipe to STORY, REEL, or LIVE. Scroll through the filters next to the camera shutter. You can press and hold the selected filter to take a video, or touch it to take an image.
The tutorial above is just an example of how to use Spark AR Studio. There are many more features in the app, but don’t worry, you will get better with time. Also, feel free to explore your creativity. As you saw, we were able to transfer our design from Gimp to Spark AR Studio and publish it as a custom filter that anyone can reuse on their face.
However, you can also check out tutorials and workarounds on the Spark Finding Your Way Around page. This will give you an overview of the various features of the application.
Do you have questions or comments? Let me know in the comments section below.
Leave a Reply