How to Take a Screenshot on an Asus Laptop (7 Free Ways)
Taking screenshots has become a big deal for many of us because it has so many uses. For screenshots on Asus laptop, you have built-in ways to capture screenshots, whether you are using Asus Vivobook, ZenBook, ProArt Studiobook, ROG, ExpertBook, TUF, Transformer Book, Chromebook or any other series. So let’s get started!
7 Methods for Taking Screenshots on Asus Laptops (Windows 11, 10, 8.1 and 7)
- Print Screen Key (Prt Sc)
- Scissors
- Fragment and sketch
- Xbox Game Bar
- Use physical buttons on Asus tablets and 2-in-1 laptops
- Install screenshot apps from the web or the Microsoft Store.
- Add a browser extension to capture web pages
1. Print Screen key (Prt Sc)
When there weren’t fancy screen capture tools, Print Screen was the best and easiest method for taking screenshots of the entire screen, and for many it’s still a reliable method because it has also been improved.
Prior to Windows 8.1, when you took a screenshot with Print Screen, you had to paste it into Microsoft Paint or any other document to save it. But now the screenshot is automatically saved in the Pictures folder (This PC > Pictures > Screenshots).
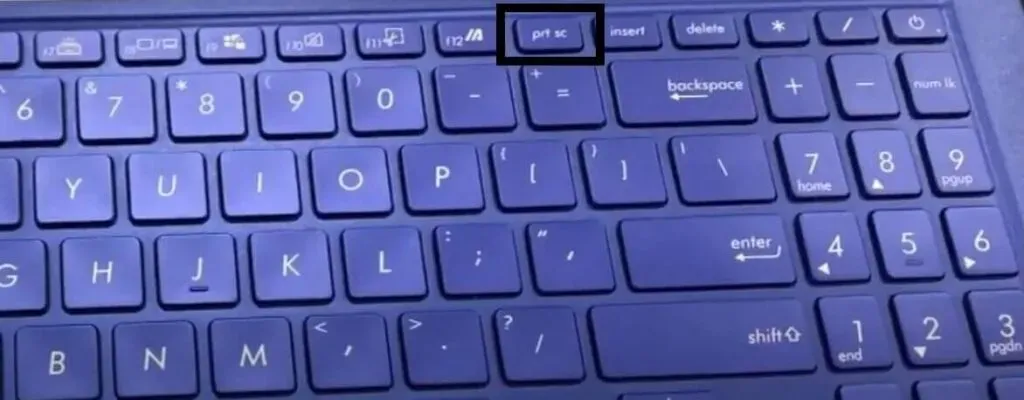
But where is the Print Screen key? You can find it on the top row of your Asus laptop’s keyboard. Basically it is a shared key with SysRq. So, we are looking for the Prt Sc / SysRq key on the keyboard. Moreover, in some models, the abbreviation Print Screen may differ. Some may label it as PrtScn, PrntScr, or PrtSc.
1.1 Take a screenshot of the entire screen
Before we get started, keep in mind that if you’re on Windows 7, you’ll need to paste the screenshot into Paint or any other save application. In Windows 8.1, 10, and 11, screenshots are automatically saved to the Pictures/Screenshots folder.
- Navigate to the screen you want to capture.
- Press the Windows logo keys + Prt Sc together, or the Fn + Prt Sc keys at the same time. (The Fn key is usually on the bottom row of the keyboard.)
- There will be no message on the screen stating that a screenshot has been taken. Go to This PC > Pictures > Screenshots to check if a screenshot was taken, or open Microsoft Paint and press CTRL + V to paste the screenshot, then choose File > Save to save it if you are using Windows 7.
- If you can’t find the screenshot, press keyboard shortcuts again. This time also try the Windows logo keys + Fn + Prt Sc.
1.2 Take a screenshot of the active window
If you don’t need to take a screenshot of the entire screen, the Print Screen method also allows you to take a screenshot of just your active window.
- When you are in the window you want to capture, press ALT + Prt Scn at the same time.
- If you’re on Windows 7, go to Paint to paste and save it. On newer versions of Windows, navigate to the Pictures/Screenshots folder.
1.3 Use the on-screen keyboard to use the Print Screen key
Some users may find that their Prt Scn key is not working. If you are one of them, use the on-screen keyboard to take pictures, or use the other methods described in this guide.
- Open the start menu, type “on-screen keyboard”and launch the app.
- Raise the screen to be captured.
- Press the Windows logo + PrtScn keys or Fn + PrtScn keys to take a screenshot.
Should I use the Print Screen method?
Taking instant screenshots with Print Screen will become easier once you learn how to use it. Because it doesn’t interrupt what you’re doing so you can keep doing what you have and also keep taking screenshots.
This is useful for full screen applications such as games and full screen videos. In addition, you can take screenshots of drop-down menus and other lists that are usually hard to take.
But there are also drawbacks to this method. For example, you cannot select the folder location, format, and name of the screenshot. It is directly saved to the default folder.
Other than taking screenshots of the entire screen and the active window, there is no other way to take screenshots. So you can’t select part of the screen.
Also, you cannot edit a screenshot before saving it. However, you can access the saved screenshot from its folder and open it with any editing app you want.
If you are looking for a screenshot method that allows you to select a part of the screen and also allows you to choose its location, use the following two methods.
2. Scissors
The Snipping Tool is a built-in tool in Windows 7, 8.1, 10, and 11. In Windows 11, Microsoft combined the Snipping Tool and Snip & Sketch (another screenshot tool) and called it the Snipping Tool. We will discuss this in the Slices and Sketches section (method 3).
Here we will use the Snipping Tool for Windows 7, 8.1 and 10 to take a screenshot on an Asus laptop.
2.1 Taking a screenshot of part of the screen with the Snipping Tool
- Click the start menu, type “crop tool”and open the first app.
- A small application will open.
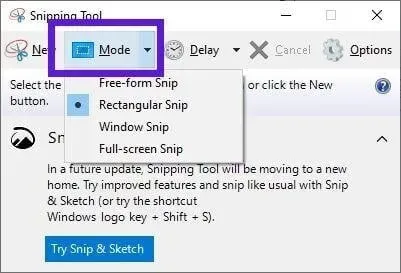
- The default option for selecting a screenshot is Rectangular Slice. It allows you to select any part of the rectangular screen. If it’s not selected, click Mode and select Rectangular Slice.
- Click New.
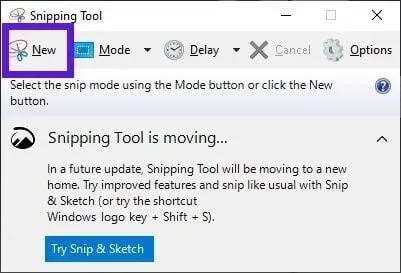
- Your screen will be gray. Drag the crosshair cursor on the screen to take a screenshot.
- When it’s done, the screenshot will open in the Snipping Tool with some editing and annotation options. Use pen, highlighter and eraser to edit.
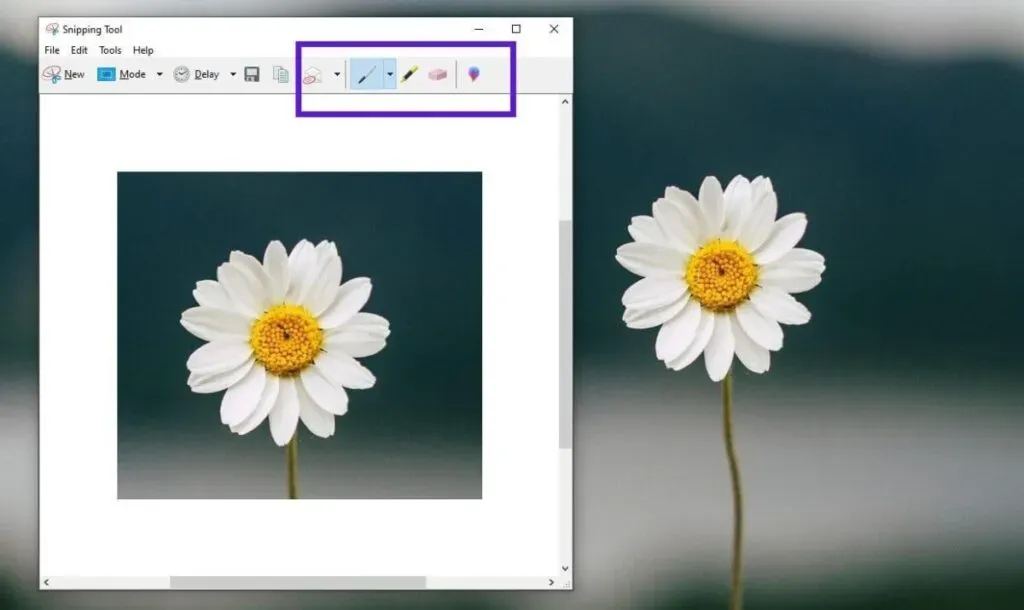
- After that, click on the floppy disk icon to save it, or choose File > Save.
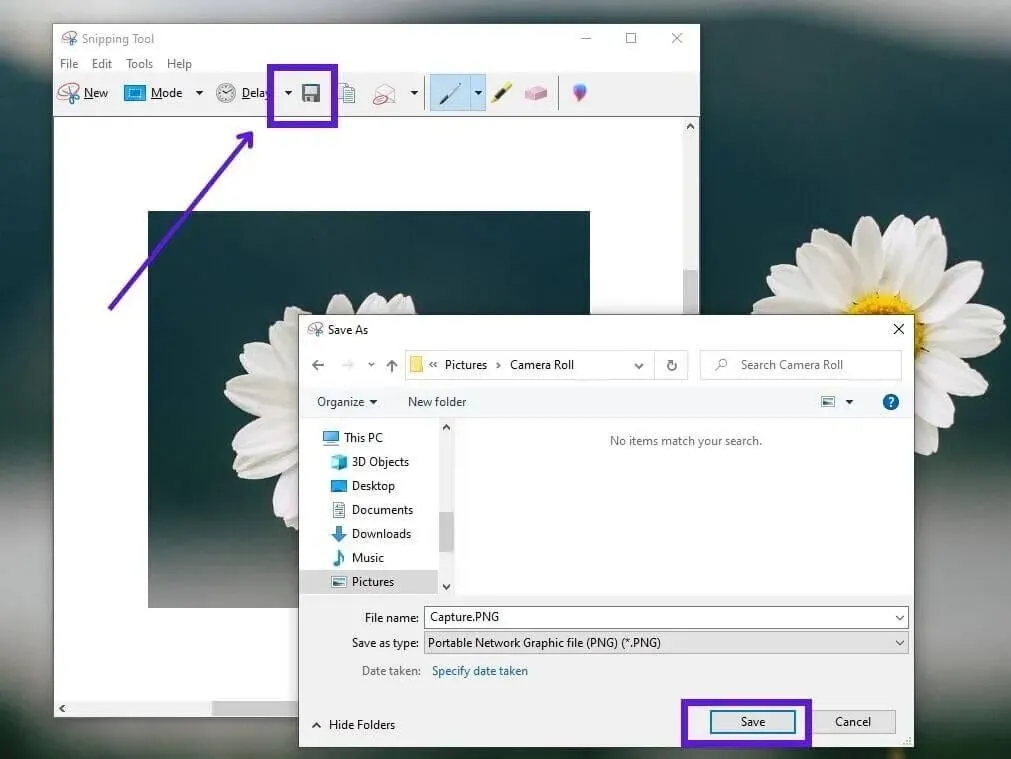
- Select a folder, name, and format for the screenshot.
- If you are not sure about the format, do not select anything. It will use its own default format, which is PNG. Click Save.
- But if you’re familiar with image formats, click the drop-down menu next to “Save as Type”and choose PNG, JPG, GIF, or MHT.

2.2 Use the modes in the Snipping Tool to your advantage
The Snipping Tool has four screen capture modes.

- Freeform Fragment: Select any part of the screen, not limited to a rectangle or any other shape. Choose a screen of any shape.
- Rectangular Slice: Take screenshots by selecting an area of the screen in different rectangle options. Screenshots with this method are preferred because they don’t appear jagged like freeform fragments.
- Window Fragment: This makes it easier to take screenshots of any window in front of the screen. Select this mode and click the window you want to take a screenshot of.
- Full Screen Snapshot: If you want to take screenshots of the entire screen, select this mode. Once you select this mode, a screenshot of the entire screen will be taken instantly.
2.3 Using delay in Snipping Tool (taking screenshots of drop-down menus and lists)
We know it’s hard to take screenshots of certain menus and lists because they disappear when you click somewhere else. While there are easier ways to capture this type of menu using the Snipping Tool (in Windows 11), Print Screen, and Snip & Sketch, if you can’t use them, learn how to do it with the Snipping Tool (in Windows 7). 8.1 and 10).
- Click the start menu, type “
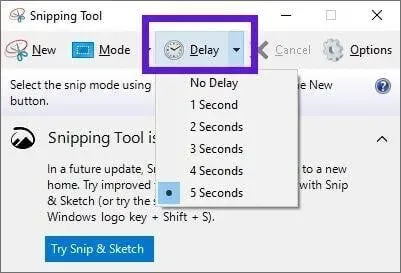
Snipping Tool“and open the application. - Click “Delay”and choose the number of seconds it takes you to open the menu or list you want to capture.
- Finally, select New.
- Now quickly open the menu you want to capture and wait for the Snipping Tool to freeze the screen.
- When you see a gray overlay on the screen, it is frozen. Click and drag the mouse cursor to take a screenshot (depending on the selected mode)
- The screenshot will open in the Snipping Tool. Edit and save it.
Should I use the Snipping Tool?
The Snipping Tool in Windows 7, 8.1 and 10 has some advantages.
- This is useful for capturing part of the screen, taking screenshots of the active window, and taking screenshots of the entire screen.
- It allows you to select the folder location, format, and name of the screenshot.
- Editing a screenshot you have taken is easy as it gives you the option to edit before saving the screenshot.
- Sharing is also convenient because after you take a screenshot, it will be copied to your clipboard. So you can share it even before saving.
Does the delay function work?
The Snipping Tool also allows you to take screenshots of drop-down menus and lists if you use the Delay option. This option is useful if you are running Windows 7 and have no other options.
But if you’re on any recent version of Windows, you might not need it as there are better options like Snip & Sketch and the updated Snipping Tool in Windows 11.
3. Snip and sketch
Snip & Sketch is a preinstalled app in Windows 8.1, 10 and 11. It’s the best way to take screenshots.
Update: In Windows 11, Snip & Sketch and Snipping Tool are the same. Whichever app you open will launch the updated Snipping Tool.
Here’s how to use Snip & Sketch:
- Open the start menu, type “Snip & Sketch”and launch the first app.
- When it opens, click Create.
- Tip: A faster way to launch Snip & Sketch is by pressing the Windows + SHIFT + S keys at the same time.
- A black overlay will appear on the screen and you will see several screenshot modes in the top center of the screen.
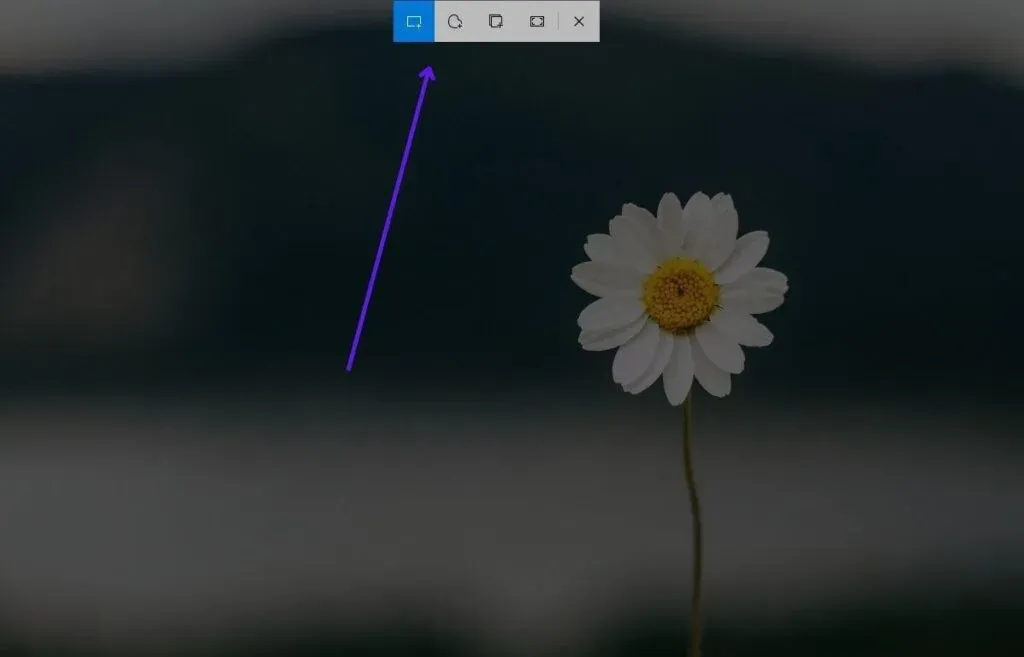
- The first option on the right is Rectangular Cutout. This allows you to take screenshots of a rectangular portion of the screen.
- The next one is Freeform Snip which allows you to take screenshots without following any form or template.
- Then we have Window Snip. It makes it easier to take a screenshot of any window, as you can simply click on a window to take a screenshot of that window.
- Finally, this is a fullscreen snippet. Once selected, a screenshot of the entire screen will be taken.
- Select the desired mode. We will choose Rectangular Snip.
- Click and drag the mouse pointer to select the screen area for the screenshot.
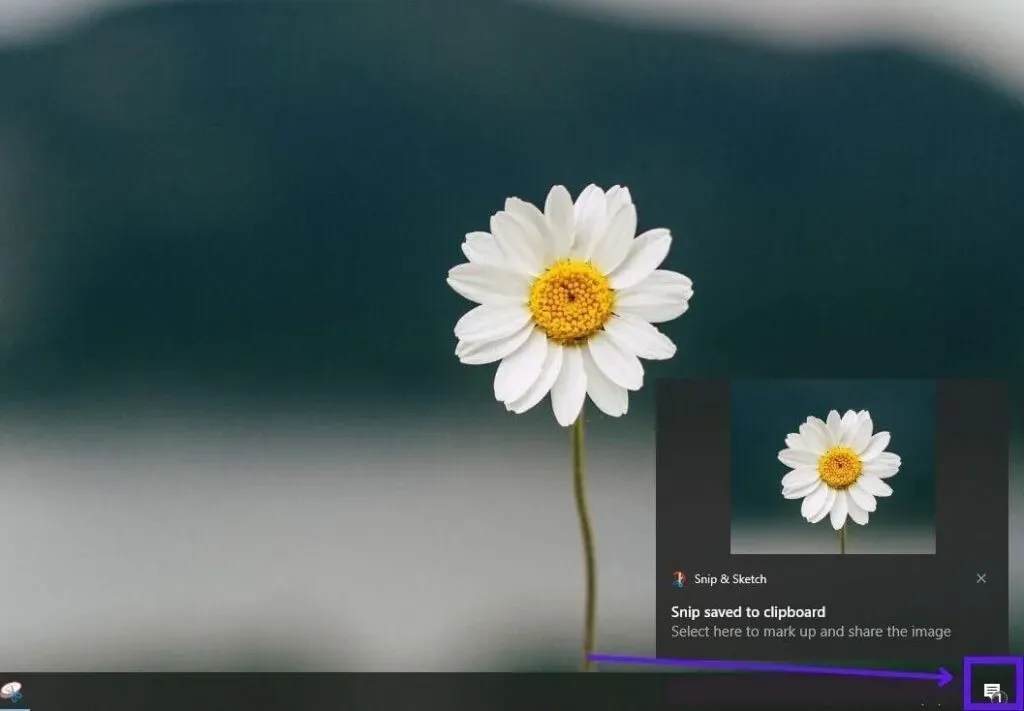
- When the screenshot is taken, you will see a notification that the screenshot has been taken. Click a notification to open a screenshot in Snip & Sketch, or open it later by going to Notification Center.
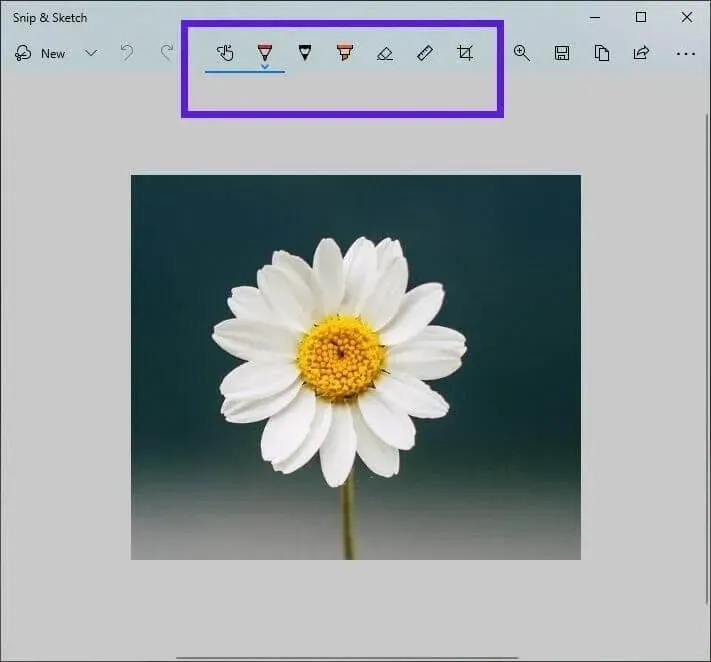
- Once opened in Snip & Sketch, use the editing tools in the toolbox to annotate the snapshot.
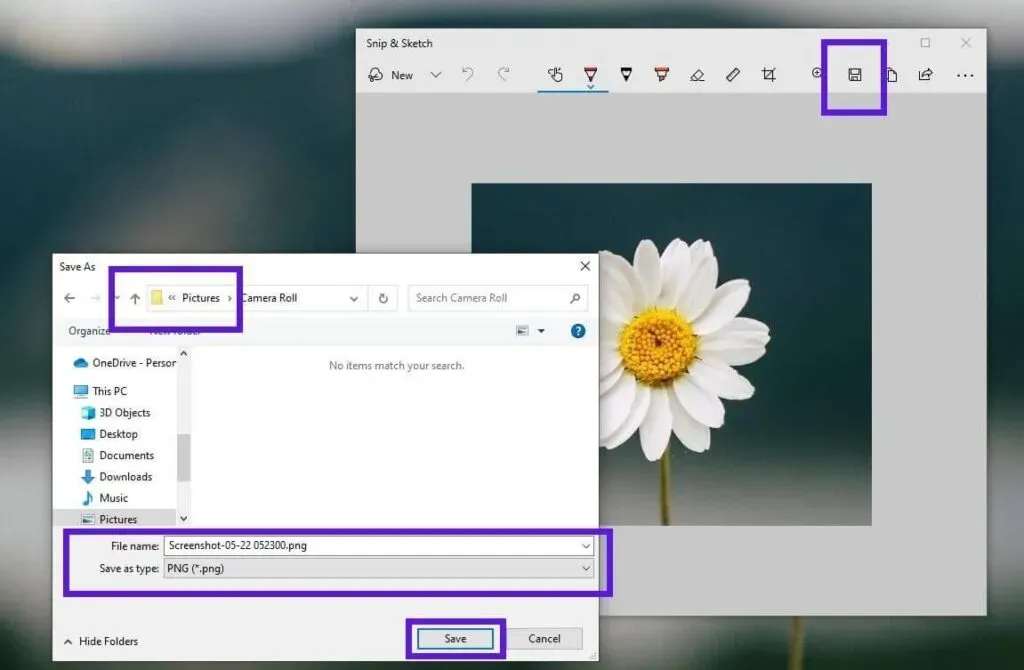
- When you’re done, click the floppy disk icon or choose File > Save to save the screenshot.
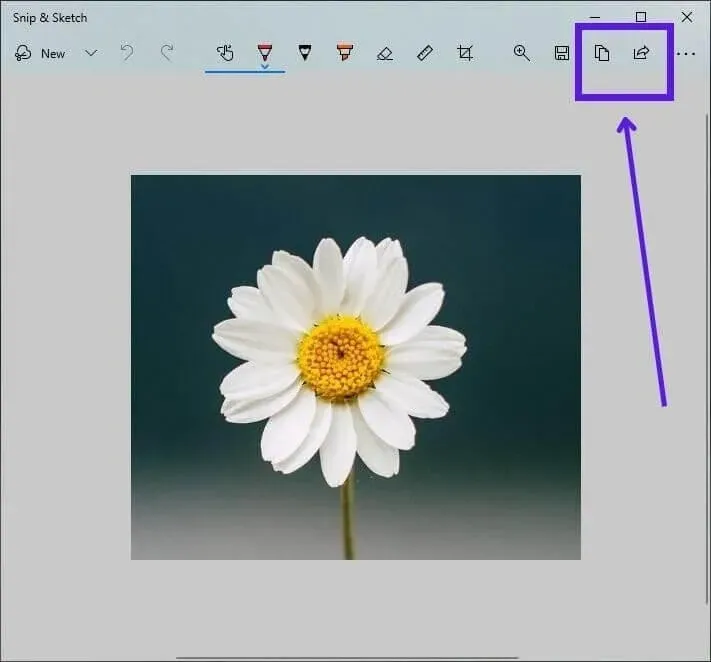
- To share, click the Share button (arrow icon) or select the Copy button (two page icon) and paste it into any document or chat.
Snip & Sketch does everything you need from a screenshot tool.
- It allows you to select a portion of the screen and select the active window or full screen for the screenshot.
- You can choose any folder, name and format for the screenshot.
- When you take a screenshot, it is automatically copied to the clipboard. This means you can paste a screenshot into any chat to share, even if you haven’t saved the screenshot yet.
- For editing, you have basic editing tools for quick editing.
- It’s also handy for taking screenshots of full-screen applications such as videos and games.
- Also, taking screenshots of drop-down menus and complex menus is easiest with Snip & Sketch.
The only downside we found with this app is that it’s not suitable for people who want to take multiple screenshots in a short amount of time. For example, if you are playing and want to capture every second of the game for the next 1 minute, then it is not possible with Snip & Sketch. You must use the Print Screen method for this. Or, if you only need it for games, check out the Game Bar.
4. Xbox Game Bar
The game bar is designed for gamers, as its name suggests. It is a screen recording tool that also takes screenshots when needed. Its screenshot function is similar to the Print Screen method. Let’s know how to use it.
- Open the start menu, type “Game Bar”and launch the app.
- Several widgets open on the screen.
- If it’s only one widget, click the camera icon on the main widget (top center of the screen).
- Now in the widget at the top left, click on the camera icon to take a screenshot.
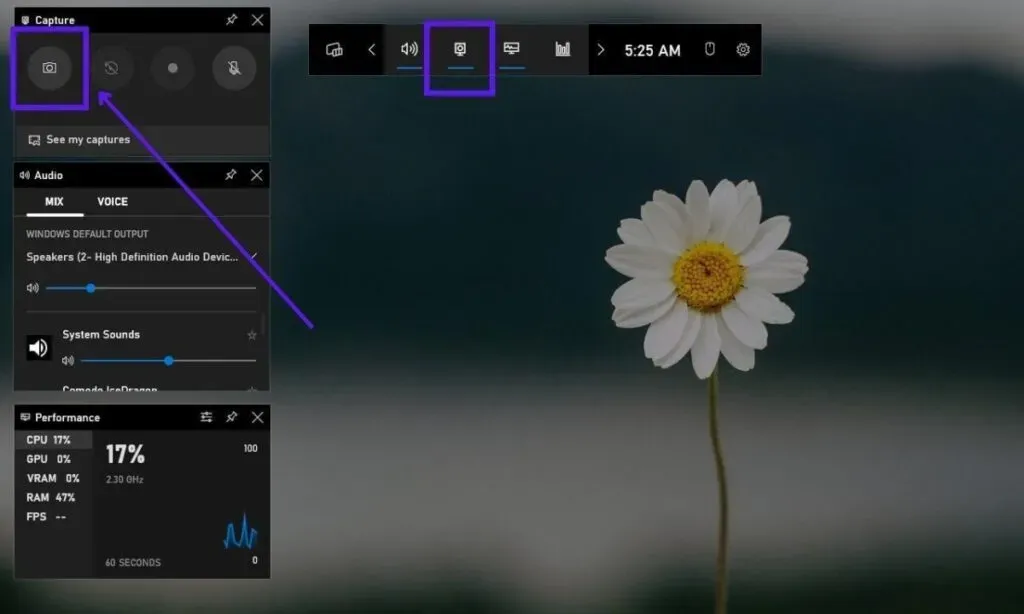
- A notification will appear stating that the screenshot has been saved.
- You can access your screenshots by going to This PC > Videos > Captures.
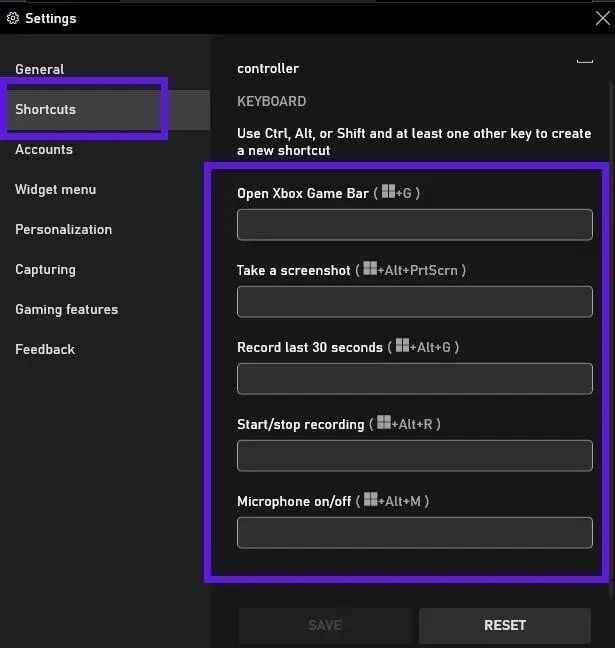
This method is useful for gamers who want to take dozens of screenshots and don’t want to pause the game. It gets better if you use a keyboard shortcut for this (press Window + ALT + PrtScrn at the same time).
There are other keyboard shortcuts that you can read or reset by clicking the settings icon on the main game bar widget (top center of the screen).
5. Use physical buttons on Asus tablets and 2-in-1 laptops.
If you’re using an Asus tablet (Android or Windows), you have another quick way to take screenshots – the physical buttons.
- Open a window, video or game to capture.
- Press the power button and volume down button together.
- The screenshot will be taken and saved in the Pictures/Screenshots folder on Windows and Gallery on Android.
But this method has the same limitations as the Print Screen method. Takes only a screenshot of the entire screen. But you can crop the screenshot later with Paint 3D or the Photos app.
6. Install screenshot apps from the web or the Microsoft store.
If you need options that the aforementioned tools don’t have or want to learn new tools, there are many free screenshot apps you can try.
6.1 Finding Screenshot Apps on the Web
- Launch your web browser and visit Google.
- Find free screenshot tools for Windows.
- Look through several listings to find free apps.
- Install them to test.
6.2 Install search apps from the Microsoft Store
The Microsoft Store also has screenshot apps, and many of them are available for free.
- Open the Microsoft Store
- Find “screenshot”.
- Find free apps and install them.
7. Add a Browser Extension to Capture Web Pages
If you mainly take screenshots of websites and web pages, you can also use a browser extension for this purpose. They are useful if you are looking for a tool to capture the entire web page, not just the visible area of the web page.
Install extensions in Google Chrome, Mozilla Firefox, Opera and Microsoft Edge by following these steps:
- Open a web browser and go to the Chrome extensions page, or go to the Firefox add-ons page.
- Find “screenshot”.
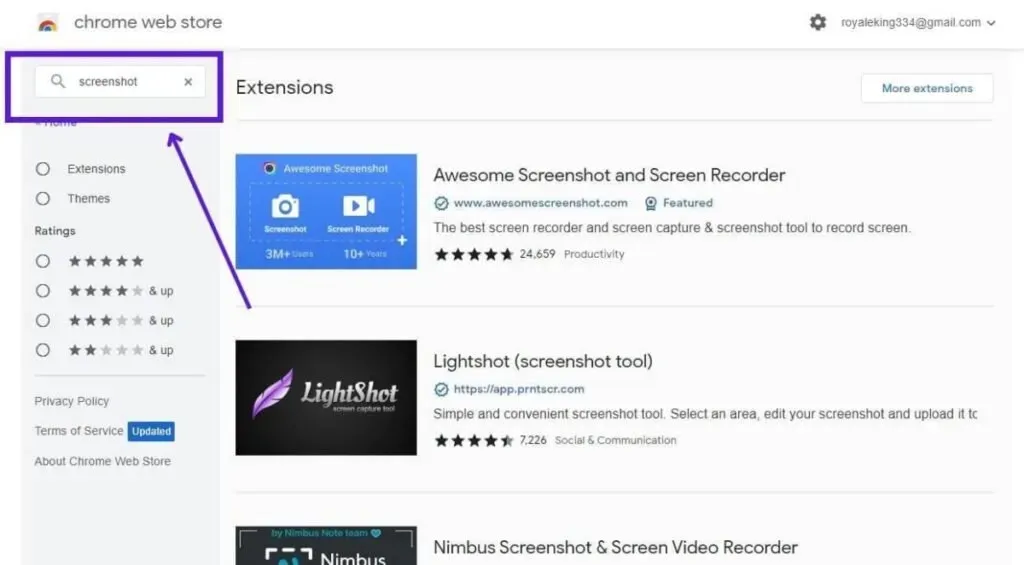
- Find free extensions.
- Click “More Extensions”for a complete list of extensions.
- Add any extension you like to your browser.
For Microsoft Edge, before following the steps above, enable Chrome extensions on it:
- Open the edge.
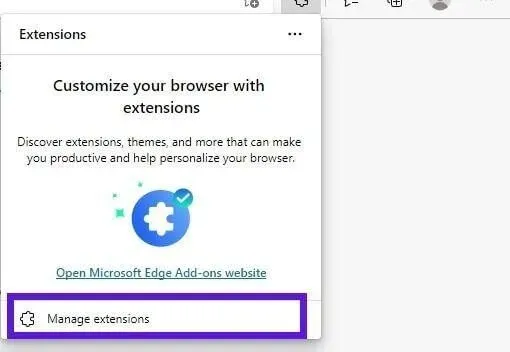
- Click on the three dots in the top right corner and select “Extensions”.
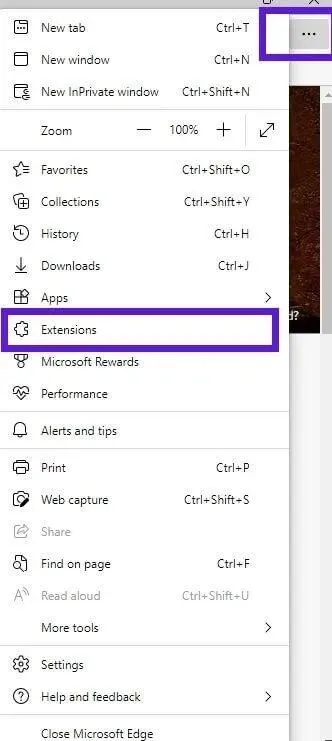
- Now select Manage Extensions.
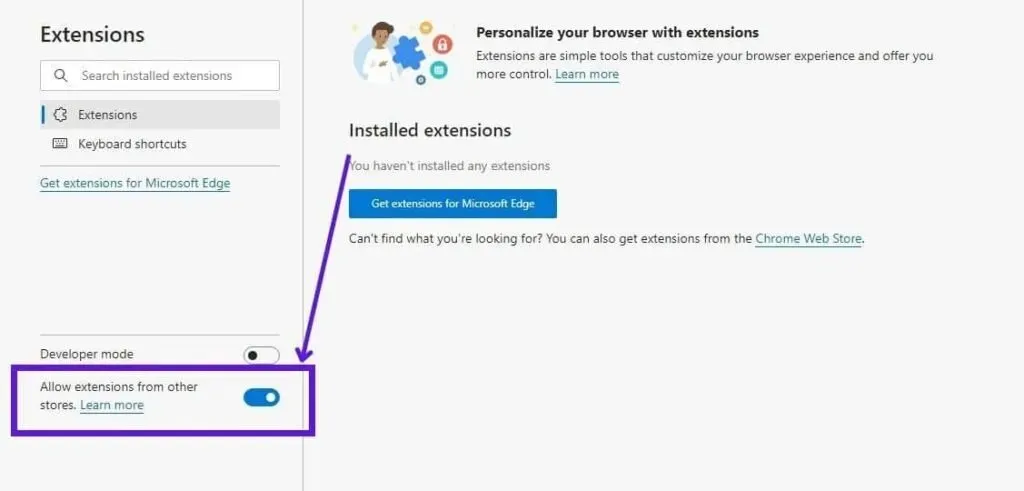
- In the left pane, turn on the “Allow extensions from other stores”toggle.
How to take a screenshot on an Asus Chromebook?
Your light and fast Chromebook has a built-in Screen Capture tool that lets you take screenshots and record your screen. Use these methods:
- Using Screen Capture to Take Screenshots on a Chromebook
- Taking a screenshot of the active window using a keyboard shortcut
1. Using Screen Capture to Take Screenshots on a Chromebook
- On a Chromebook, click the time to open the Quick Settings panel and select Screenshot to open the tool.
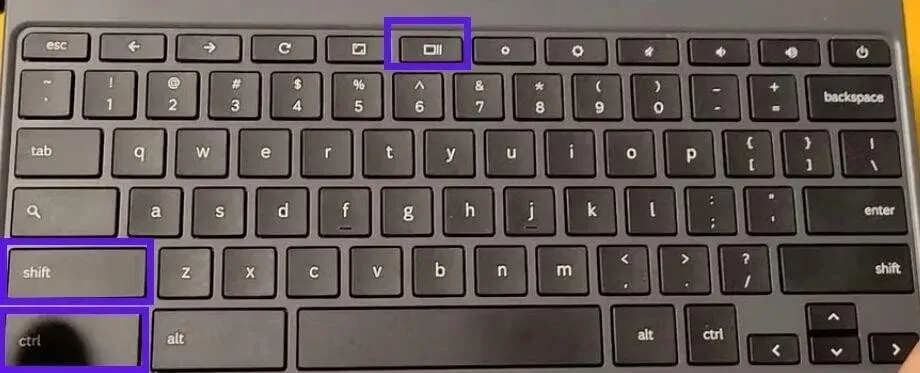
- For quick access, press CTRL+SHIFT+Show Windows at the same time to open the Screenshot toolbar.
- When it opens, click the camera icon to take a screenshot.
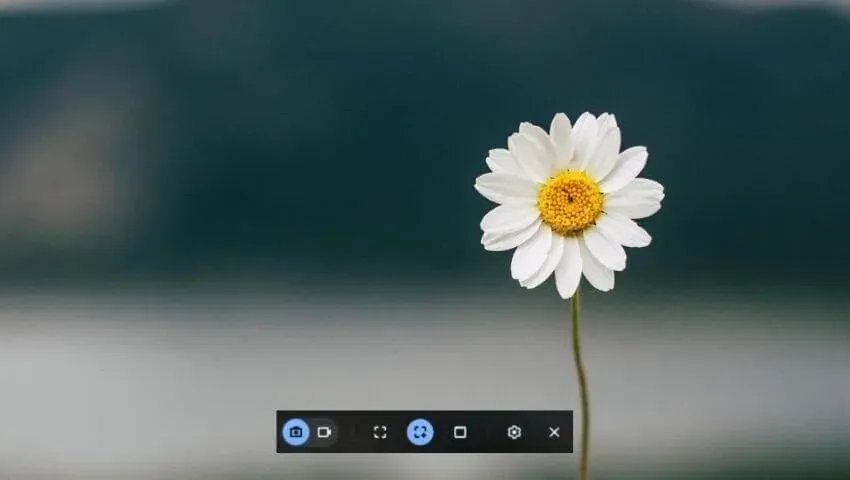
- It takes screenshots in three different modes. Full Screen Snapshot, Rectangular Snapshot, and Active Window Snapshot.
- If you want to highlight part of the screen, select the Rectangular Screenshot option. Hover your mouse over each option to see its name.
- Now click and drag the mouse cursor to select a part of the screen.
- When you’re done, you’ll be notified that the screenshot has been taken.
- To access the screenshot, navigate to your Downloads folder.
- If you want to change the default location of screenshots, open the Screenshot toolbar and click the gear icon > Choose Folder.
2. Take a screenshot of the active window using a keyboard shortcut
If you only need to take a screenshot of the active window, you can do it instantly without opening the Screenshot toolbar. Use these steps:
- Open the window you want to take a screenshot of.
- On your Chromebook keyboard, press CTRL + Show Windows keys at the same time.
- The screenshot will be saved to your Downloads folder.
Conclusion
You can take screenshots on Asus laptops just like you would on any other Windows laptop or computer. Use the above methods and conveniently take screenshots.
FAQ
How to take a screenshot on an Asus laptop?
To take a screenshot on an Asus laptop, press the Prt Scn + Windows logo keys at the same time, or press the Prt Scn + Fn keys at the same time. You can also use the Snipping Tool or Snip & Sketch on Asus Windows laptops to take screenshots.
How to take a screenshot on Asus ZenPad?
To take a screenshot on your Asus Zenpad, press the power button and the volume down button at the same time. It works for any Windows and Android tablet.
Where do my screenshots go on my Asus laptop?
If you take a screenshot using the “Print Screen”key on your Asus laptop, they will go to “This PC”> “Pictures”> “Screenshots”. However, in Windows 7, the Print Screen key only copies the screenshot to the clipboard. You may need to open Microsoft Paint to paste the screenshot onto it and save it.
How to take a screenshot without the Print Screen button?
You have several options if you want to take screenshots without the Print Screen button. Open the Snipping Tool or Snip & Sketch and take screenshots with it.
Leave a Reply