How to Sync Notes from iPhone to Mac in 2022
Taking quick notes on iPhone is a great way to jot down ideas or reminders on the go. But what if you want to access those same notes from your Mac?
Luckily, there are several ways to sync notes from iPhone to Mac—with and without iCloud. Let me walk you through the various methods below.
Before syncing Notes from iPhone to Mac:
- Make sure your Apple ID is the same on both devices.
- Make sure your iPhone and Mac are connected to the Internet.
How to Sync iPhone Notes to Mac Using iCloud
iCloud is one of the easiest ways to sync Notes between iPhone and Mac. Plus, your notes will automatically sync across all devices that are signed in with the same iCloud account. All you have to do is make sure iCloud Notes sync is enabled on your devices.
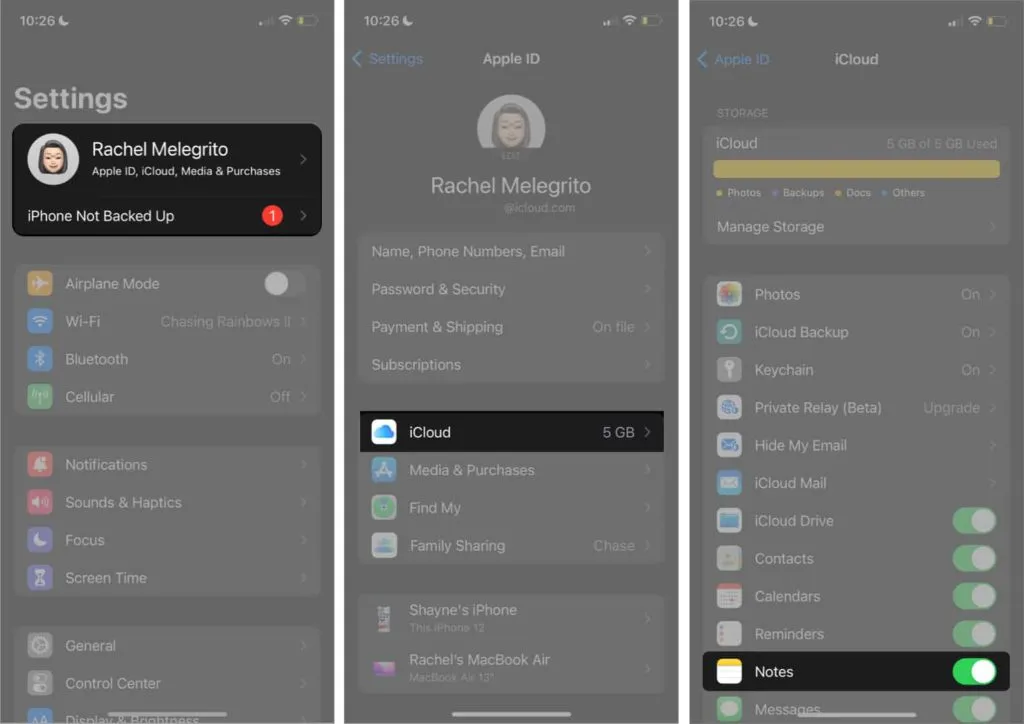
I. On your iPhone:
- Go to settings.
- Tap [your name] → iCloud.
- Turn on notes.
Now all the notes you take on your iPhone will be automatically synced to your iCloud. However, you must also enable iCloud sync for Notes on Mac.
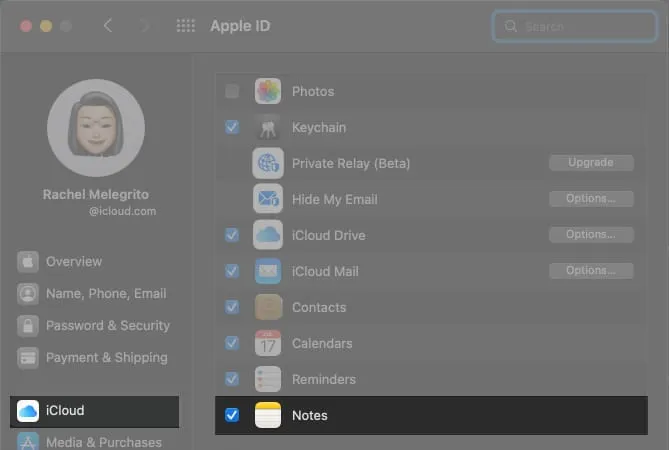
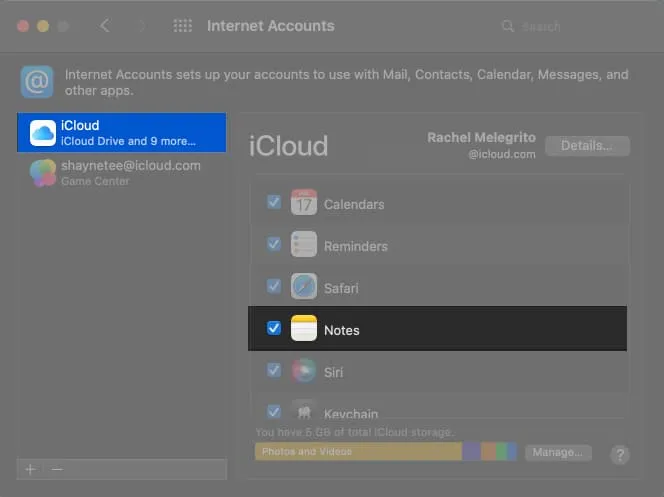
II. On your Mac:
- Go to System Preferences → Apple ID.
- Select iCloud in the left pane → check “Notes”.
Alternatively, you can set this up right from the Notes app on your Mac:
- Open notes.
- Click “Notes”in the menu bar → “Accounts”.
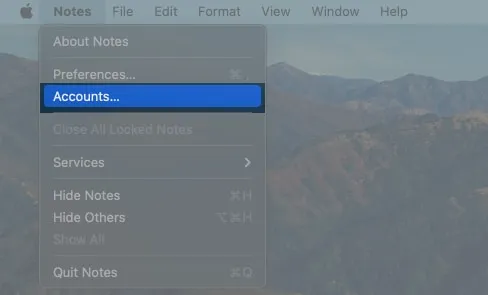
- Select iCloud from the left pane → scroll down and check Notes.
If you find that your notes aren’t syncing, your default account on iPhone may not be set to iCloud. To check, open Settings → Notes → Check if the default account is iCloud.
In addition to syncing Notes across your devices, you can do the same for Safari bookmarks, calendars, reminders, and more.
How to Sync Apple Notes from iPhone to Mac without iCloud
While iCloud sync is the easiest way to access your notes across devices, there are other ways to do it without the help of iCloud.
I. Sync notes from iPhone to Mac with third party email account.
While your notes are saved locally on your iPhone or iCloud, you can store them in a third-party email account like Gmail.
Note. This creates a dedicated space in Apple Notes for the selected third party account.
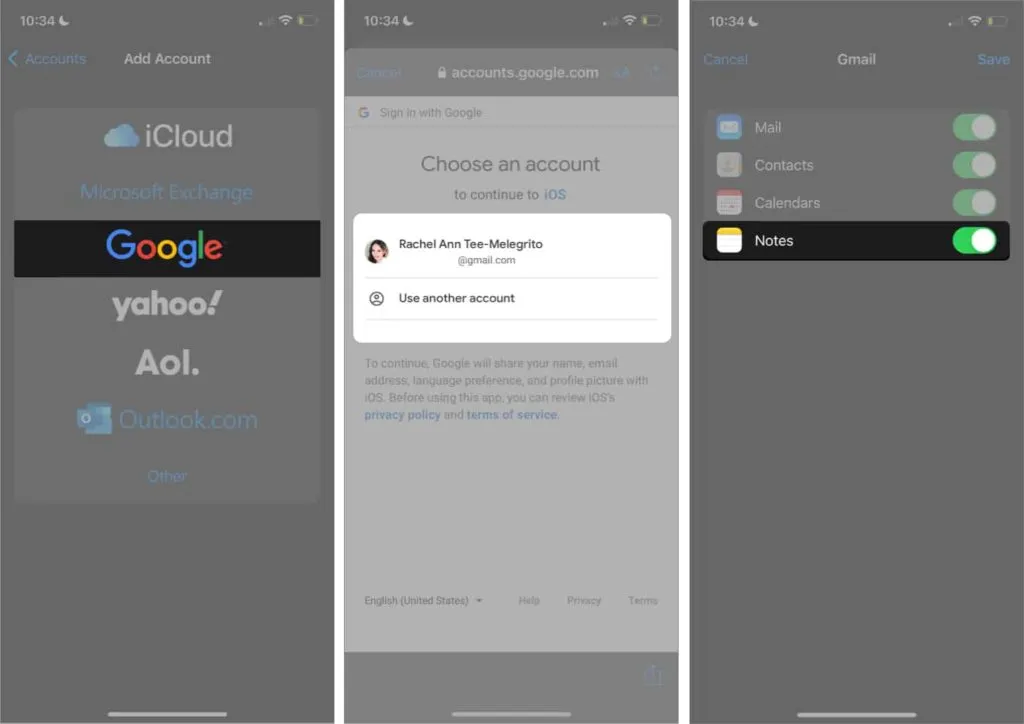
If you haven’t already, the first step is to add a third-party email account like Gmail to the Notes app on iOS:
- Open Settings → Notes.
- Click Account → Add account.
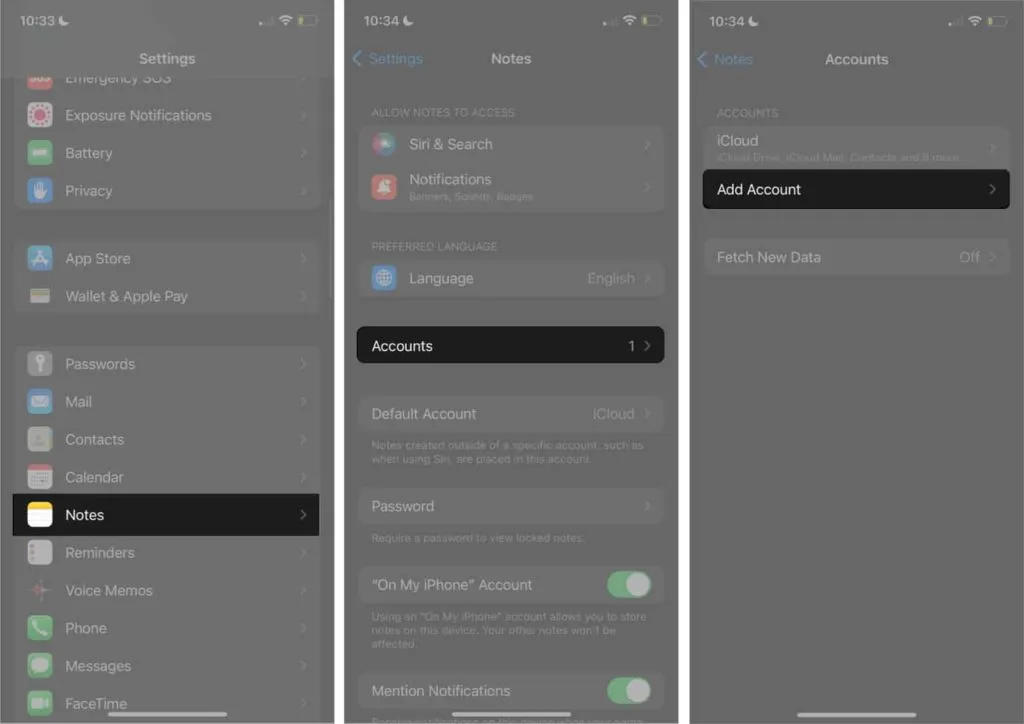
- Select an email account → Continue.
- Sign in to your account.
- Then go to “Account”→ choose your email account.
- Make sure notes are enabled.
Once the setup is complete, you can create a note that will be automatically saved to your Google account. Go to Notes → press back icon until you see all folders → select Notes under email account → press New.
You should see the Notes category in your Gmail account where all of your notes are stored.
II. Sync Notes from iPhone to Mac with Mail
You can also send a note by mail. It simply sends your note as an email with which you can access your email on Mac and copy and paste the note.
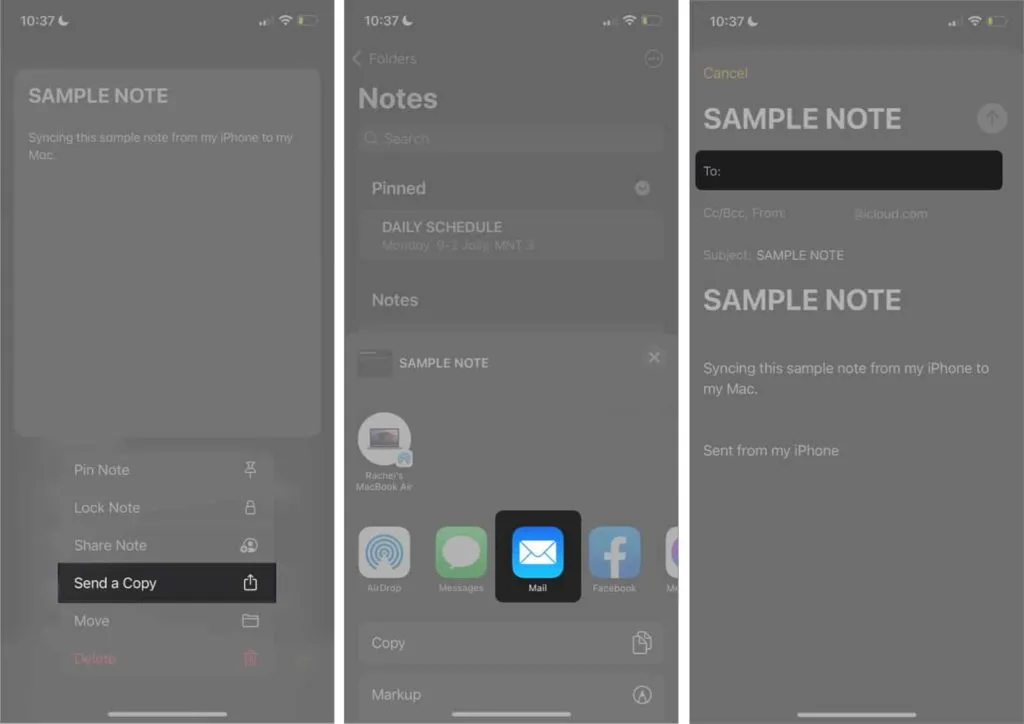
On your iPhone:
- Open Notes → select the note you want to send to your Mac.
- Press and hold it to open the context menu → Send a copy.
- Select Mail → enter your email address.
III. Sync Notes from iPhone to Mac via AirDrop
You can also send a note via AirDrop. Just make sure AirDrop is enabled on both devices.
To enable AirDrop on iPhone, enter Control Center → press and hold the network settings card → tap AirDrop → select Everyone.
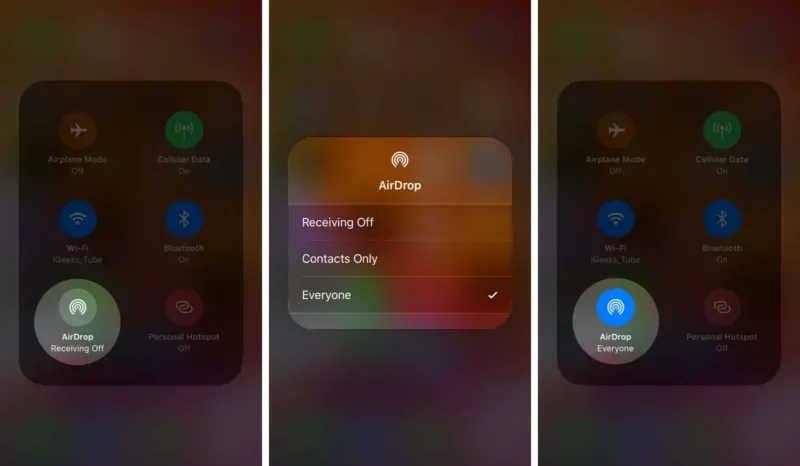
On a Mac, tap the Control Center icon in the menu bar → click AirDrop → enable AirDrop → select Everyone.
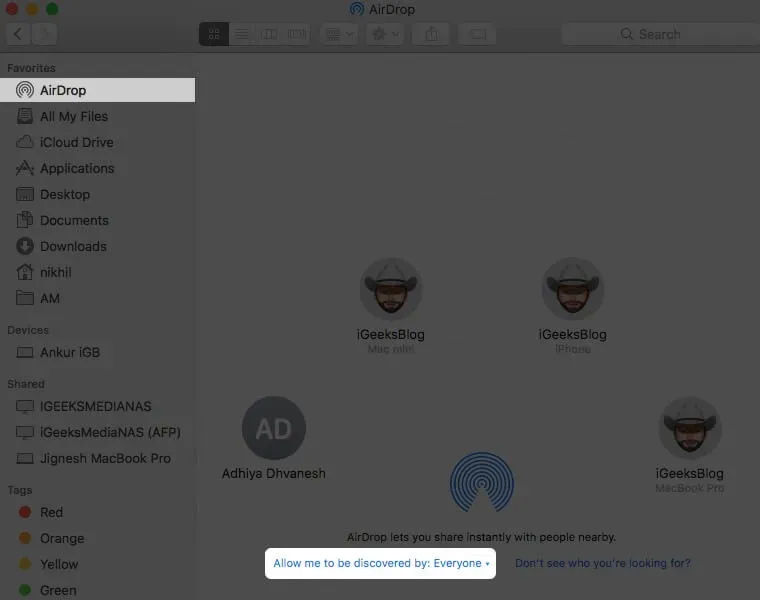
Now go to Notes on your iPhone → select the note you want to send → send a copy → tap on AirDrop. Find your Mac and tap it. Once sent, your note will automatically open in the Notes app on your Mac.
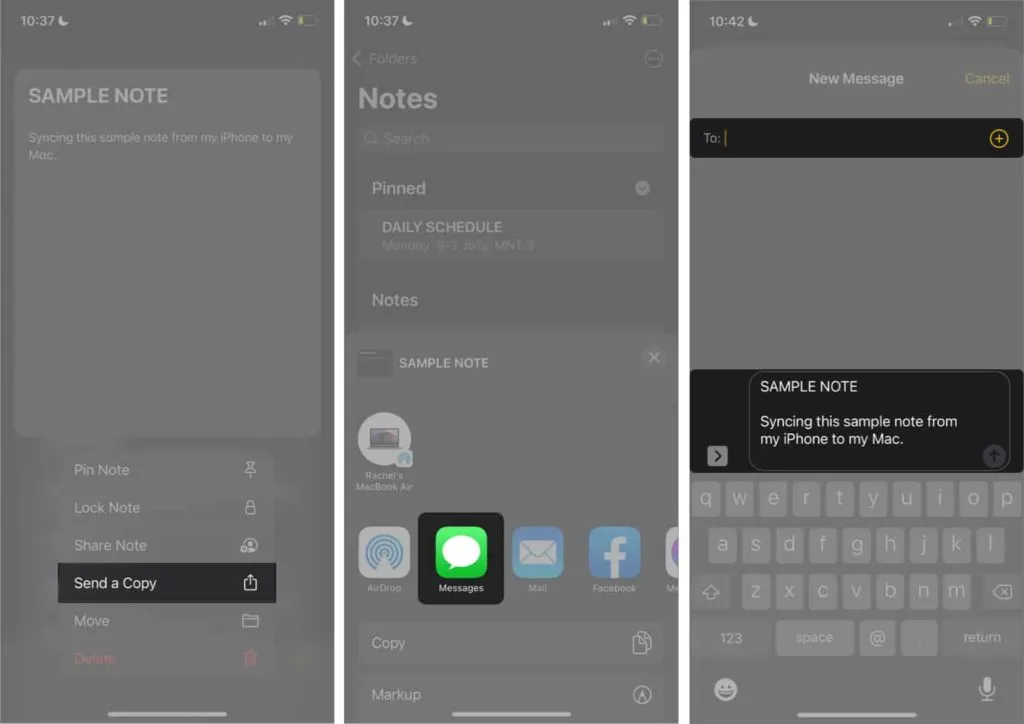
IV. Sync Notes from iPhone to Mac via Messages
Messages might be another option if you use iMessage on your iPhone. However, you must also set up and enable iMessage on your Mac if you haven’t already. Make sure both messages are using the same Apple ID. After both are configured:
- Go to Notes on your iPhone.
- Select and press and hold the note you want to send to Mac → Send a copy.
- Select Messages → enter your name or number.
- Tap the Send icon (↑).
- Open Messages on your Mac to access your note.
V. Sync notes with a third party app
If none of these methods work, you can take the help of iPhone data transfer software like EaseUS MobiMover or FoneDog.
Their ability to help you keep your notes in sync is just one of their many features. They also serve as a backup tool that allows you to sync other types of files and perform backup and restore.
FAQ
This may be due to changing certain settings on any of the devices. Make sure you’re signed in with the same Apple ID on both devices. Then check if your notes are stored locally on your iPhone and not in iCloud. Finally, make sure iCloud sync for Notes is enabled on both devices.
This usually happens when you deselect Notes from iCloud sync. Check it out on your Mac by going to System Preferences → Apple ID. Select iCloud from the left pane and make sure iCloud is ticked.
Completion…
Notes are a convenient way to jot down your thoughts and ideas throughout the day. Syncing it to your Mac might be perfect if you’re the kind of person who wants to browse, organize, or keep taking notes and brainstorming on their Macs.
Personally, I prefer iCloud because it’s the most convenient method. And you? Share your favorite sync method below in the comments section!
Leave a Reply