How to Schedule Instagram Posts (3 Methods + Bonus Tips)

Learning how to schedule Instagram posts ahead of time is the easiest way to save time on the platform so you can focus on what’s important.
The more complex your Instagram marketing efforts are, the more useful the planning tool becomes. This is true whether you own a small business or manage a global team. Consistent, high-quality content is easier to plan, create, and share when you automate some of the tedious work.
In this article, we’ll take a look at how to schedule posts on Instagram, including the best Instagram scheduling tools for businesses, creators, and personal accounts.
Visual Learners: Watch this video to learn how to schedule Instagram posts and stories with Creator Studio and Hootsuite. To everyone else, keep reading.
How to schedule posts on Instagram (for business accounts)
Can I schedule posts on Instagram Business? You definitely can!
Brands with business profiles can use third-party apps like Hootsuite to schedule posts across multiple social media platforms, including Instagram, Facebook, TikTok, Twitter, LinkedIn, YouTube, and Pinterest.
You can schedule posts in the feed, stories, carousels, and ads on Instagram.
Before you get started, be sure to switch to an Instagram Business or Creator account – it’s free and only takes a minute. If you prefer to use a personal account, we have a section for you.
If you use Hootsuite, linking your Instagram account is easy. From the Hootsuite Dashboard:
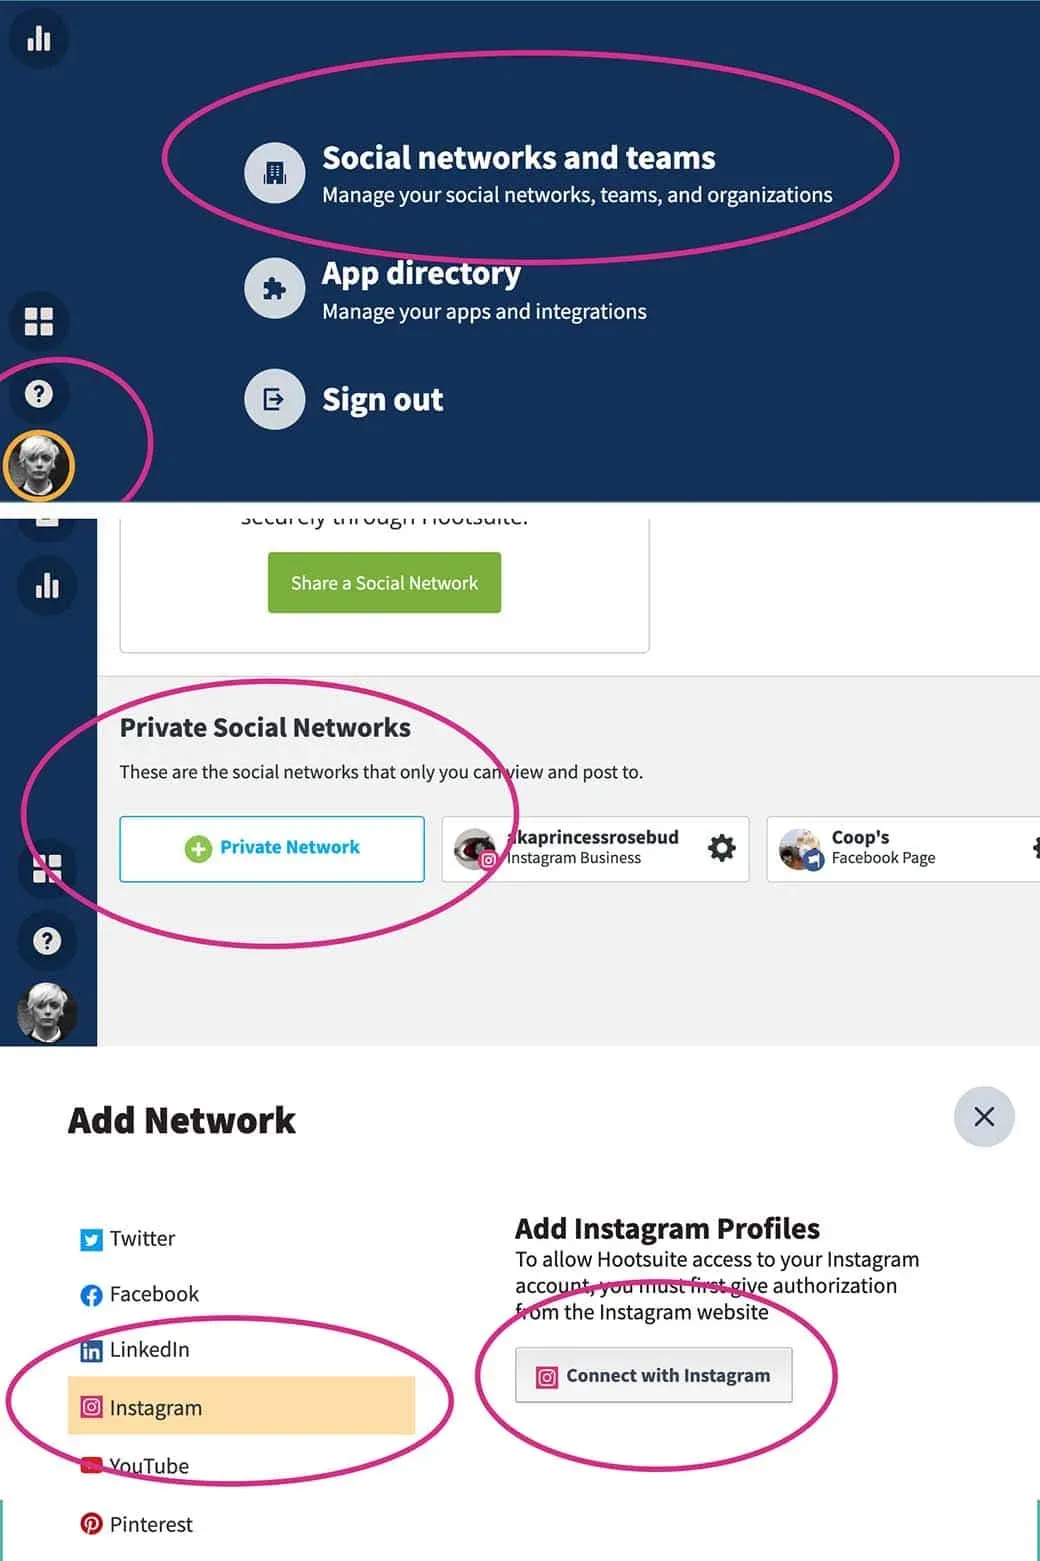
- Click your profile icon in the bottom left corner.
- Next, click Social networks and teams.
- Select + Private network in the bottom left corner.
- Select Instagram from the list of networks and click Connect to Instagram.
- Enter your account credentials
For more details on this process, check out our very detailed help article.
2. Write your Instagram post
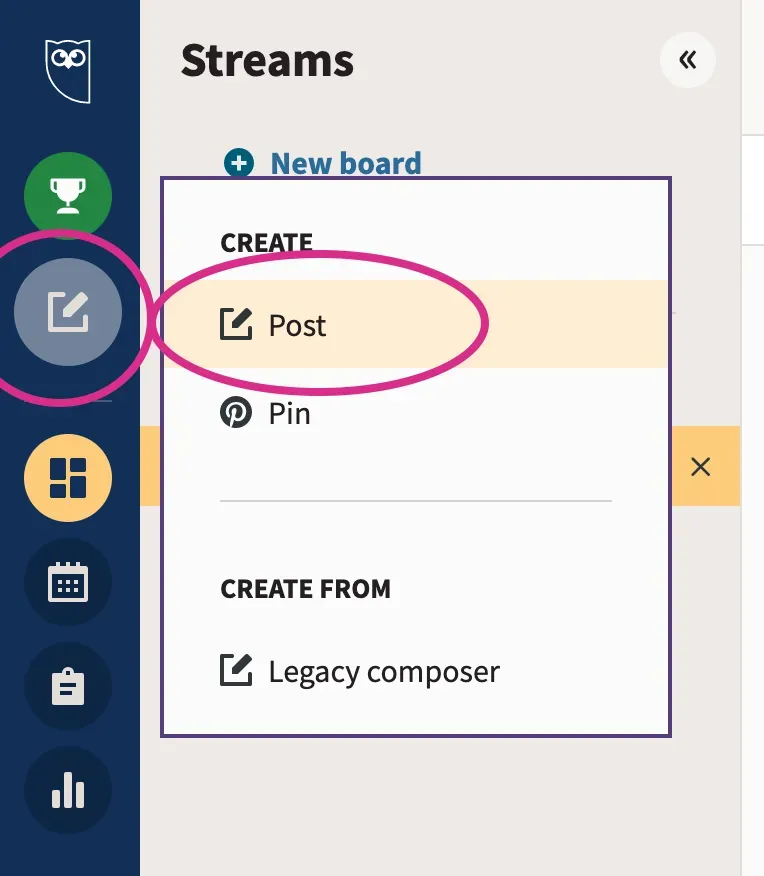
On the Hootsuite toolbar, click the Create icon, then choose Publish.
In the Post to field, select your preferred Instagram account from the list.
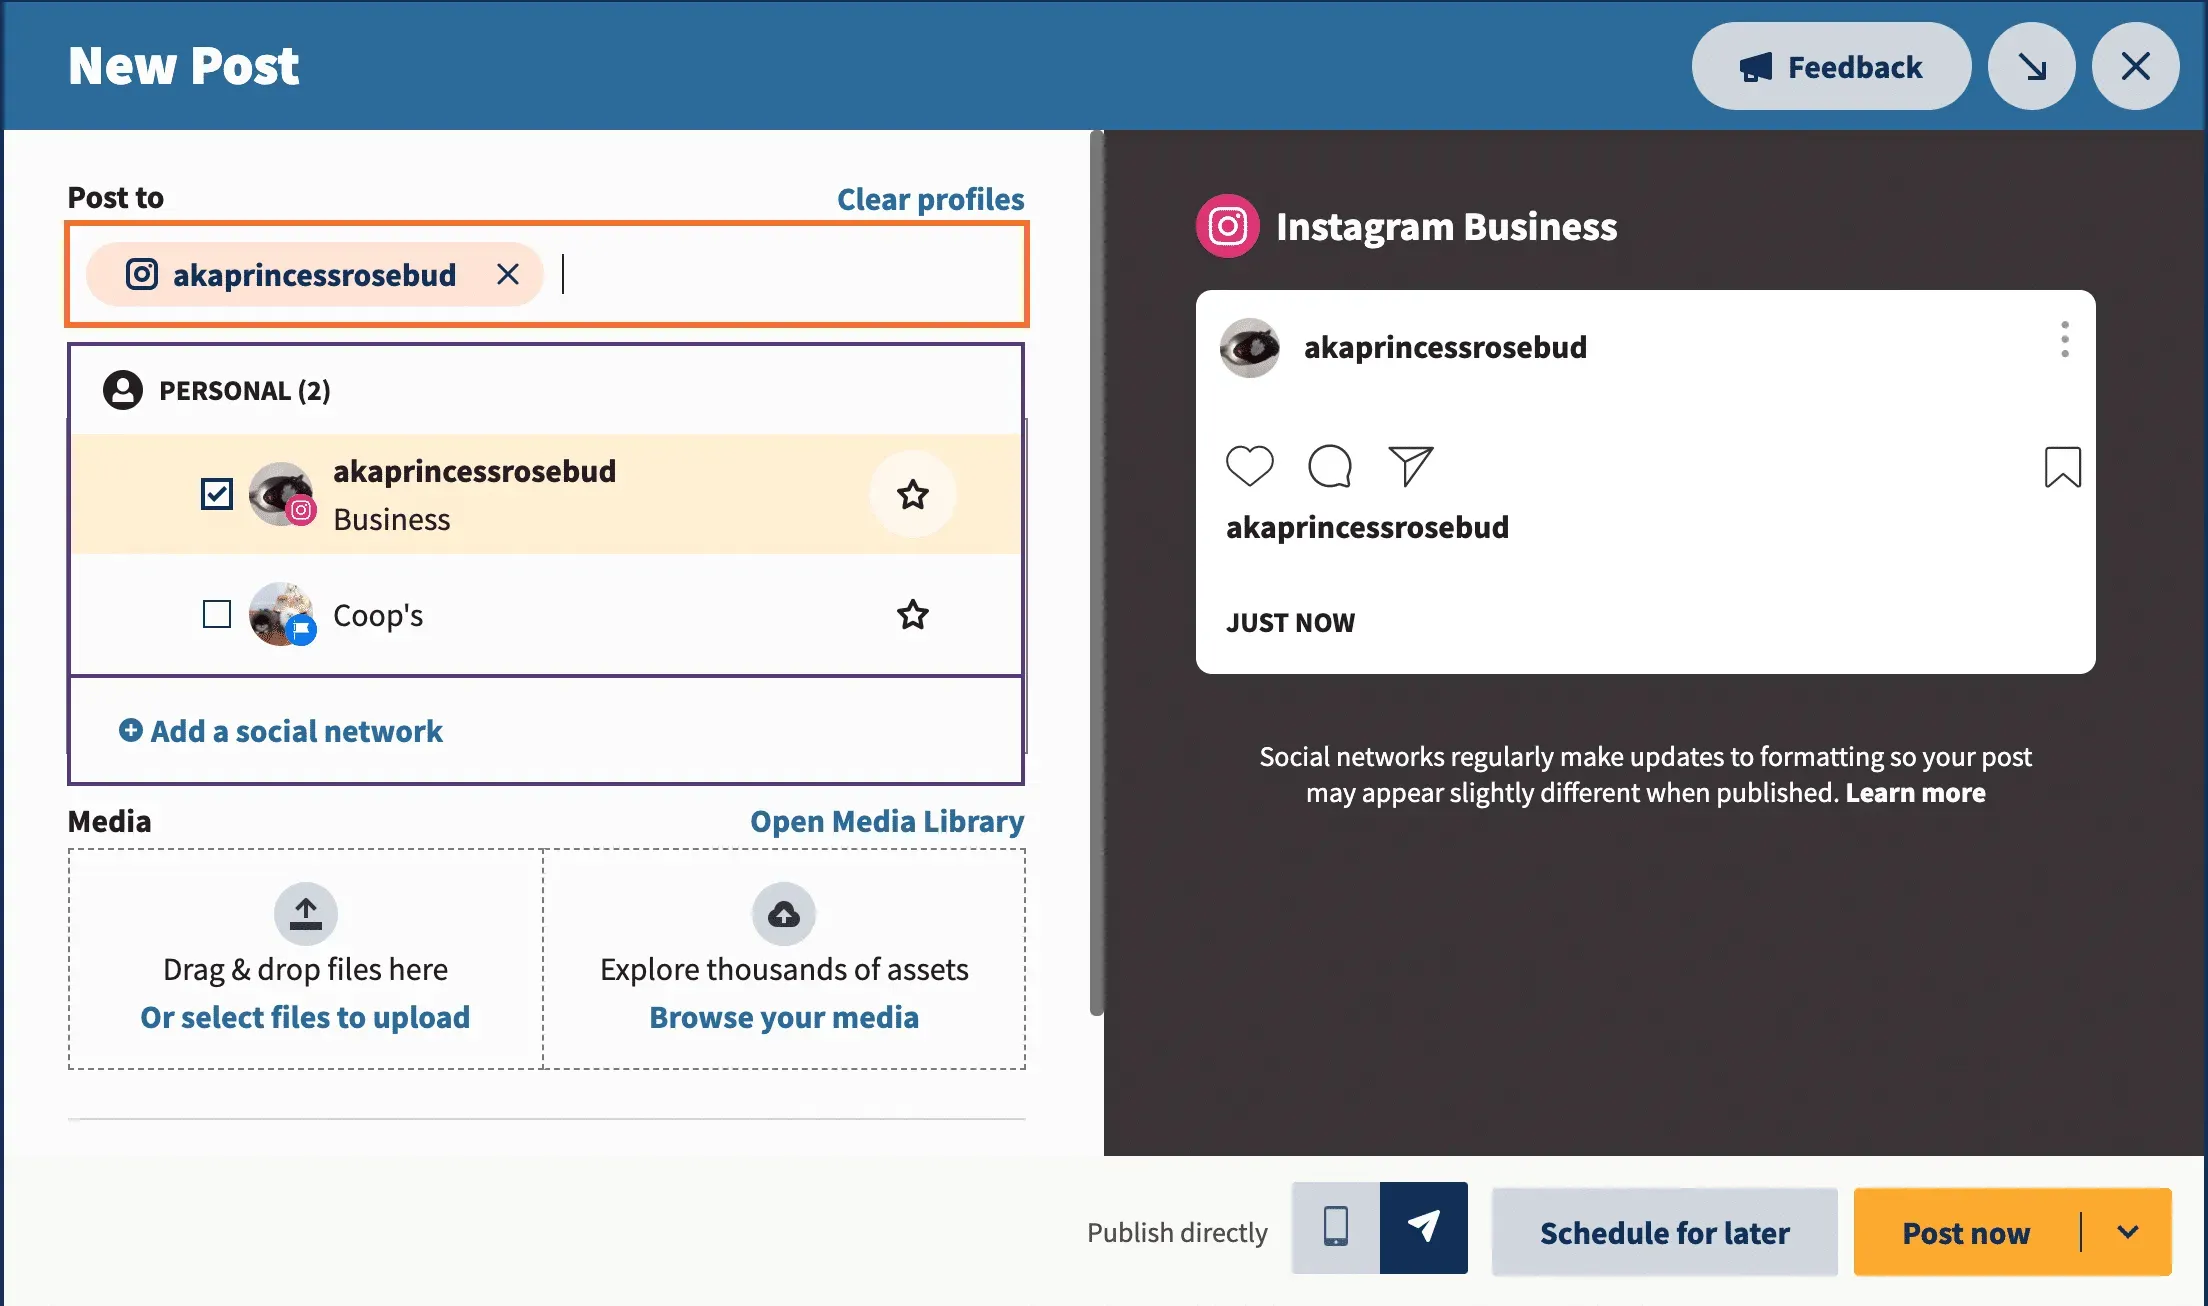
Now upload your visuals (or choose from your content library). You’ll also want to write an attention-grabbing caption, add your hashtags, tag relevant accounts, and include your location.
Your draft will appear as a preview on the right.
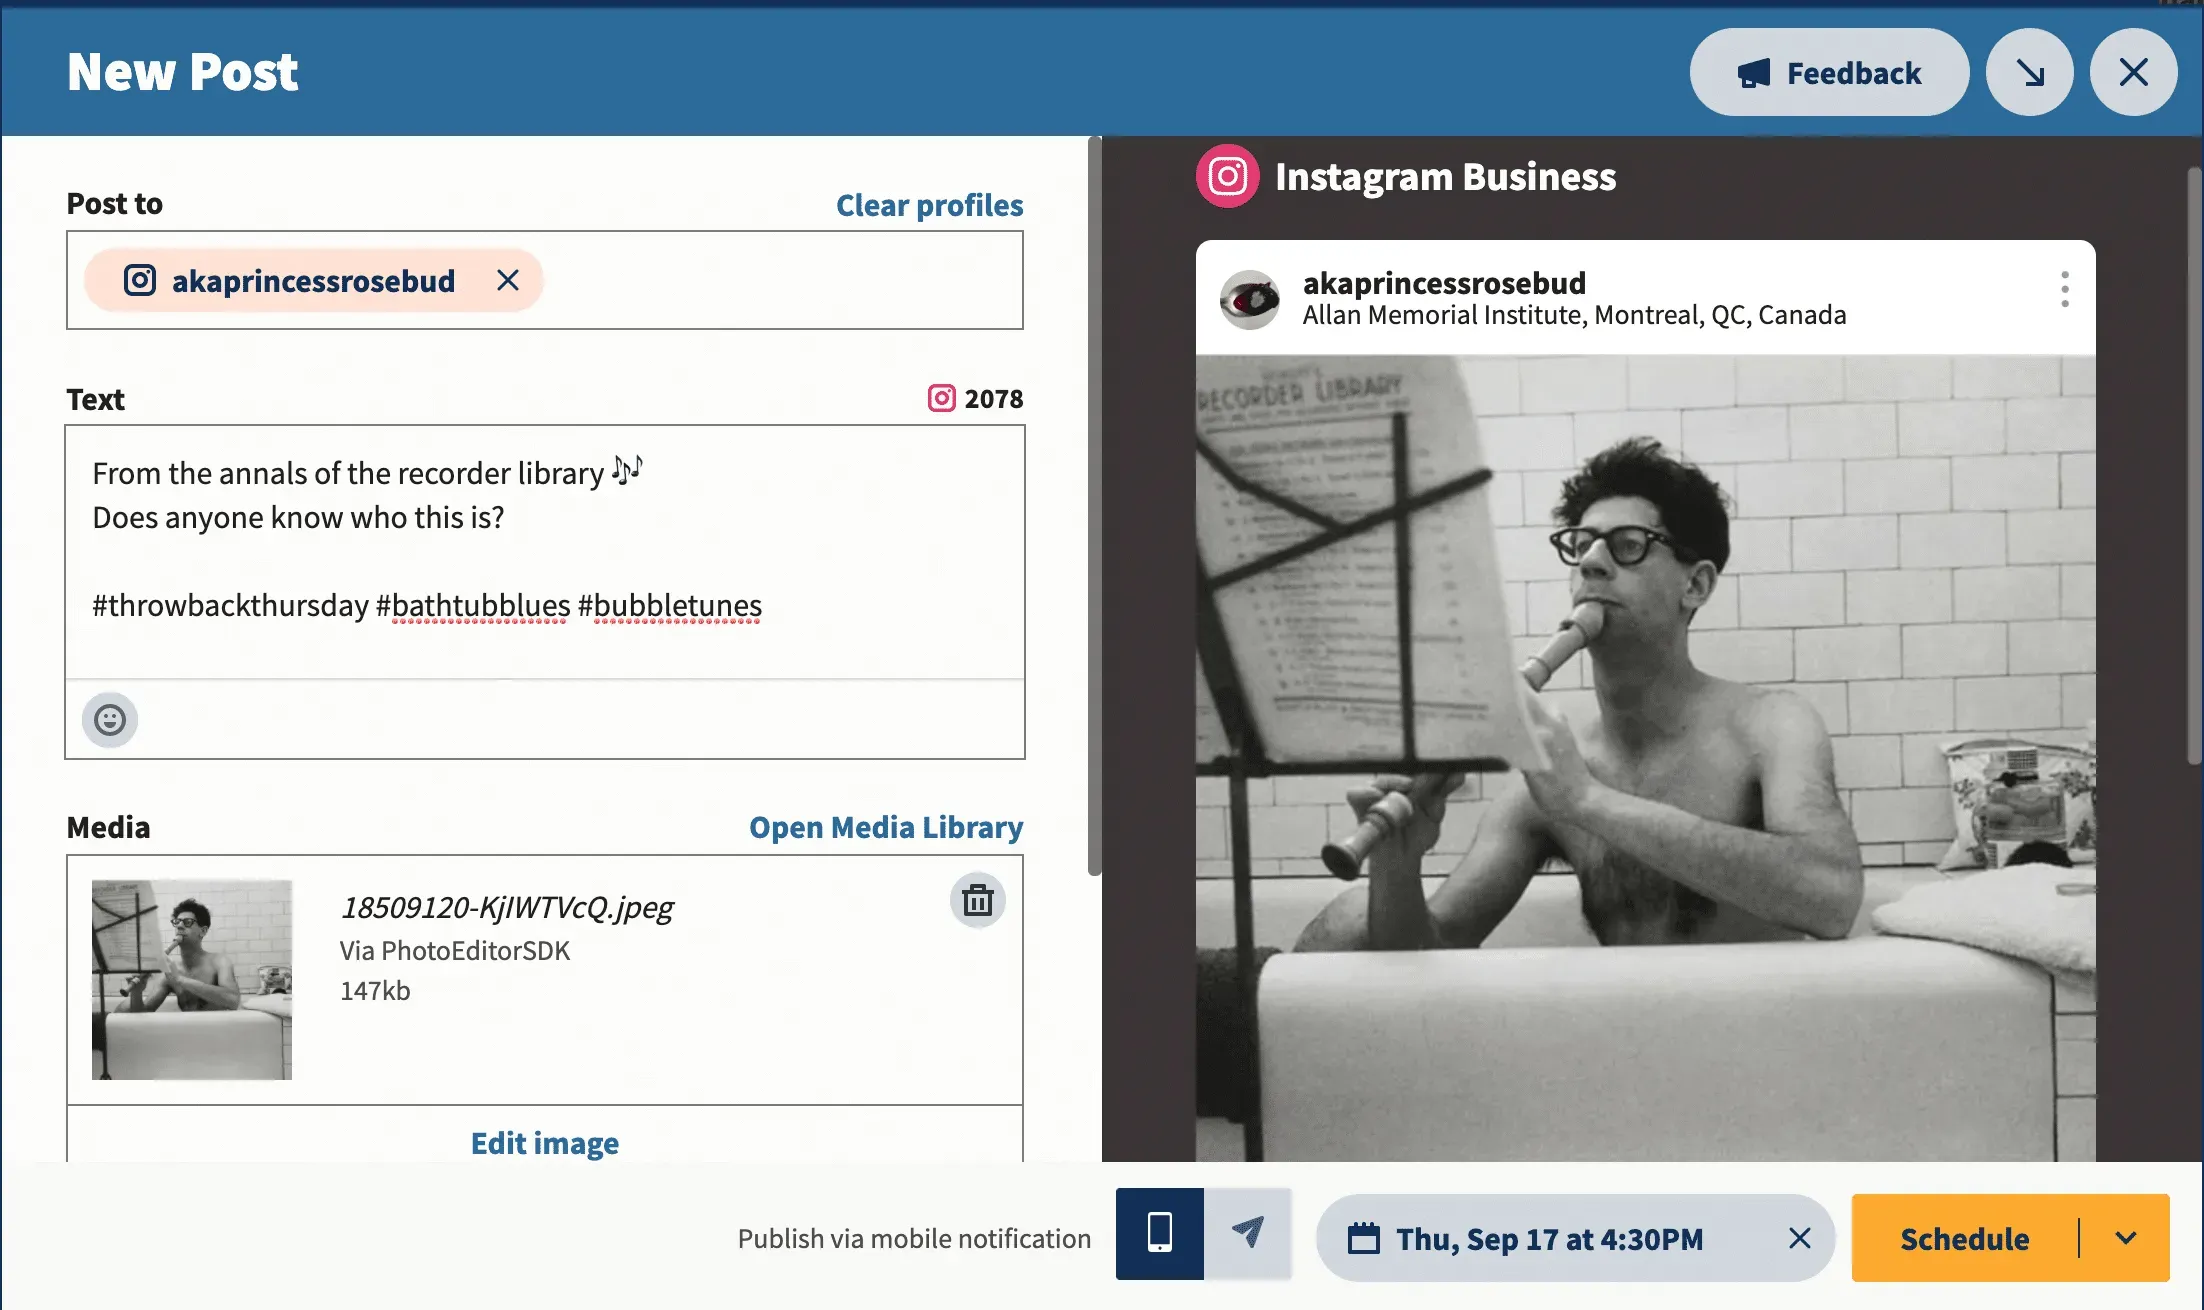
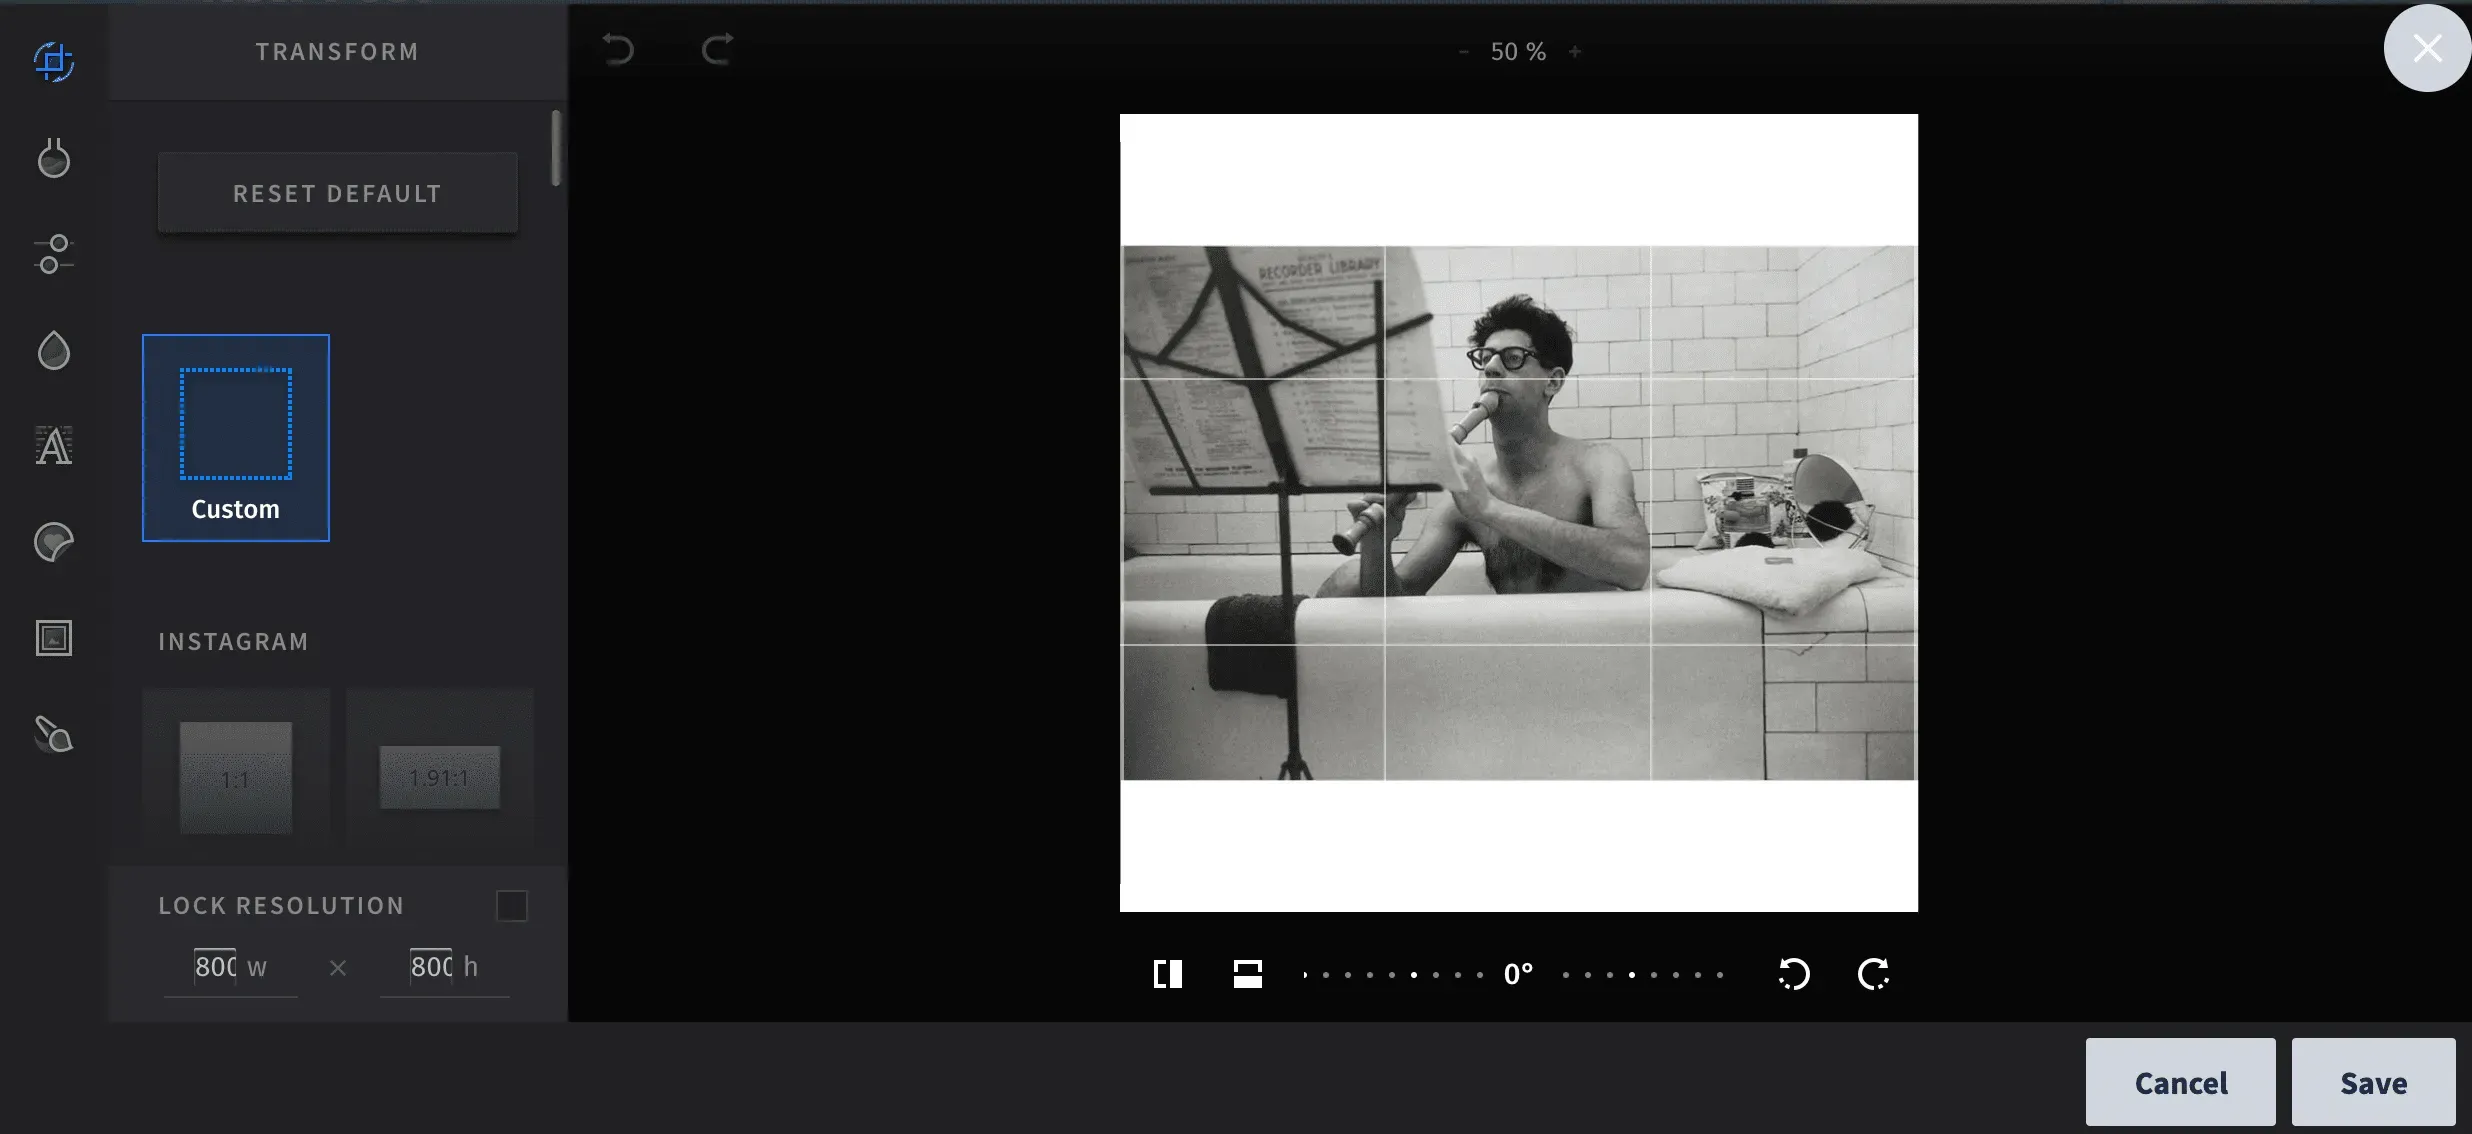
If you haven’t prepared your Instagram image yet, it’s easy. Click Edit Image to crop the visual to the desired aspect ratio (i.e. 1.91:1 or 4:5), filter it, or otherwise enhance it.
Don’t skip this step even if you are a one person team. Instagram is an image-centric platform. Giving an Instagram aesthetic is fundamental to capturing your audience.
3. Find the best time to post
Posting at the right time can help you reach your audience when they’re online. Additionally, early engagement tells the Instagram algorithm that people like your content (also pushes it to show up on more users’ feeds).
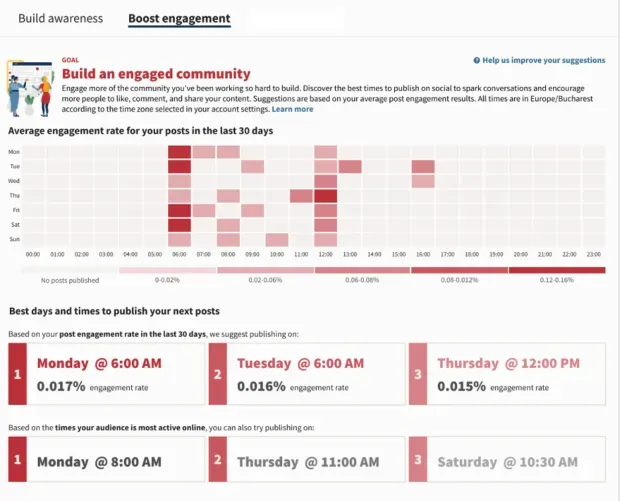
Hootsuite’s “Best Time to Post”feature shows you the best time to post on Instagram based on your posts in the last 30 days. It groups posts by day of the week and hour to determine when your posts had the most impact based on average impressions or engagement rates.
To determine the best time to post, save a draft post and follow the instructions below:
- On the menu on the left, click Analytics.
- Then click Best time to post.
- From the drop-down menu at the top of the screen, select the Instagram account you’re posting to.
You’ll see a heatmap showing the best time to post (based on your account’s historical performance). You can switch between the two tabs, Raise Awareness and Increase Engagement, to find the time that works best for your specific goals.
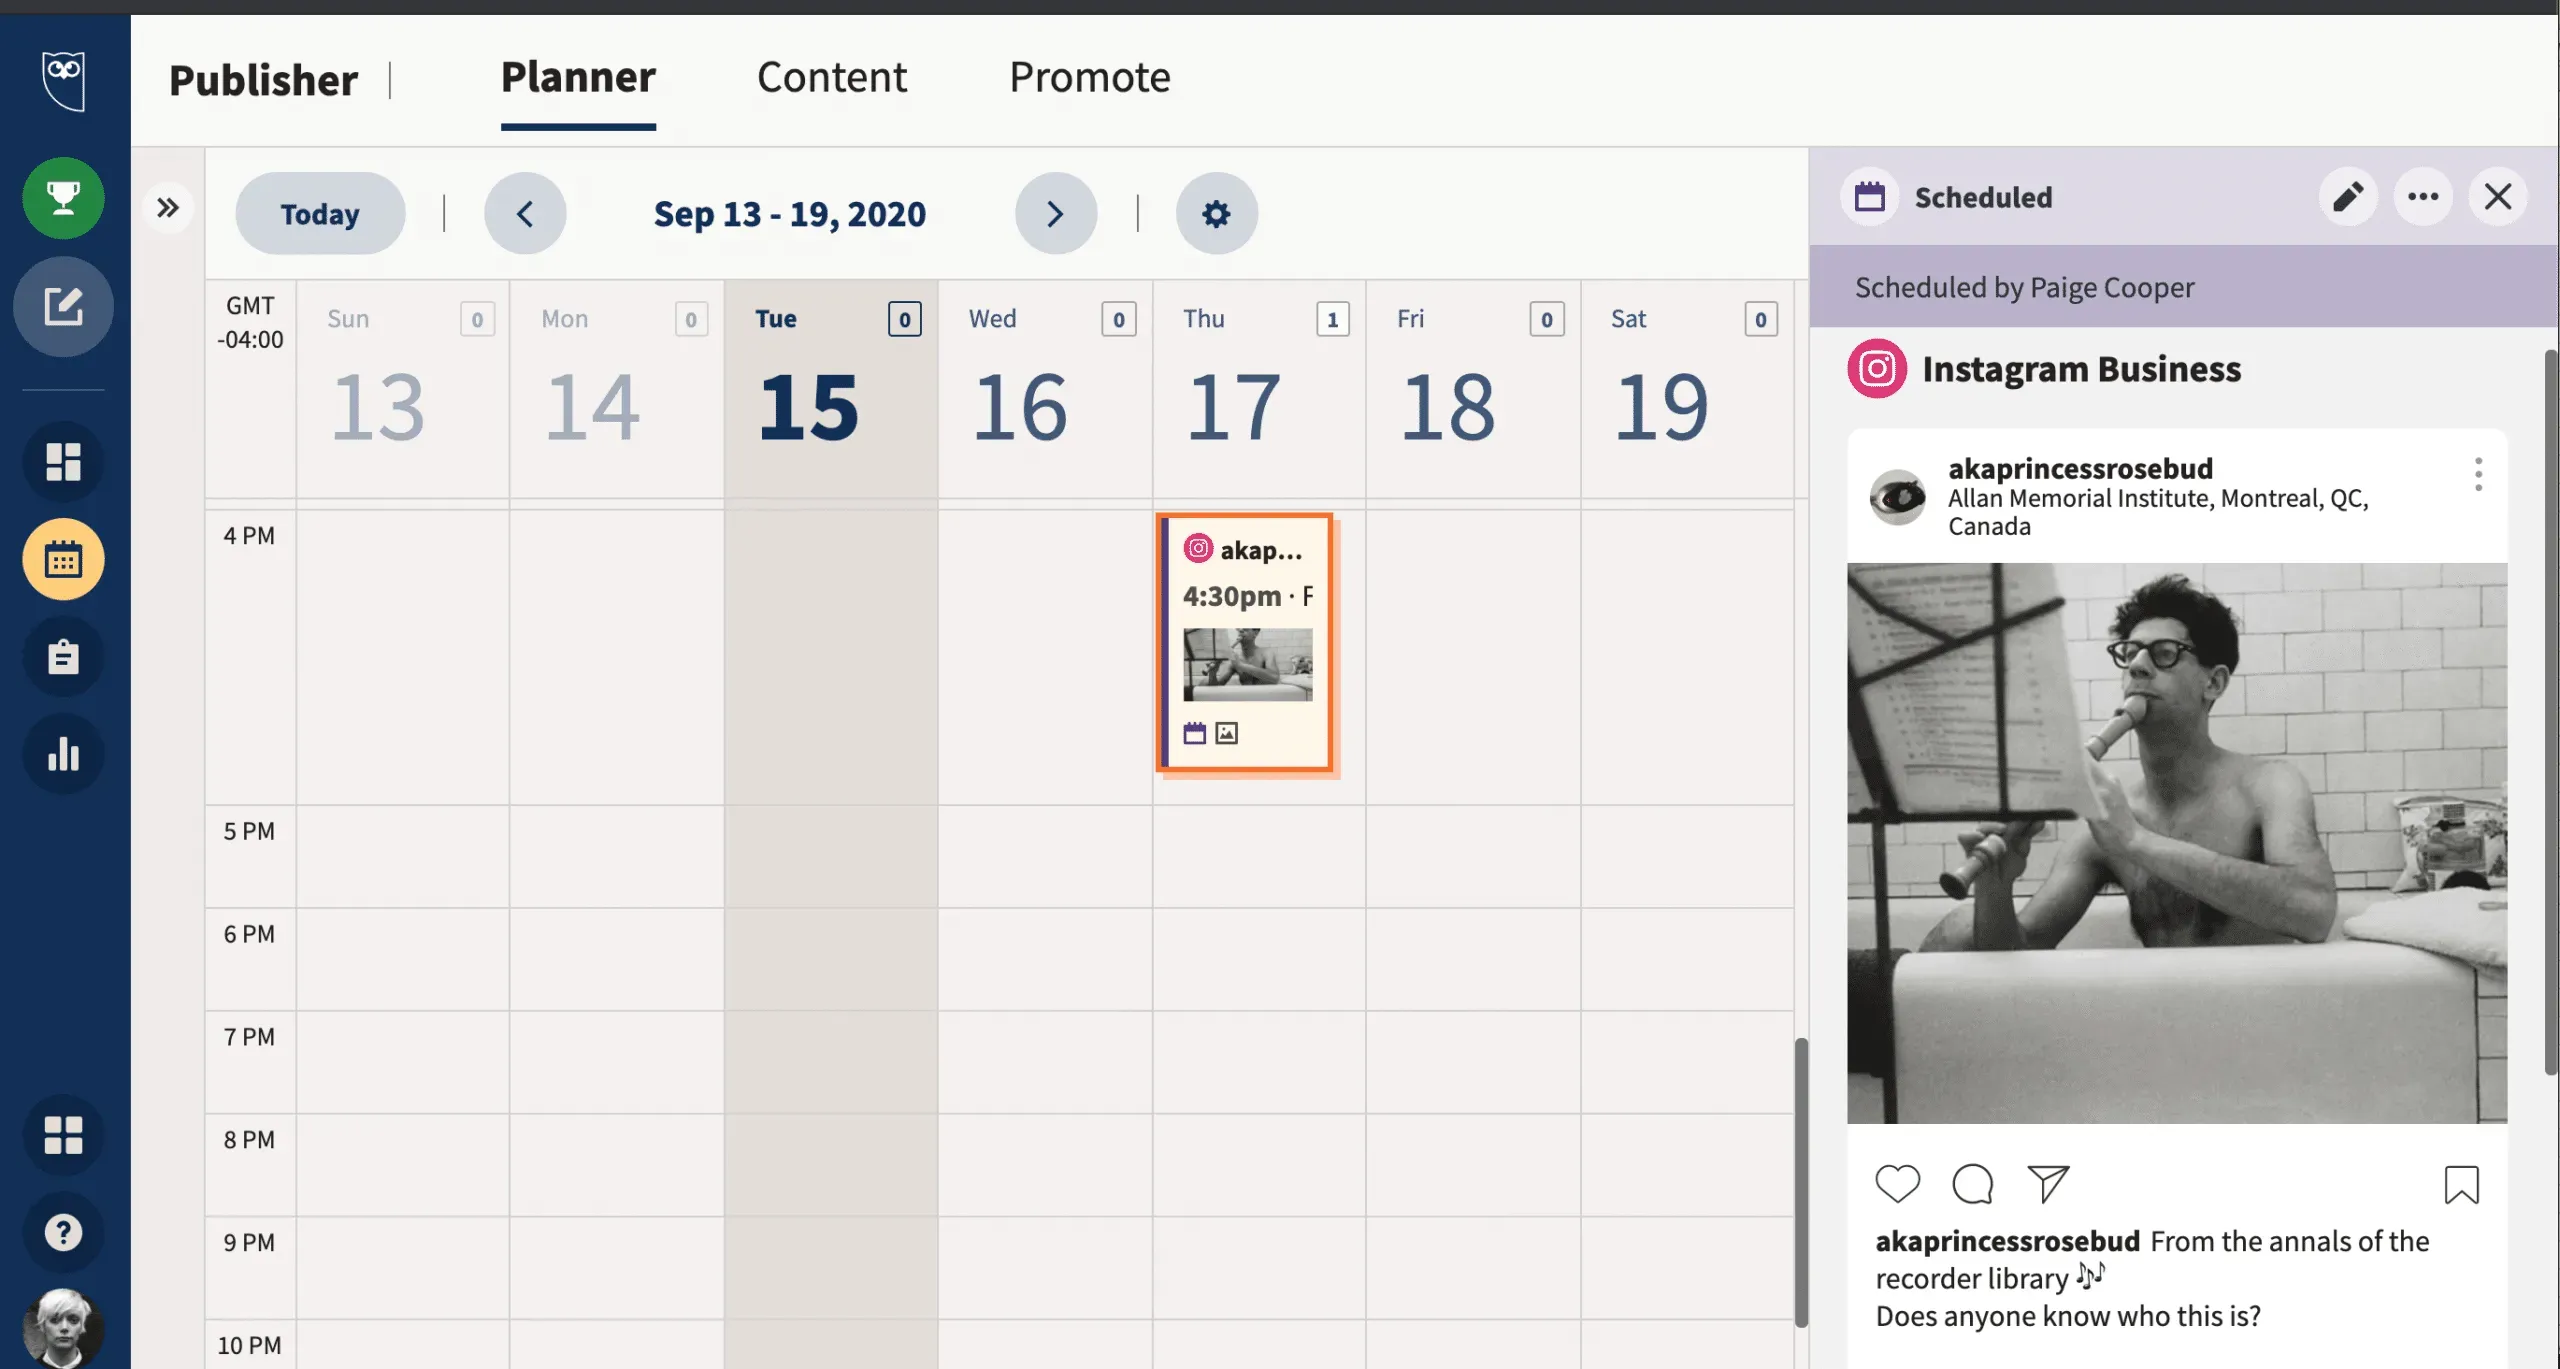
4. Schedule a post
Okay, now the easy part. Click “Schedule for Later”in the lower right corner and select a date and time for the post to be published.
If you skipped the step above and didn’t go into analytics to find the best time to post, you’ll see a couple of recommended post times after you select a date. You can choose one or manually set the time.

That’s all! You can view your scheduled posts in the Hootsuite Scheduler and edit them there before they are published.
How to schedule posts on Instagram (for personal accounts)
Finally, let’s take a look at how to schedule a post to IG for those of us using private profiles.
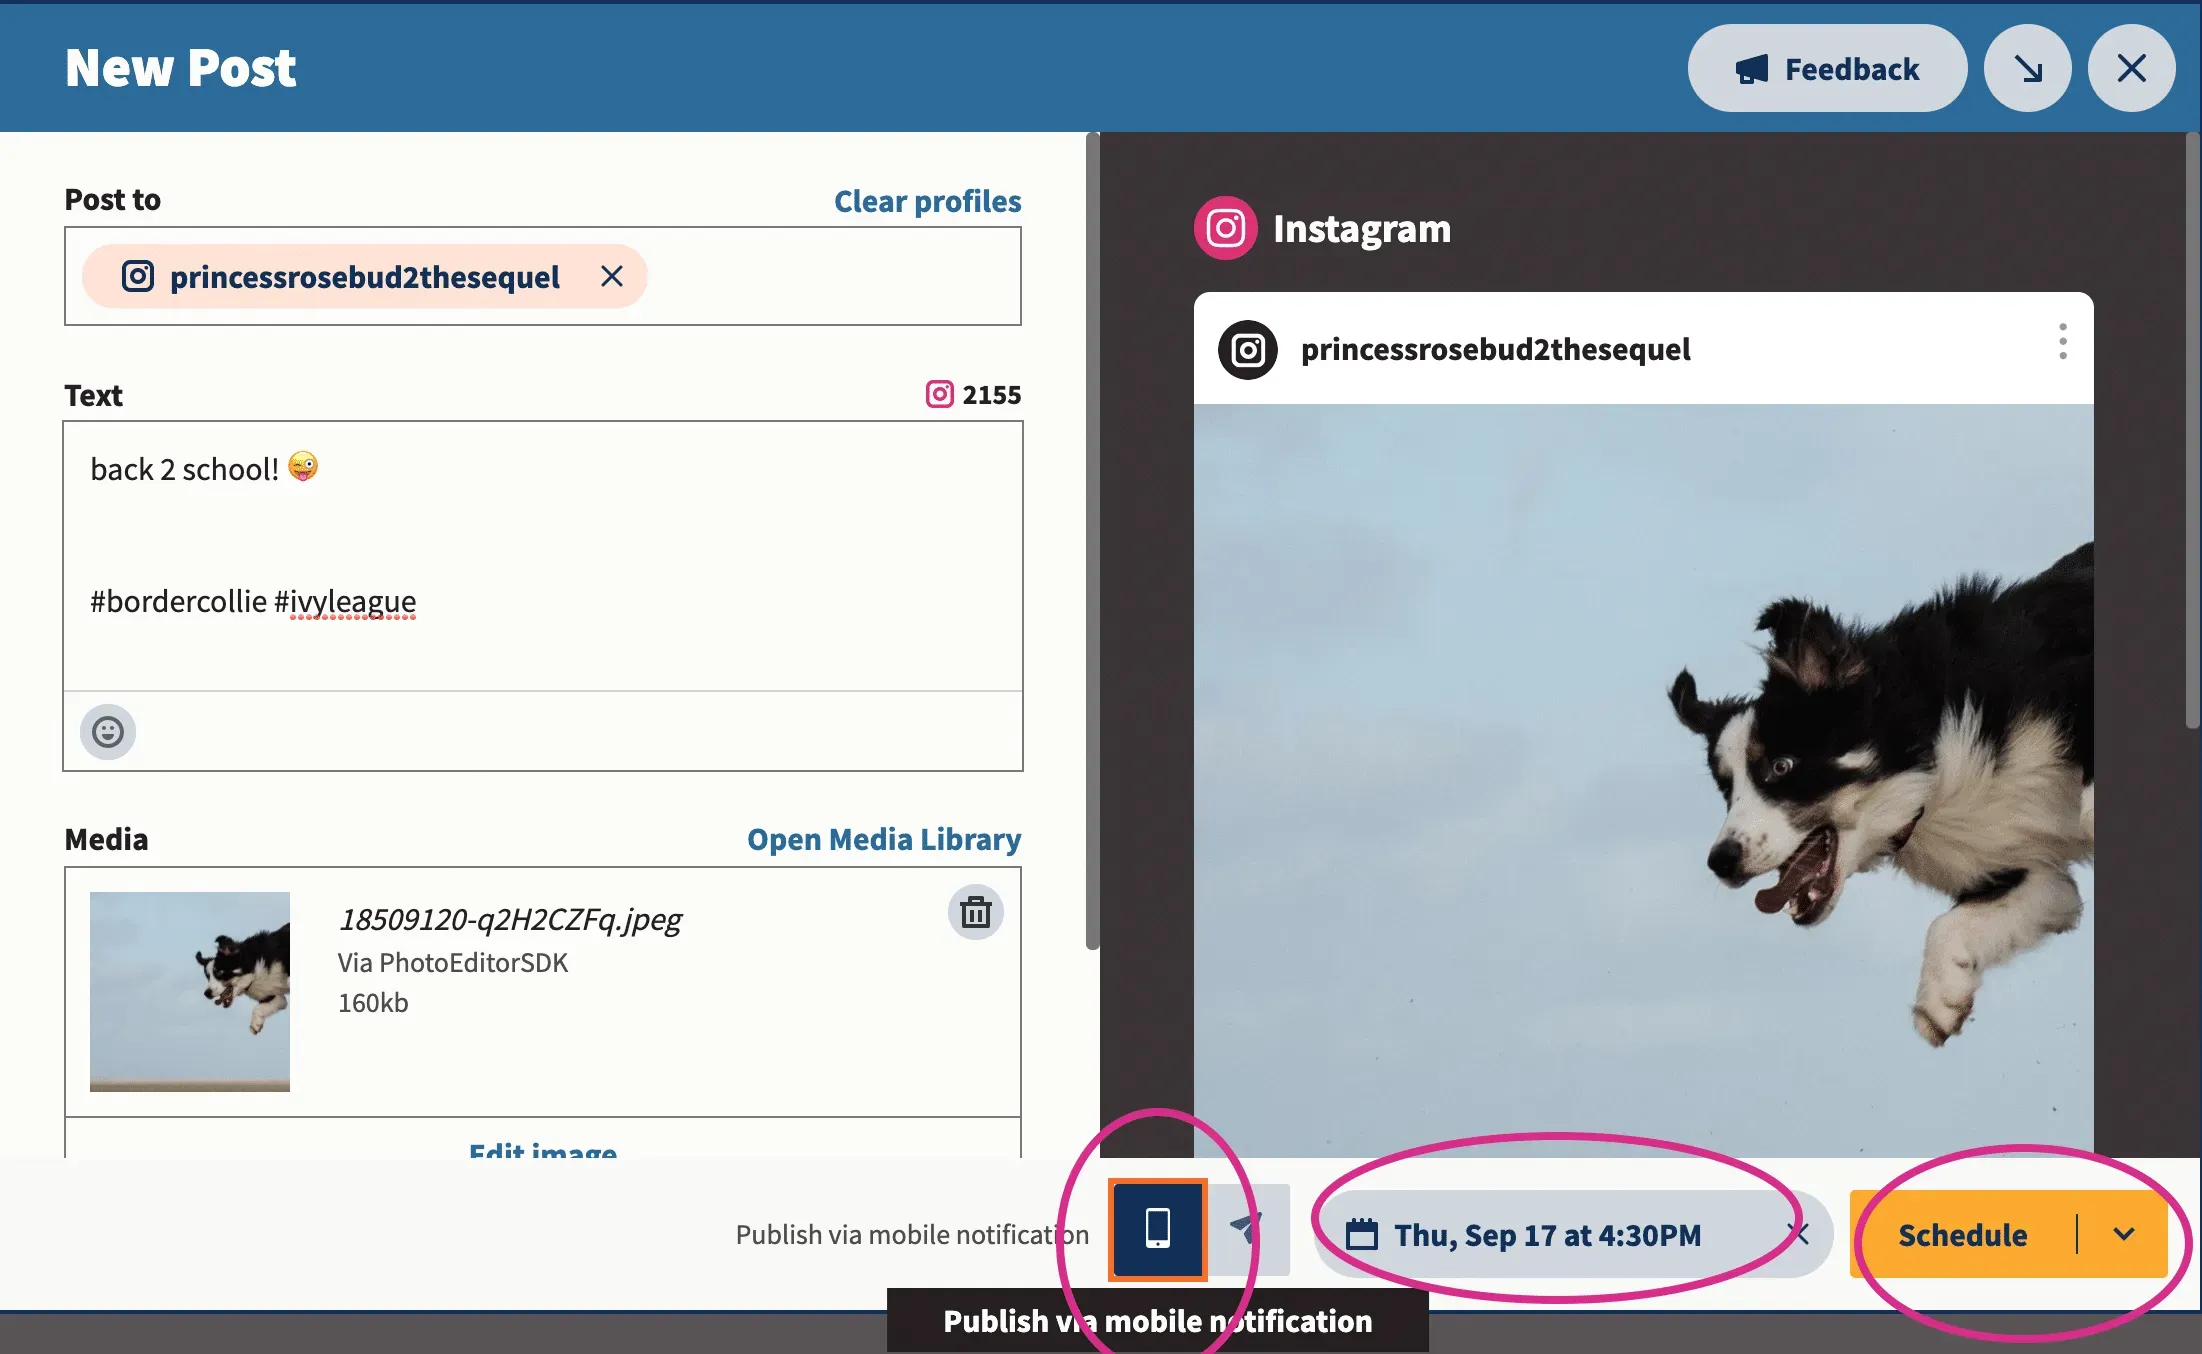
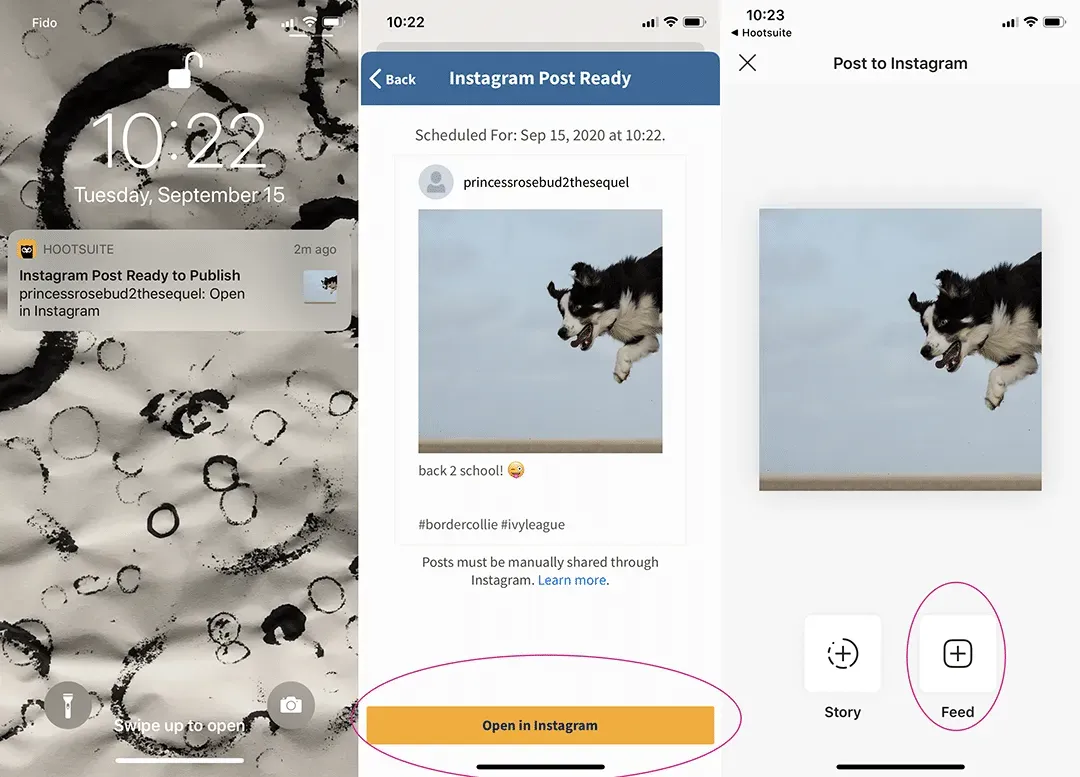
If your Instagram profile is neither a copyright nor a business account, don’t worry. You can still schedule your posts; there are just some extra steps. In short: Hootsuite sends you a mobile push notification at the scheduled time that reminds you to log in and click Publish.
1. Add your Instagram profile to the social media management platform.
For obvious reasons, we will assume that your preferred management platform is Hootsuite. From the Hootsuite Dashboard:
- Click your profile icon in the bottom left corner.
- Next, click Social networks and teams.
- Select + Private network in the bottom left corner.
- Select Instagram from the list of networks and click Connect to Instagram.
- Enter your account credentials to integrate accounts.
You’ll also want to set up your ability to use mobile push notifications. Do the following on your phone:
- Download the latest version of the Hootsuite mobile app on your phone.
- Open the Hootsuite app, tap your profile icon in the top left corner, go to Settings, then Notifications.
- Find your Instagram profile in the list and make sure Send me a push notification is enabled.
2. Write your post
You know how to do it: write a good headline, use the right hashtags, tag relevant accounts, and add your location.
If you want to level up your posts, check out our list of Instagram marketing tips. Or check out the latest Instagram trends in 2022.
3. Schedule a post
What is the key difference between a business account and a personal account? Messages scheduled for a personal account are not automatically posted. Instead, you will receive a mobile notification.
You’ll still want to check your Instagram analytics and make sure you pick the best time to post.
Select a time and date, then click Schedule.
4. Publish your post
When the time is right, you will receive a push notification on your phone to remind you to post on Instagram. Note that this is essentially the same process for scheduling your Instagram stories (regardless of which account you have).
The publishing process looks something like this. The Hootsuite app will take care of most of the work, but you need to open Instagram, insert a caption, select a photo, and so on. Don’t strain your brain, but give yourself five minutes to triple check if everything is in order.
And voila! You did it!
How to Schedule Instagram Posts with Creator Studio
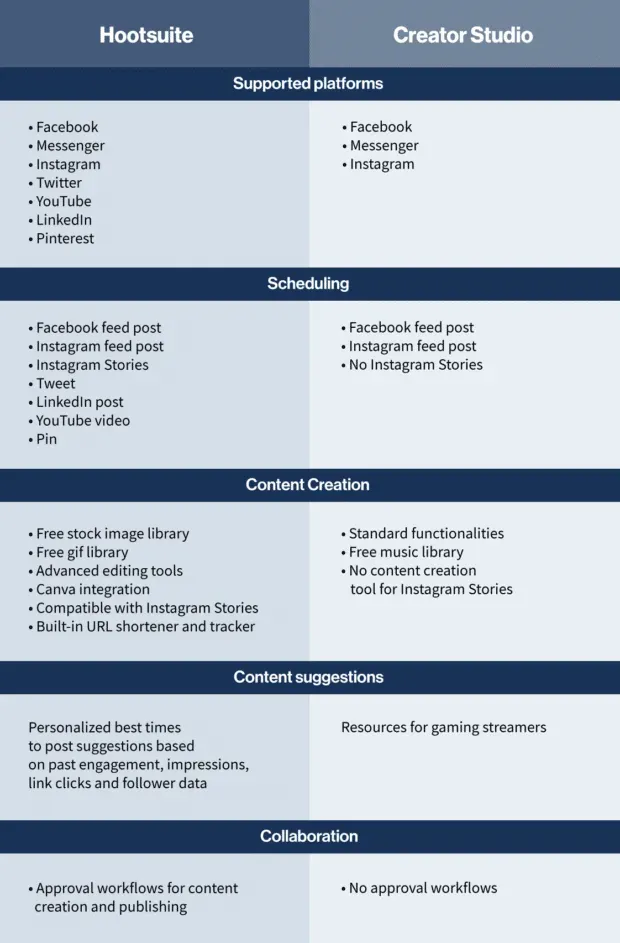
Can you plan your Instagram feed on Facebook? Of course you can if you have a Business or Creator profile on Instagram. The native Facebook Creator Studio lets you create and schedule Instagram posts from your computer.
Please note that while Creator Studio is a handy Facebook scheduler for Instagram, it is currently not possible to post or schedule an Instagram story from Creator Studio. For that, you need to check out our post on how to schedule Instagram Stories.
All in all, Creator Studio is a good tool if you only want to schedule Instagram and Facebook posts (and don’t mind not being able to schedule Stories). But most social media professionals can save a lot of time and energy by using a social media management tool and managing all social channels from a single dashboard.
A tool like Hootsuite helps you schedule content for your Instagram and Facebook Pages, as well as TikTok, Twitter, LinkedIn, YouTube, and Pinterest, all in one place. Here’s how Creator Studio compares to Hootsuite:
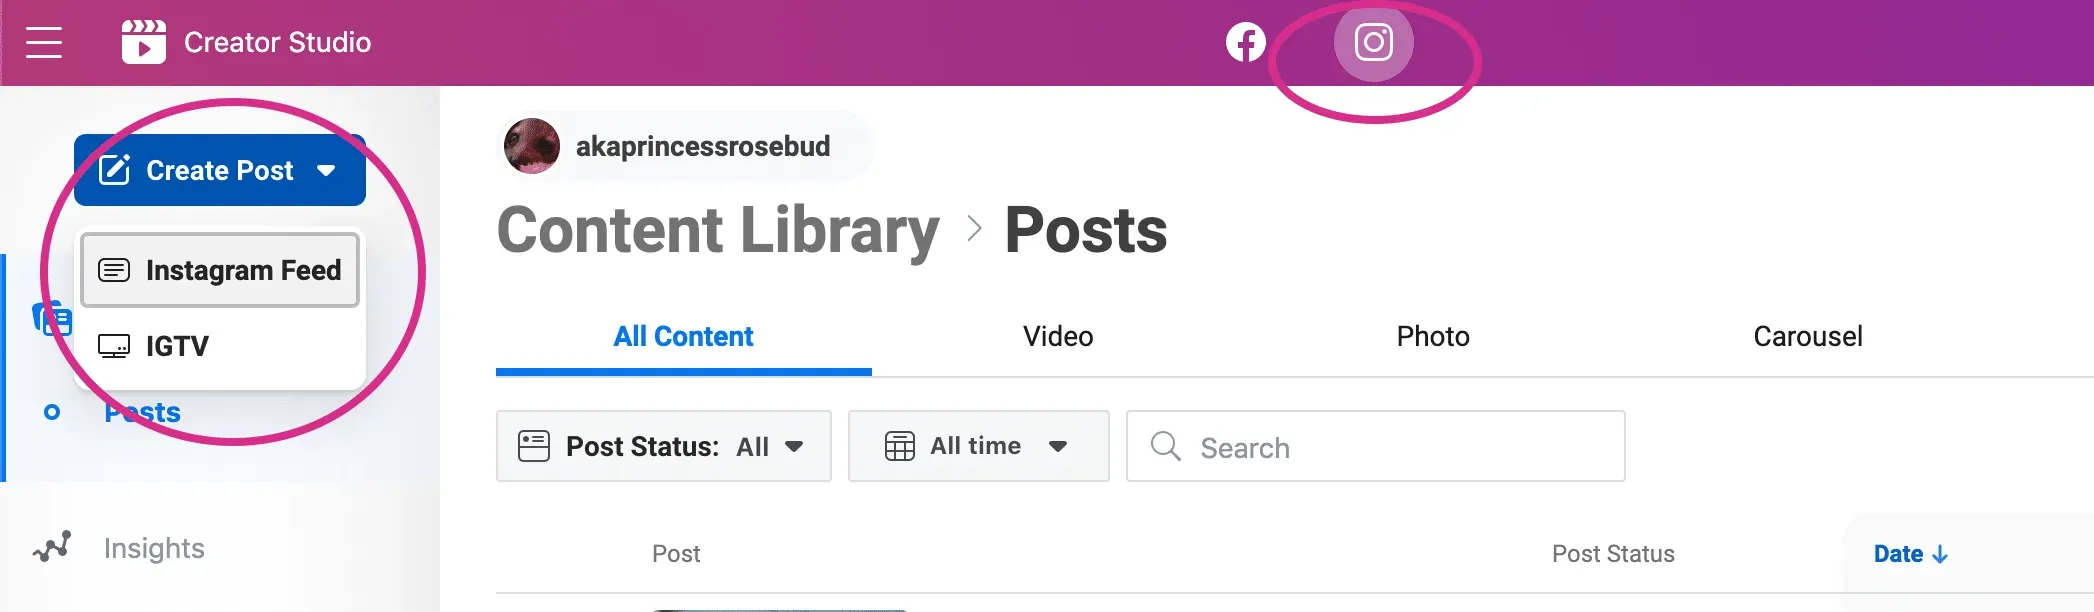
To schedule Instagram posts from your computer using Creator Studio, follow these steps:
- Link your Instagram account to Creator Studio.
- Click the Create Post button.
- Upload your visuals (photo or video – you can upload multiple files to create a carousel).
- Create your post (write a caption, add emoticons, mentions and hashtags).
- Click the arrow next to the blue Publish button and select Schedule.
That’s all! Now you can kick back and check your DMs.
What about cross posting?
If you want to further streamline your process, you may also want to consider cross publishing.
Cross-posting is the process of sharing similar content across multiple social networks. This is a convenient choice for companies with a smaller budget and less time to personalize content.
You can use cross posting (via Hootsuite or Facebook Creator Studio) to set up Facebook to post to Instagram. However, it’s not always the best choice for really interesting content.
We have more details in our detailed cross-posting guide. If you’re serious about scaling your Instagram marketing efforts, you have better options.
Instagram Post Scheduling Best Practices
If you’re ready to take the plunge and become really efficient with your posting habits, these tips will help you stay ahead of the game.
1. Post at the best time
In general, it’s important to post when your followers are online. This is because the Instagram algorithm prioritizes novelty. This means that, in general, a newer post will show up higher in your followers’ feeds than an older post.
This is one of the reasons why simple crossposting might not work. Your Facebook audience can be active from 18:00 to 22:00 on weekdays, but view Instagram from 13:00 to 16:00.
The right Instagram analytics tool will tell you when your audience is most likely to be online and/or engage with your post.
For the Hootsuite social media team, these times are 8:00 am to 12:00 pm PST or 4:00 pm to 5:00 pm PST weekdays. For you, it may be different.
Luckily, Hootsuite’s Best Time to Post feature can show you the best time to post on Instagram based on your posts in the last 30 days. It groups posts by day of the week and hour to determine when your posts had the most impact based on average impressions or engagement rates. It then suggests the best time to post.
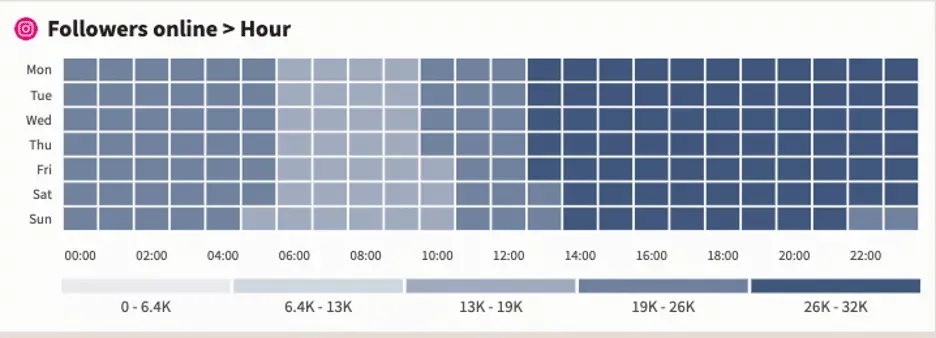
It will also suggest timeslots you haven’t used in the last 30 days so you can change your posting habits and test new tactics.
2. But don’t plan ahead
If we have learned anything in 2020, it is that the world is changing faster and faster. That’s why automating Instagram posts is a little more difficult than “set it and forget it”.
When it comes to Instagram scheduling, going longer than a week ahead can increase the risk of things going wrong. You don’t want to cause a social media crisis for your brand by posting something insensitive. If something unexpected happens, you may need to completely pause your posting calendar. You may even have to use your social channels to communicate during times of crisis.
Our advice: keep your finger on the pulse and be nimble.
3. Be prepared to hit pause
If you plan your posts ahead of time, it’s not the end of the world. Sometimes you need a full two weeks of vacation!
Just make sure you’re using Instagram’s scheduler, which allows you to press pause on all upcoming content if a crisis or emergency suddenly strikes.
With Hootsuite, pausing scheduled social media content is as easy as clicking the pause icon on your organization’s profile and then entering a reason for pausing. (This is actually one of our favorite Hootsuite hacks.)
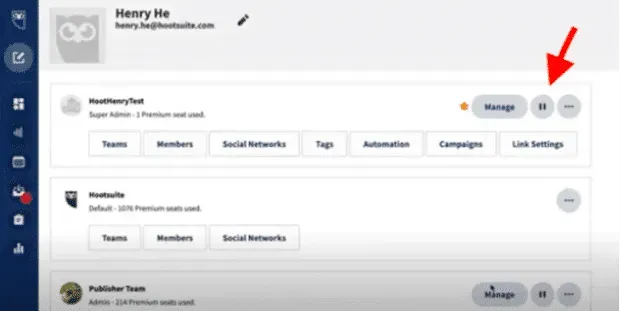
Source: HootSuite
4. Don’t receive spam
Yes, the miracle of Instagram scheduling means you can now increase your posts without sacrificing quality. But should you?
Short answer: “maybe”. Long answer: “Perhaps if you can maintain consistent quality at this pace in the long run.”
When it comes to interaction, consistency is more important than frequency. Remember that the algorithm prioritizes good relationships: if your followers engage with your Instagram content, the algorithm will show them more.
5. Optimize and edit
No matter how busy you are, be sure to take a fresh look at this copy before it goes live.
And for large teams with lots of moving parts, the internal multi-stage approval system is perfect for preventing oversight.
But while words are important for any social media post, visuals are key on Instagram. Get yourself an Instagram scheduler that will let you edit your photos in the same toolbar you post from. This will save you much more time and ensure that your images are fully optimized before publishing.
Say hello to the Hootsuite image editor that can crop your image to the right size for any social network. It also has an extensive library of filters (useful for those of us who prefer to leave photo editing to the pros). Watch the video below for a preview of the tool.
6. Analyze and adjust
Now that you know how to schedule IG posts, it’s time to look at the big picture.
Are you creating content that works for your audience? What brings likes? What is collapsing? Choose your preferred Instagram analytics tool and start exploring.
Use Hootsuite to schedule Instagram posts at the best times, respond to comments, track competitors, and measure performance, all from the same dashboard you use to manage your other social networks.
Leave a Reply