How to Encrypt Gmail Emails on iPhone for Extra Email Security
Gmail uses TLS or transport layer security by default for all email messages, so all your emails will use standard encryption as long as the recipients also support TLS. But there is a way to further increase the security of your Gmail email, and you can use the Mail app on your iPhone to do so.
Apple has supported S/MIME, or Secure/Multipurpose Internet Mail Extensions, on the iPhone since iOS 5 more than a decade ago. S/MIME is a widely used cryptographic protocol for sending and receiving digitally signed encrypted messages, running on top of the Gmail TLS system. S/MIME is similar to PGP or Pretty Good Privacy which ProtonMail, FlowCrypt and Hushmail use.
TLS, used by Gmail, encrypts the tunnel between mail servers, making it harder for hackers to eavesdrop or snoop on messages in transit. The connection between mail clients and mail servers is also encrypted. So as long as you’re communicating with someone whose email provider uses TLS, the round-trip route is secure. However, email remains vulnerable on both sides.
Why You Should Use S/MIME Encryption for Gmail
Gmail can and does scan your emails for smart features like malware detection, calendar integration, and autocomplete, so if an email has a particularly sensitive subject, you might want to further secure it. Gmail servers can also be hacked one day by attackers, which can give hackers access to all your data.
In addition, a hacker can gain physical access to a user’s device to search for their email, or install malware to view email remotely. They can even attack the user’s email account directly through password cracking, social engineering, and other attack vectors for unfettered access.
When using S/MIME, both you and the recipient use a CA certificate to encrypt Gmail messages end-to-end. To send them an encrypted email, you need their public key, and they need your public key to send you secure messages. To read the messages, each of you uses your private key associated with the public key to decrypt the content.
Gmail directly supports S/MIME, but only for paid Google jobs, and the workspace administrator must enable this feature. You can’t use Gmail’s S/MIME support on your personal Gmail account, and this is where a private S/MIME certificate comes into play. It’s easy to set up S/MIME in the iOS Mail app if you have a personal certificate for your email address.
Note that this example uses personal Gmail addresses for both the sender and recipient. In an Exchange environment, things will be different, unless you’re talking to people who don’t use Exchange.
Get an S/MIME certificate for your Gmail address
To use S/MIME, you need an S/MIME certificate from a CA. Generally, S/MIME certificates cost money, but some companies issue demo or free certificates that are valid for a limited time. If you like how it works, you can pay for a subscription. For example, a personal GlobalSign S/MIME certificate costs $59 per year, but a demo version is offered to try.
For this tutorial, I’m using Actalis because it’s one of the few CAs that offers a free one-year certificate for personal use. You can even re-apply for a new certificate after one year, according to its policy:
9.1 Fees
Certificates issued under this policy are provided free of charge (that is, free of charge). However, a maximum of 1 certificate request per year is accepted per unique email address.
Other CAs you can check out include SSL ($20-$30/year) and Sectigo ($13.99-$39.99/year). You can get a free trial or a free limited certificate upon request.
Install an S/MIME certificate on your iPhone
After you sign up for a personal S/MIME certificate, the company must provide you with a password for the certificate and email you a PFX file, also known as PKCS #12, or a ZIP file containing the PFX. A PFX file is a password-protected certificate archive containing a complete certificate with public and private keys. Save this to your iPhone in the Files app for safekeeping.
Then unzip the file if needed and click on the PFX file which will download the certificate as a profile to your iPhone. Click “Close”on the “Profile loaded”message. Then open “Settings”and click “Profile loaded”at the top. (You can also find it via Settings -> General -> VPN & Device Management.)


Then click “Install”, enter your iPhone passcode and click “Install”again.


Now click “Install”at the prompt. However, before you can install it, you will need to enter the password that the CA provided you when you signed up for the certificate. Click Next, then Finish. You should now see your email address as a configuration profile in your VPN and device management settings.
- Don’t Miss: Remove Unwanted Profiles and Certificates on Your iPhone to Protect Your Privacy and Security


Enable S/MIME for your Gmail address
You can now activate the certificate for your Gmail email address using the downloaded certificate. Go to Settings -> Mail -> Accounts and select your Gmail account. Then tap your account email address at the top and select More.


Here you need to go to “Sign”and “Encrypt by default”and enable them. The former will add a verified signature to your email so that the recipient knows it comes from you and not from anyone else. The second will apply encryption whenever possible to all outgoing emails from the Gmail address in your mail app. If you just want recipients to know that the email is definitely from you, use a signature but disable encryption.


Back in Advanced Gmail Account Settings, it should say “Yes”to both options, or at least one or the other, depending on what you want to get out of it.
Ask the recipient to complete steps 1-3
It’s a two-way street, so you can never use end-to-end encryption unless the person you’re talking to also has a certificate. Once they have it, you both need to swap the public keys because they will encrypt messages. The private key then decrypts and reads incoming messages from the associated public key.
Swap public keys
Ask the person you want to use end-to-end encryption with to send you an email after they set up their certificate in the Mail app. In the email you received, tap their name in the From field, which should now have a blue check next to it, so you know their signature is valid. On their contact page, click View Certificate, then Install, then Finish.


After that, send them an email and ask them to do the same to add your public key to their device. If you see a “Unable to encrypt”message with a red padlock crossed out, you will need to click “Send Anyway”after you try to send it. You can also click on the same padlock icon to disable encryption, which will be sent as a standard email with your public key certificate.
Send and receive encrypted emails
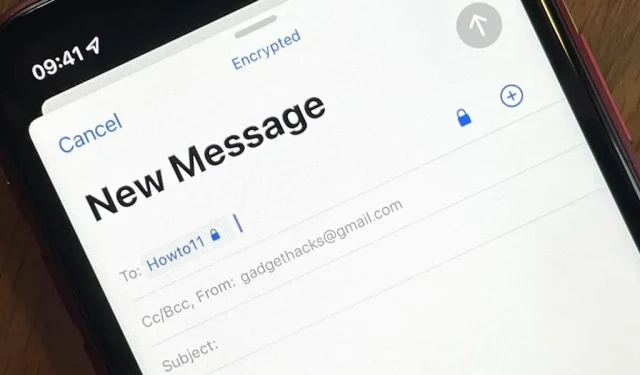
Whenever you want to send an end-to-end encrypted message to a recipient, create a new draft and add their name in the “To”field. You should now see a blue padlock icon next to their name indicating that encryption is enabled and it should say “Encrypted”at the top of the window.
If you want to send a regular message, just tap the blue padlock icon to the right of the “To”field and encryption will be disabled this time. You will know because “Encrypted”will disappear from the top and the padlock icon will be crossed out.
You’ll know that received messages were successfully encrypted if you see the lock icon next to their name in the From field. If you just see a check mark, it means it has been signed but not encrypted. Responses will also be encrypted unless they are disabled on a per-message basis.


You can check the email status by tapping the other person’s name in the “To”or “From”field of the message, and you’ll see “Signed”, “Encrypted”, “both”or “neither”in their certificate.
Install certificates on other devices (optional)
If you want to read encrypted Gmail emails from Mail on your iPad or Mac, you won’t be able to do so because they can’t be decrypted. You need to install the private key on all devices you use with Mail, which decrypts emails. For iPadOS, the process is the same as described above. MacOS is a little different, but pretty intuitive to set up.
You can also use S/MIME certificates for non-Gmail email addresses such as Outlook, Yahoo, AOL, etc. so you’re not limited to secure communication between Gmail.
Leave a Reply