Learn how to install and use Dropbox on a Mac
Instead of constantly visiting the Dropbox website to download or upload files, learn how to set up the Dropbox software on your Mac and manage your new and current files.
You can add Dropbox to Finder just like you can set up Google Drive on your Mac for simple file uploads and downloads. After that is complete, you can use this well-known cloud storage service in your Mac’s Finder like any other folder.
All of your current files will be located in this local Dropbox folder. Also, everything you transfer into this folder will instantly upload to Dropbox and be accessible from all of your devices, including computers, phones, and the internet.
Install Dropbox on a Mac
1) Download Dropbox using this official link on a Mac. Instead, if Dropbox is already installed on your phone, open it and select Account > Connect a Computer.
2) To install the application, double-click the DropboxInstaller.dmg file you downloaded and then adhere to the straightforward on-screen directions.
3) After the setup is finished, log into your Dropbox account.

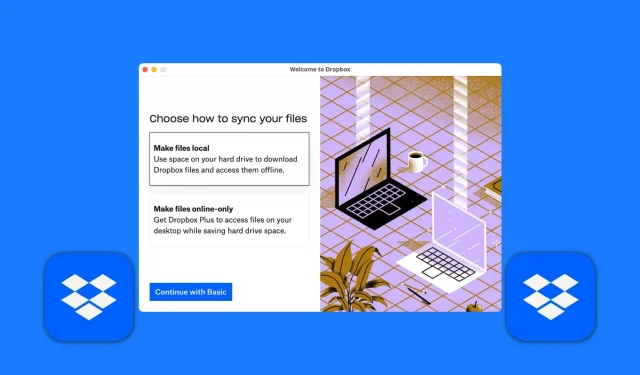
4) Choose the file synchronization method now. If you’re using the free, basic plan, your only choice is Make files local, which will keep all of your current files on the internal drive of your Mac.

5) When you’re done, Finder will launch into the Dropbox section. If not, use Finder and look in the upper left corner for the Dropbox folder.

File management in Dropbox for Mac
Access: You may access your existing Dropbox files and folders by clicking the Dropbox folder in the Finder. A green checkmark indicates that the file is also saved to your computer’s offline storage, and a blue symbol shows that the file is synchronizing.
Upload: Drag and drop any new files to this folder, and they will all upload to Dropbox.
Delete: Whatever you delete from your Mac’s Dropbox folder will also be deleted from Dropbox and any other devices that use this Dropbox account.
If you log into Dropbox.com within 30 days, you can retrieve your data from the Deleted files area or restore it from your Mac’s Trash.

Add the Dropbox sidebar to the Finder
It’s likely that the Dropbox folder is hidden in the Finder sidebar’s top position. Alternatively, it can be found in the Finder sidebar’s Places section. From this location, you can drag it to any other location in the sidebar.
But if Dropbox isn’t shown anywhere in the sidebar, use these instructions to add it:
1) Click Go > Go to Folder in the top menu bar of a new Finder window.
2) Type /Users and press Return.
3) Choose the user if your Mac has several user accounts.
4) Last but not least, drag the Dropbox folder to the left sidebar.

On a Mac access Dropbox preferences
The navigation bar provides access to Dropbox settings.
1) At the top menu bar of your Computer, click the little Dropbox symbol.
2) Choose Preferences by clicking the profile symbol.

The Account portion of the Preferences screen also has a sign-out option.
Having trouble logging into Dropbox on a computer? Here is how to solve it
The sign-in window ought to appear automatically after you complete the installation. If you don’t, try opening the Dropbox app from the Launchpad on your Mac; it won’t display an app window. Instead, a tiny Dropbox symbol will appear in the top menu bar. After clicking it, select Sign In from the gear menu by clicking the gear icon.

Sign-in may occasionally fail if you utilized the Step 1 option to connect a computer (when installing the desktop software) or if you have already logged in to the same computer. The app interface that protrudes from the Dropbox menu bar icon in this situation will act as though it is loading or fetching material. But, it usually does nothing and leaves you hanging. Here’s how to repair it, then:
1) On the menu bar of your Mac, right-click the Dropbox app icon and select Quit Dropbox.

2) On your phone, open the Dropbox app and select Account > Manage devices.
3) Tap Unlink after sliding left on the name of your machine.
4) Launch the Dropbox application on your Mac and sign in using the procedures listed above.

Effortlessly remove Dropbox from Mac
If you no longer require Dropbox, I suggest deleting all of its data using a program like AppCleaner.
You might discover that your Dropbox files are still present on your Mac’s local storage even after removing the software. Go to the Users/YourUsername/Dropbox folder to get to them. You can delete the individual files or the entire Dropbox folder from this point. If you can’t find your files here, try looking in /Library/CloudStorage.
Leave a Reply