Best monitor settings for gaming (11 settings)
You need a solid gaming rig and a matching set of monitors to get the best gaming experience. Changes to the best monitor settings for gaming, such as resolution, refresh rate, enabling anti-tearing technologies, and calibration are all examples of monitor settings.
Below are some of the most important items, although there are others for the best monitor settings for gaming. I made a list of things to think about. Explore each one individually, and then update your settings as needed.
Why calibrate a monitor for gaming?
Calibration is the process of changing the settings of your monitor to produce the desired image. This requires adjusting several variables, including brightness, gamma, and contrast.
By calibrating the display, you can achieve better monitor settings for gaming, such as more uniform color in ambient light. Mods can also help prevent eye fatigue from long gaming sessions.
However, you should be aware that gaming displays have poor uniformity, meaning that the screen’s brightness, contrast, and color temperature will vary depending on where you measure them.
Since the variations are subtle, gamers should not worry too much.
Best Ways to Calibrate Your Monitor: Best Monitor Settings for Gaming
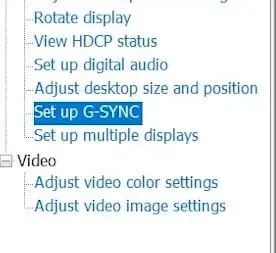
- Color Depth Adjustment
- Connectivity and HDR support
- Calibrate your resolution
- Change monitor refresh rate
- Enable HDR in Windows 10
- Enable FreeSync/G-SYNC
- Calibrating brightness, contrast, and color settings
- Adjust monitor speakers
- Aspect Ratio
- Colorful temperature
- General OSD settings and what they do
1. Adjust the color depth
Adjusting your monitor’s color depth is essential if you want the best monitor settings for gaming to display high dynamic range content. The right configuration will allow your display to display rich, well-blended colors even on an SDR panel.
Nvidia Users
- If you’re using Nvidia, navigate to resolution and refresh the speed settings screen by returning to the Nvidia control panel.
- Select the “Use NVIDIA color settings”radio button under “Apply the following settings”.
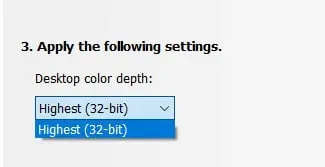
- The drop-down options for Desktop Color Depth, Output Color Depth, Output Color Format, and Output Dynamic Range can be found below.
- Set all of these options to their maximum value before choosing “Full”in the “Output Dynamic Range”menu and “RGB”in the “Output Color Format”option.
- To save these options, click Apply.
- You may have noticed that the output color depth value has decreased if you are using a 4K 144Hz display.
- In this case, increase the value to the maximum value before switching the Output Color Format to YCbCr444.
- Click “apply”again. Reduce the output color format to YCbCr422 if the color depth still fluctuates.
- I advise you to use it exclusively for games and videos, because you will probably see an unsightly, colorless ring surrounding still images and text.
- If that doesn’t fix the problem, you’ll either need to lower the refresh rate or switch to 8-bit output color depth.
- Keep reading to learn more about the best monitor settings for gaming.
AMD USERS
- This step is a bit easier for AMD users.
- On the desktop, right-click and select AMD Radeon Settings.
- Select the “Display”tab in the window that opens.
- There are “Color Depth”and “Pixel Format”fields. The first one shows the “Output Color Depth”setting that I found in the Nvidia Control Panel.

- Chroma subsampling is represented via a pixel format (similar to Nvidia’s output color format). Raise both of them to their maximum position.
- To change the color depth and pixel format, use the AMD Radeon Settings menu by right-clicking on the desktop.
- Color depth is one aspect of the “Best Monitor Settings for Gaming”.
2. Connectivity and HDR support
After preparing your PC to display HDR color, you should make sure Windows 10 has the best monitor settings for gaming enabled.
- Launch the Start Menu, then select Settings.
- Select “Display”after clicking “System”.
- Make sure the current display is selected if you have more than one monitor.
- Set “Play HDR games and apps”to “On”in the Windows HD Color area by scrolling down.
- Just above this setting, click the Windows HD Color Options link.
- You should see a lot of HDR content options in the Display Options section.
- If your display supports HDR, one or more of them should answer “Yes”.
- Turn on “Play HDR Games and Apps”and “Stream HDR Video”at the bottom of the page.
- Depending on the capabilities of your monitor, only one of them may be available.
- A slider that you can use to change the disparity between SDR and HDR content is visible if you scroll further.
- This setting should be increased for monitors with lower brightness. However, you should change your preferences to have “Best monitor settings for gaming”.
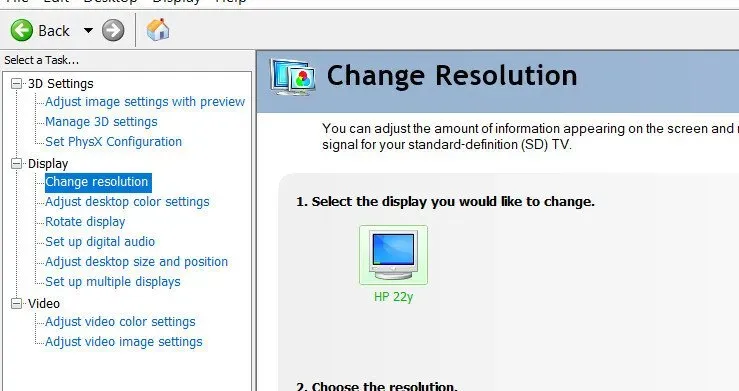
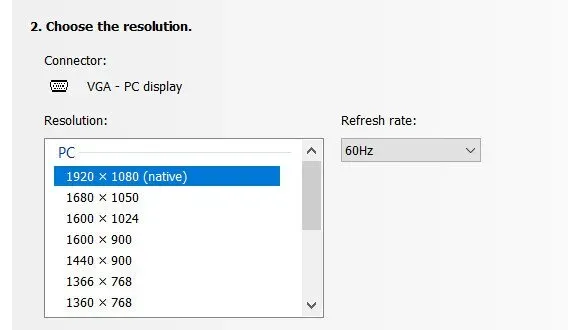
3. Calibrate the resolution
In terms of pixels per inch, screen resolution describes the visual dimensions of your display. The clarity of your photos depends on the screen resolution you choose. Adjust it wisely to have the best monitor settings for gaming.
- A lower resolution produces blurry images, while a higher resolution produces a sharper, higher quality image.
- The resolution for Full HD displays is 1080p or 1920 x 1080 pixels.

- Your preference will determine the ideal resolution for gaming.
- Choose 4K if you want amazing graphics, but 19201080 is the best option if you’re prioritizing game performance.
4K resolution: what is it?
The ideal resolution is ultimately determined by your display size and viewing distance. I’ll talk more about this shortly.
The steps to change your monitor resolution are as follows:
- Go to the “Control Panel”of your PC.
- Select Appearance and Personalization.
- Adjust the screen resolution with a mouse click.
- Set the slider to the screen resolution you want to get the best monitor settings for gaming.
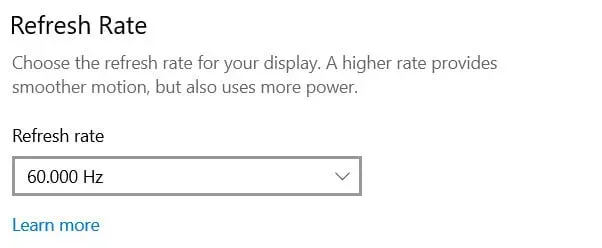
4. Change monitor refresh rate
Refresh rate and screen resolution are practically interchangeable terms. Their refresh rate determines the “smoothness”of your displays. It shows how many times per second your display can refresh visuals.
High-end gaming monitors can deliver refresh rates up to 240Hz, while standard monitors have a 60Hz refresh rate. While a higher refresh rate guarantees a smoother display, most games run best at a 120Hz refresh rate.
The truth is that it gets harder and harder to even perceive the difference as the refresh rate increases. Another thing to remember is that the hardware must support and support your monitor’s refresh rate.
So don’t spend more money on a 120Hz monitor only to find it’s incompatible with your graphics card. Change the refresh rate to get the best monitor settings for gaming.
How to change the refresh rate is as follows:
- Just right click on the desktop.
- Select display settings.
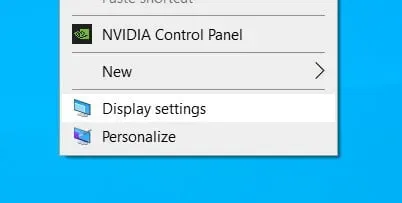
- Click to view additional display options.
- Select your monitor from the drop-down menu.
- To view the properties of the video adapter, click.
- In the dialog that appears, select the “Monitor”tab.
- Select the desired refresh rate from the drop-down list in the monitor settings.
5. Overdrive settings
Monitor response time is increased by overdrive, which also helps to minimize any ghosting or stuttering issues. Unfortunately, using overdrive requires your monitor to have overdrive capabilities.
Use the buttons on the monitor to navigate the OSD. In my opinion, this is vital if you are using adaptive sync technology.
The monitor works on the video card using adaptive sync technologies. Depending on the frames that the video card produces, it changes the refresh rate. Therefore, the refresh rate can fluctuate greatly.
- Additionally, adaptive-sync monitors often have high refresh rates.
- Look at the list of G-sync displays from NVIDIA. Most high quality monitors include adjustable overdrive features.
- To balance this volatility, an overdrive is required.
- This is important as overdrive can lead to reverse ghosting issues, which is another problem.
- Check your settings to get the best monitor settings for gaming.
6. Enable FreeSync/G-SYNC
An AMD FreeSync or Nvidia G-SYNC capable monitor takes precedence. With these technologies, your GPU and display can work together. It delivers a significantly better gaming experience by providing an adjustable frame rate that helps stop screen tearing.
G-SYNC has recently become available for Nvidia’s FreeSync-enabled monitors. Chances are you can still use adaptive sync if you have an Nvidia GPU and a FreeSync display.
Just keep in mind that the list of “G-SYNC compatible”displays officially certified by Nvidia is constantly growing. If your monitor is not on this list, there is no guarantee that it will run G-SYNC flawlessly.
Nvidia Users
- Login to Nvidia Control Panel to get the best monitor settings for gaming.
- To customize G-SYNC, select Customize under Display. After that check “Enable G-SYNC, G-Sync Compatible”.
- Two switches enable G-SYNC in full-screen, windowed, or just full-screen modes.
- First check the box for both. You should change this setting to “full screen only”if you are experiencing stuttering or other strange behavior in the game.
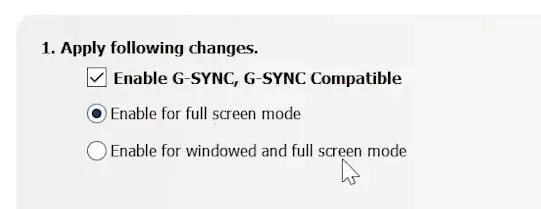
- Click “Apply”after selecting the display and checking the “Enable settings for the selected display model”checkbox.
AMD Users
- You must first activate FreeSync using your monitor’s OSD if you are using AMD hardware.
- This is usually accessible through the Games submenu and can be quickly found, selected, and activated.
- You must re-enter the AMD Radeon Settings menu.
- To enable AMD FreeSync, select the Display tab and click the AMD FreeSync button.
- Although it’s most likely already enabled, be sure to double-check.
7. Adjust brightness and contrast
Many gamers refuse to adjust their monitor at all. The manufacturer often applies some sort of calibration to many high quality screens.
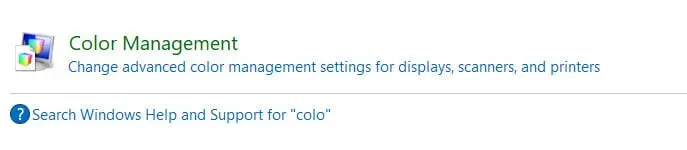
- “Control Panel”must be entered in the “Start”menu.
- Locate the Advanced tab by clicking on the Color Management icon.
- “Display Calibration”must be selected in the “Display Calibration”section.
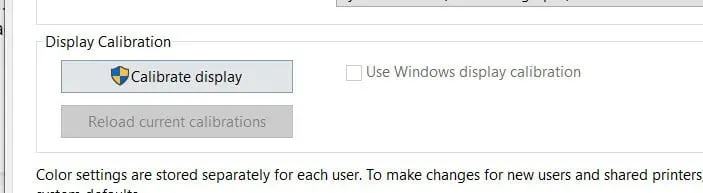
- The Windows display color calibration tool will appear.
- It will guide you through the gamma, brightness, contrast, and color balance settings.
- Windows will prompt you to use the ClearType Tuner to customize the text display.
- Keep reading to calibrate the best monitor settings for gaming.
8. Adjust monitor speakers
Modern monitors often already have speakers. There are exceptions to the rule, they are usually minor and not very impressive. Therefore, it is important to find out what type of sound your monitor is capable of producing.
- Before turning on the speakers, open the OSD menu using the buttons on the monitor.
- Make sure they are not disabled by finding the sound setting (usually it has a separate submenu).
- Then click the Start button, type Control Panel, and press Enter.
- Select the Sound icon. The Playback tab should show your new monitor if you’re connected via HDMI or DisplayPort.
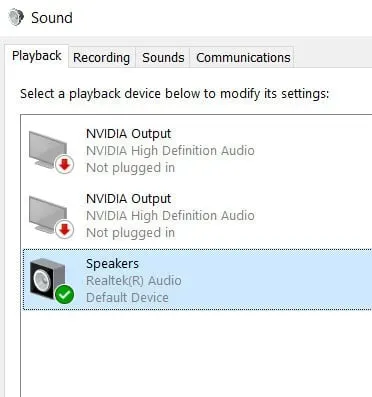
- If you want Windows to output sound through the display by default, right-click and select “Set as Default Device”.
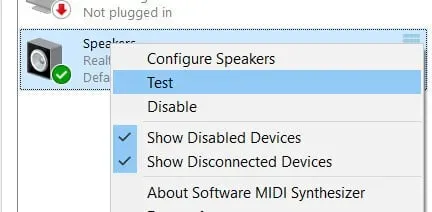
- Do another right-click and select “Check”to make sure that the sound is transmitted correctly.
- Make sure the volume is turned up by returning to the monitor’s on-screen display.
- Check again to make sure your monitor has built-in speakers and can’t send audio through the headphone port just in case you still can’t hear anything.
- Right-click the monitor again as soon as the sound is heard through the speakers.
- To use a simple setup wizard to get your speakers to sound their best, select Set Up Speakers.
9. Aspect Ratio
Due to their striking similarities, many people mistakenly believe that aspect ratio and screen resolution are the same thing. The aspect ratio determines the height and width of the image on the screen, while the resolution determines the number of pixels in the image.
Consider changing the aspect ratio of your monitor if you want to enjoy gaming.
The typical aspect ratio for games is 16.9. However, if you have a larger or 4K display, you can change it to 21.9 instead.
Changing aspect ratio settings can be tricky if you’re using Windows 10.
The only way to change the aspect ratio is through the graphics card control panel.
- Just right click on the desktop.
- Navigate to the “Graphics Settings”option.
- Go to the Zoom page.
- Click to adjust the aspect ratio.
- Change the setting accordingly.
10. Color temperature

When a color is measured in Kelvin, the monitor’s color temperature indicates what that color will look like. Various objects, when heated, emit light, the color of which varies from red to blue.
- Your monitor will appear red when the color temperature is set to zero, and a higher value will make the screen blue.
- When gaming or using a PC, color temperature is a key factor in determining image quality.
- Although 6500K is the usual color temperature for gaming, you can change it depending on your game.
11. OSD general settings
The built-in menu is in each monitor. It allows you to change the main functions of the monitor and the panel image. Please note that the names of these settings vary slightly between manufacturers and are important for the best monitor settings for gaming.
Image settings
presets
- Many monitors come with a set of picture presets designed for different materials.
- Game monitors are often focused on specific genres such as racing or real-time strategy.
- You should browse and see what you like, but feel free to edit your photo because that often produces the best results.
Contrast
- Contrast changes the display of the monitor’s contrast.
- Optimal contrast ratio is essential for the best monitor settings for gaming.
Gamma
- Gamma is closely related to the brightness of your monitor and affects its color, brightness, and contrast.
- It needs to be changed from time to time to bring it into line with the “standard”gamma value. Change it to have better monitor settings for gaming.
sRGB mode
- A common preset color mode used by media manufacturers is sRGB.
- To provide a balanced, true-to-life image, it smoothes the colors.
- This is great for editing photos and movies because it matches the format in which the images were processed, but not ideal for gaming because the monitor looks dim.
blue light filter
- Your eyes can get tired, and your circadian cycle can be affected by too much blue light, making it difficult to sleep at night.
- This setting, which can sometimes be changed to reduce exposure, adds a yellow filter to the image.
Brightness
- Adjust the display brightness to get the best monitor settings for gaming.
- This is often calibrated between 50% and 80% in production.
Active Contrast
- Many monitors have a dynamic contrast feature that automatically adjusts the screen’s contrast based on what’s being displayed.
- The monitor turns black and provides the best monitor settings for gaming.
- Leave this option disabled if you like a static image of your monitor while maintaining the brightness you choose.
sharpening
- For content lower than the monitor’s native resolution, the sharpening feature applies a filter to the image to reduce its softness.
- It is very effective at low doses, but can create artificial images at higher concentrations. To taste, adjust.
Game settings
overdrive
- The overdrive monitor puts it into a higher gear.
- Turning on Overdrive can help eliminate ghosting, but turning it up too much can introduce aberrations.
- Turn this on only as much as you need to in order to stop the ghosting.
Excellent Resolution
- The term “Super Resolution”refers to the display’s built-in scaling to play content at a lower resolution than native.
- Low resolution games often look sharper in Super Resolution mode.
- This may sometimes increase sharpness when viewing content at the monitor’s native resolution.
Trillian/Aim Assist
- While one could rightly argue that they have an unfair advantage, they are great for shooters who don’t let you aim.
- Use them in single player, disable them in multiplayer, otherwise you will be accused of cheating.
white equalizer
- You can instantly change the black levels on your monitor with the handy Black Equalizer feature and get the best monitor settings for gaming.
- By turning it on, you can often see further into darkened windows and other dark places where snipers like to hide.
freesync
- This option, which usually has an on/off switch, enables adaptive AMD FreeSync frame rate sync.
Reduced motion blur
- The MBR does exactly what it claims to do and helps reduce motion blur during tight turns.
- If you enjoy playing fast paced competitive shooters, turn this setting on.
Conclusion
You’ve no doubt made a few comparison purchases before you buy, whether you’re building your first gaming PC or just upgrading your monitor.
I have considered the most typical questions and situations. This will allow you to immediately dive into the action and get the most out of your new gaming monitor’s performance. Follow all the tips to get the best monitor settings for gaming.
FAQ
What are the best settings for an Aoc monitor?
The sRGB color temperature improves the monitor’s fidelity, but locks in brightness at around 82 percent if you use 80 to 90 percent brightness. Otherwise, use a “warm”color temperature. Set the overdrive to “medium”if you’re using loose sync, as strong overdrive leads to severe ghosting when overshooting at slower refresh rates.
What are the best monitor settings for gaming?
Gaming performance is smoother the higher the refresh rate. Each display will be set to its maximum refresh rate. Think of the maximum as a limit that we cannot exceed. For the best experience, we advise you to set the maximum number for them.
Is the Aoc monitor suitable for gaming?
Most use cases are compatible with AOC 24G2. With reduced input lag, high refresh rates and fast response times, this small monitor delivers outstanding gaming performance. Due to its small screen size, it’s suitable for general office use, as long as you’re not too multitasking.
What should my monitor settings be for gaming?
High-end gaming monitors can deliver refresh rates up to 240Hz, while standard monitors have a 60Hz refresh rate. While a higher refresh rate guarantees a smoother display, most games run best at a 120Hz refresh rate.
Leave a Reply