Apple Maps for iPhone Tips and Tricks
Apple Maps, the built-in navigation tool developed by Apple for iOS, isn’t the most popular app – quite the opposite. Although often ignored or removed entirely, Apple Maps contains many valuable features to help you navigate, especially after its overhaul in iOS 15.
Whether you’re new to this app, wondering what’s new in Apple Maps, or you’ve finally decided to give it a try, here are a lot of useful features and tricks to help you get the most out of Apple Maps.
1. Explore with Look Around
Look Around is the Apple Map version of Google Maps Street View. It follows the same concept: you find a place on a map and the app gives you a quick look at that street as if you were standing there.
When you’re looking for a location and you see the binoculars icon, tap it. This should show a popup covering half the screen. You can click the arrows in the upper left corner of the window to expand the view to full screen. Check out our guide to using Look Around in Apple Maps for a better understanding.
2. Use gestures to change the look of the map
Maps can be difficult to use. Don’t worry; you can use gestures to navigate Maps on iOS. For example, you can use two fingers to rotate the map and double-tap to enlarge the map. You can also manually use the zoom gesture to zoom in and out of the display.
What else? You can also adjust the tilt of your map, whether you’re in a 2D or 3D view.
If you want to share your current location with someone, lift up the route card at the bottom and click Share My Location.
You can also share your ETA with your contacts. You can do this by simply telling Siri “Share my estimated time of arrival”and specifying who you want to send it to. This is useful if you are following someone or someone is waiting for you. You can also do it manually:
- In navigation mode, tap the route map → tap Share Estimated Arrival Time.
- Select the contact you want to share your estimated arrival with.
Note. This is an active feature and will automatically update to keep the recipient aware of your current location.
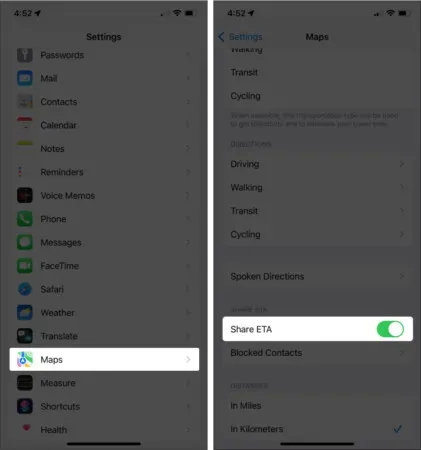
If you don’t see this option, it may not be enabled. Go to “Settings”→ scroll down to “Maps”→ turn on “Share expected arrival time”.
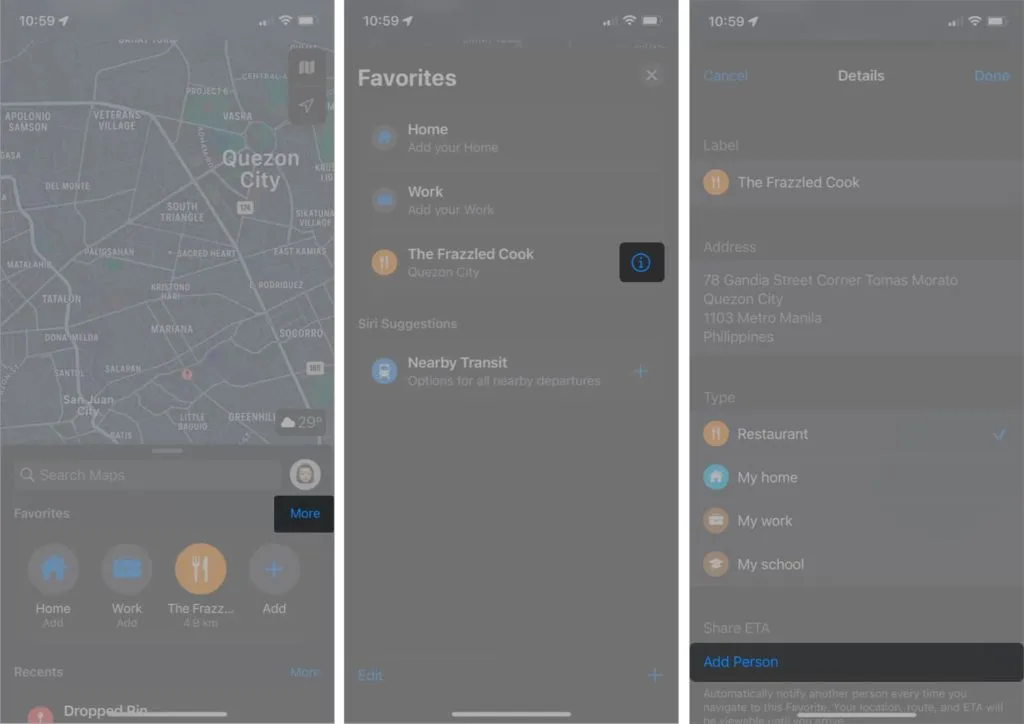
To stop sharing your expected arrival time, tap Sharing at the bottom → select a name. You can also automatically notify someone when you are on your way to a location saved as a Favorite. Do it:
- Open Maps → tap More.
- Select a location → tap the Info icon (i).
- Click Add Person → select a contact.
4. Find a parked car
Apple Maps not only allows you to find you, but also your parked car. This feature will save you time wandering the streets, especially in an unfamiliar area.
This feature requires your device to be connected and paired with your car’s Bluetooth or CarPlay. To set it up:
- Go to Settings → Privacy.
- Select Location Services → scroll down and select System Services.
- Make sure important places are enabled.
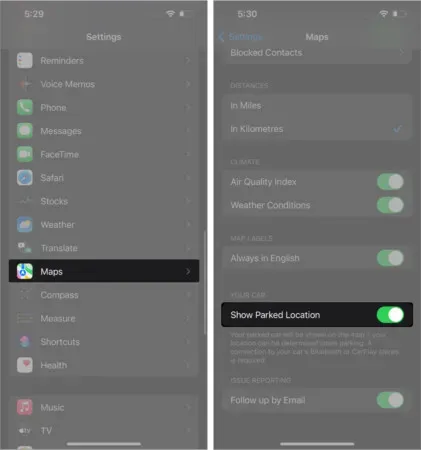
Go to Settings → Maps → turn on Show Parking Location. To find your car, open the app → tap “Search”→ select “Parked car”from the list. You should be able to get directions to your car.
5. See immersive AR instructions
If you’re heading into a major city, Apple Maps lets you scan buildings around you to determine where you are and gives you step-by-step augmented reality (AR) walking directions.
Tap Directions and follow the route as you normally would, but select Walking → tap Start. On the right side of the screen, tap the augmented reality icon, which looks like a 3D hexagon. Please note that this feature is not always available, so you will not always see this icon on your screen.
Your iPhone’s camera will launch, prompting you to scan your surroundings. After that, he will be able to determine exactly where you are and where you are looking. When you rotate your iPhone, you will also see massive street signs in 3D.
Also, there is a hack to allow non-Apple users to use Apple Maps on their devices!
6. Mark the location or add a pin
If you want to mentally mark a place you want to visit in the near future, or see how far it is from you, you can put a pin on the map. Pinning will show you his full address, as well as an estimate of how long it will take to walk, get to work, or drive.
Check out our guide to learn how to add a pin in Apple Maps.
7. Add and get contacts from specific locations
Maps are not just for navigation. You can also use it to get contact information for establishments such as restaurants, cafes, hotels, malls, and hospitals.
Just go to Maps → find your destination. Once you find it, tap the More icon (…) → select Create New Contact to save the location number. You can also call them directly from the app. Just scroll down and click the call icon.
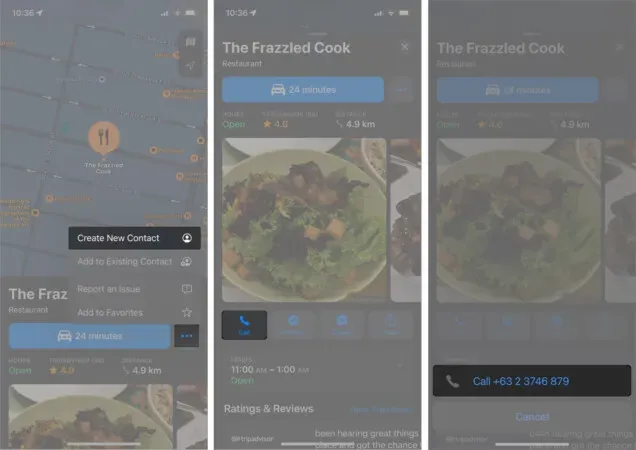
If you’re on the road and see a sign with contact information, you can use Live Text on your iPhone to call the establishment.
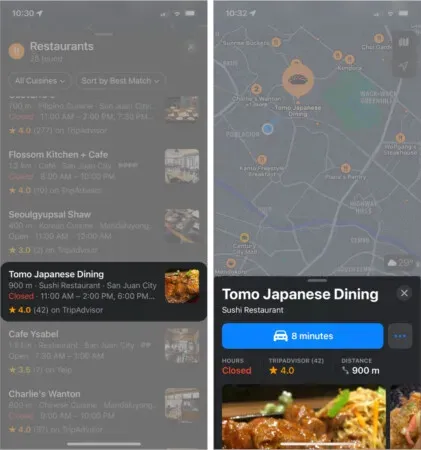
8. Quick search for amenities
You can also use the Nearby Maps feature to find nearby places. They are organized into different categories to help you find what you need faster.
On Maps, tap the search bar to expand it. You should see the categories under Find Nearby. Scroll right to find more options. Categories include COVID-19 testing sites, hotels, restaurants, banks and ATMs, and more.
Then tap a category to make your search easier. For example, if you want to find a nearby restaurant, tap Restaurants. In this case, all restaurants will be highlighted on the map. Use the available filters to narrow down your search.
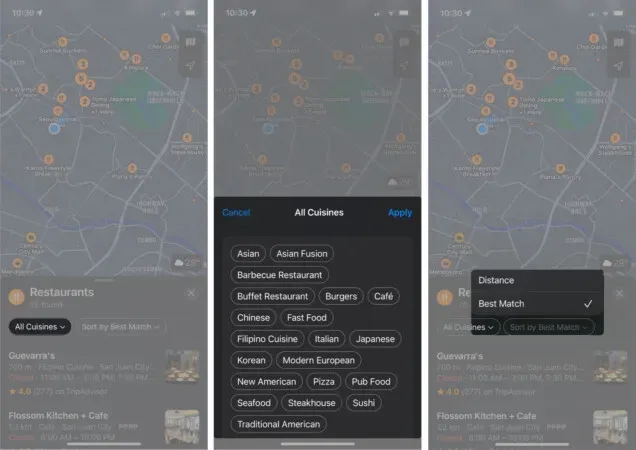
Tap a restaurant in the list or tap an icon on the map to see more detailed information about places, including their distance and estimated travel time.
9. Create your guide
If you’re planning a vacation or a trip, you can use Apple Maps to keep everything organized. You can also use this feature to select destinations for quick access later when you need them. Begin:
- Find a place on the map → select a place.
- Click Manuals → select an existing manual or create a new one by clicking New Manual. If you’ve created a new guide, give it a name.
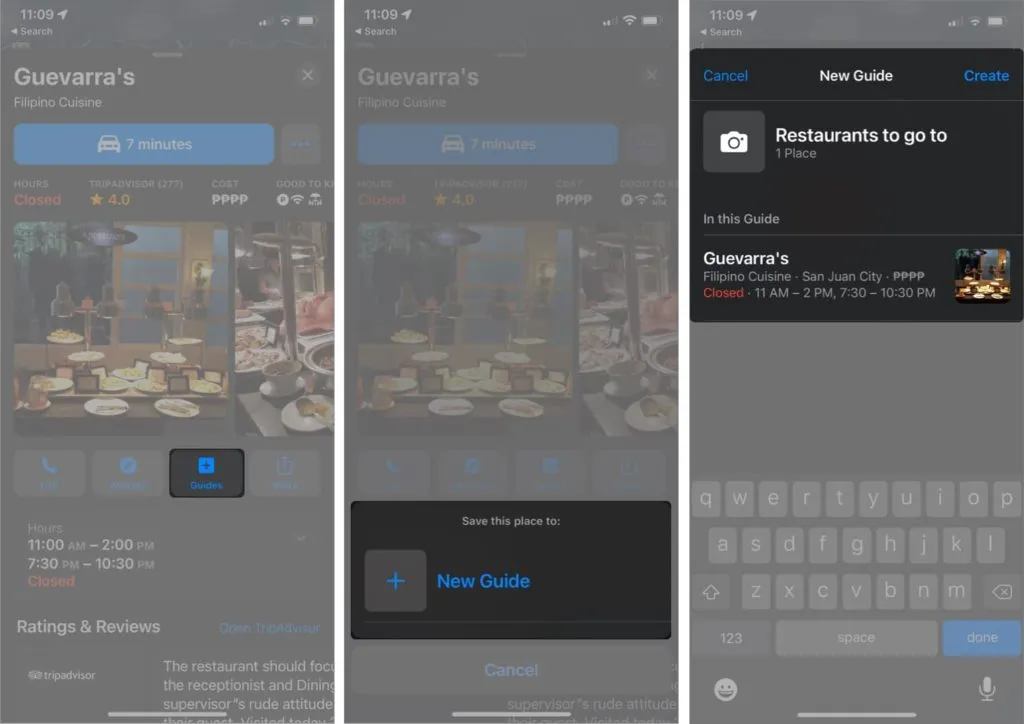
To access guides, lift the route card in Maps, scroll down and select a guide.
10. Ask Siri for direction on Maps
You may have already figured out that Siri is a pretty fantastic assistant. Not only does it know how to answer fun questions or fulfill requests related to Apple Music, but it also helps you get to your destination.
Do it:
- Launch Siri by saying “Hey Siri!”
- Say, for example, “How to get to Guevarra.”
- Touch transport mode. If you can’t, Siri will make a choice based on how close you are to your destination.
- You can get started right away by clicking Go. If you can’t, navigation will start within five seconds.
You can also ask Siri to end navigation before you reach your destination by saying something like “Hey Siri, stop navigating.”
11. Avoid highways and toll roads.
Whether you’d rather avoid tolls to cut costs, or prefer to drive on motorways to enjoy a more leisurely ride on your next trip, you can change some of your Apple Maps settings.
Once you have chosen your destination and are ready to choose the best route, scroll down the list of suggested routes. In the “Avoid”section, you will see the item “Toll roads and motorways”. Turn them on to have Maps suggest a route that suits your preferences.
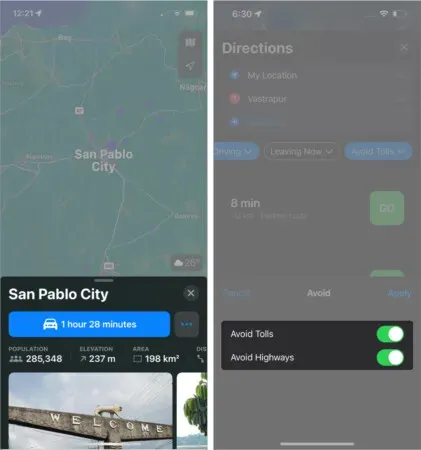
You can apply this Apple Maps setting to all destinations by going to Settings → Maps → Driving. Then turn on Toll Roads and Highways.
12. Enable compass on Maps
Navigating a map oriented in a certain way can be confusing if you are unfamiliar with the area. In compass mode, your iPhone serves as a compass and the map follows and rotates based on where your iPhone is pointing.
To turn on compass mode, press the location arrow until it is vertical with a line at the top. A small compass will also appear.
13. Travel cities with Flyover
One feature that sets Maps apart from Google Maps is the Flyover tour. This allows you to get a drone view of different cities around the world. This is only available for some major cities such as New York.
To explore this feature, find major cities such as London or New York → tap Flyover and start exploring the city by swiping, panning and zooming in and out on the screen.
14. Access Wikipedia from Apple Maps
If you need more information about your destination, Apple Maps sometimes provides location information snippets. Instead of searching in the browser, you can go directly to Wikipedia by clicking “Wikipedia”below the snippet.
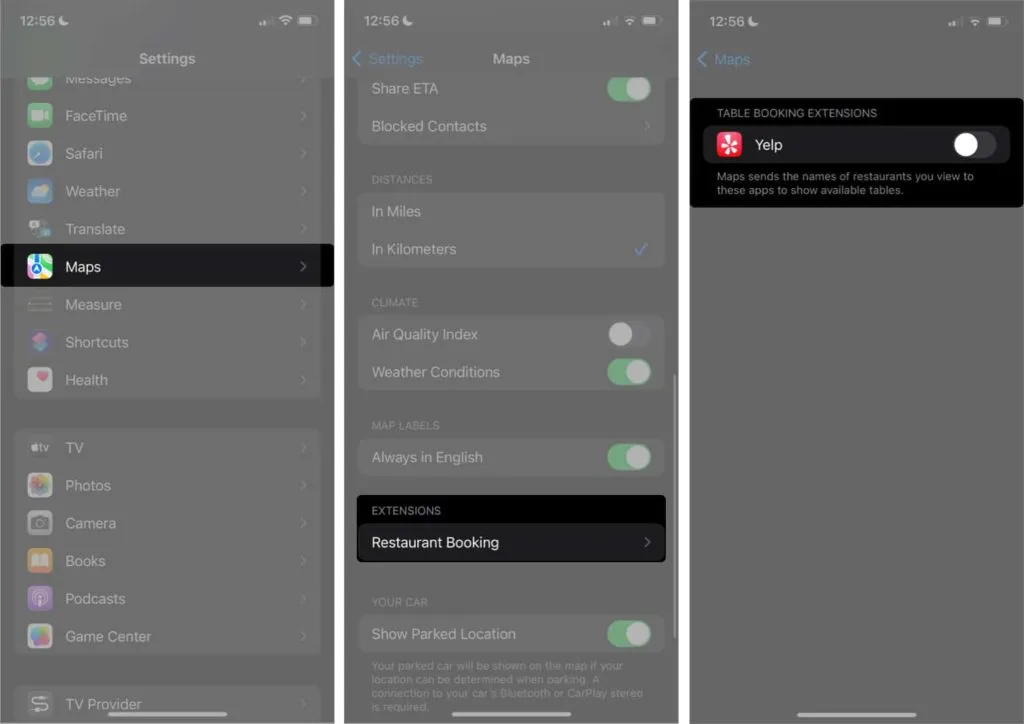
15. Enable Third Party Extensions
Another unique feature that sets Apple Maps apart from other navigation tools is the ability to integrate third-party apps as extensions. Although the choice is limited, this feature reduces the need to switch between applications.
At the moment, the available apps are limited to travel and restaurant booking apps. To enable them:
- Go to Settings → Maps.
- In the “Extensions”section, select “Order a restaurant”or “Order a car.”
- Enable the app you want to include as an extension. Note that you can only see these options if the apps are installed on your phone.
16. Auto focus driving
Distractions are never welcome when we’re trying to focus. If you’re an iPhone owner, you can turn on Focus Mode to stay in the moment and turn off all distracting notifications and alerts.
For many, myself included, driving requires intense concentration. The good thing is that you can let Maps automatically switch to Driving Focus mode as soon as it detects you are driving.
Do it:
- Go to Control Center → press and hold focus mode.
- Tap the More icon (…) next to Driving to change its settings.
- Select While Driving → select Automatic.
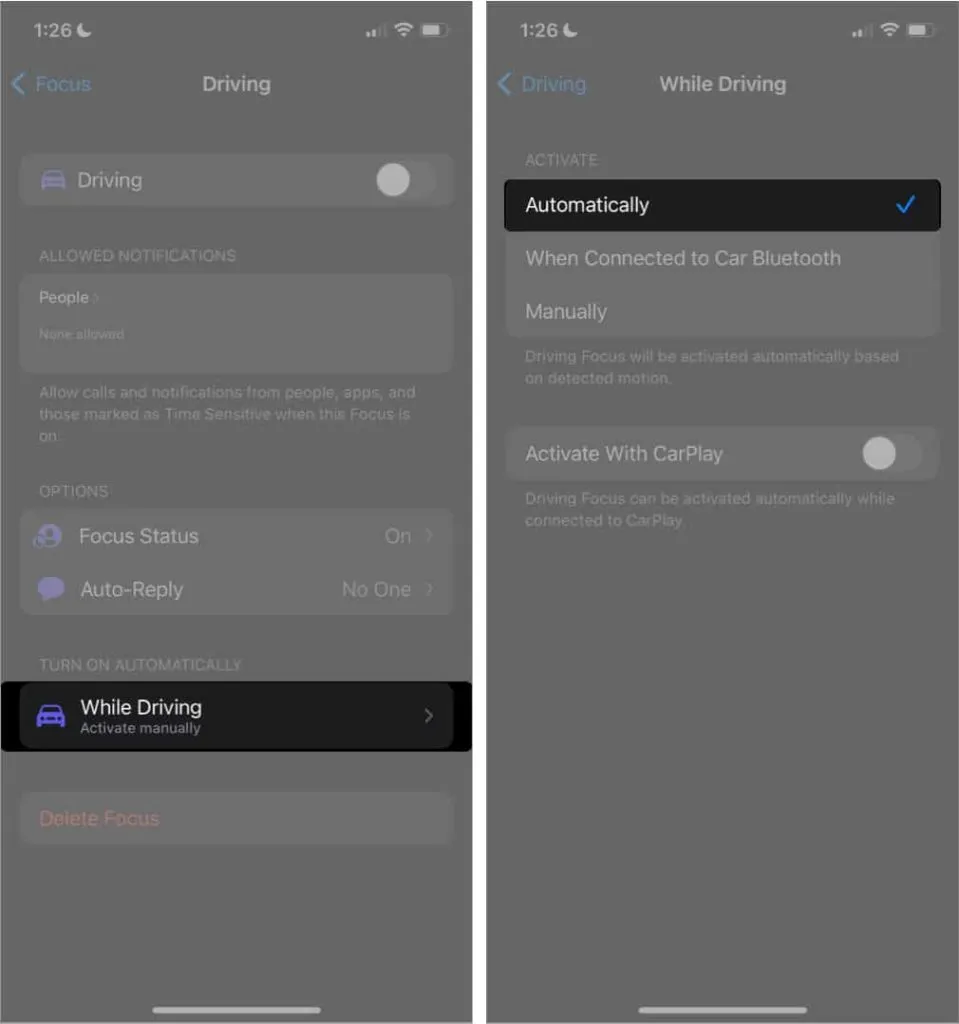
You can also choose to enable it automatically after connecting to CarPlay. To do this, simply enable “Activate with CarPlay”.
The cards work not only on the roads, but also in large institutions such as shopping malls and airports. This can come in handy when looking for bathrooms, shops, or lounges within an establishment. To do this, simply find the institution → tap the switch that says “Look inside.”
18. Report accidents, speed checks and hazards
Everyone hates delays due to accidents and dangers. Help other drivers avoid the hassle by reporting them through the app. To report an incident using step-by-step instructions:
- Touch the gray arrow (^) at the bottom of the screen.
- Select “Report Incident”→ select “Accident”, “Danger”, or “Speed Check”.
If your hands aren’t free, you can ask Siri to do it for you by saying something like “Hey Siri, report an accident”or “Hey Siri, report a roadblock.”
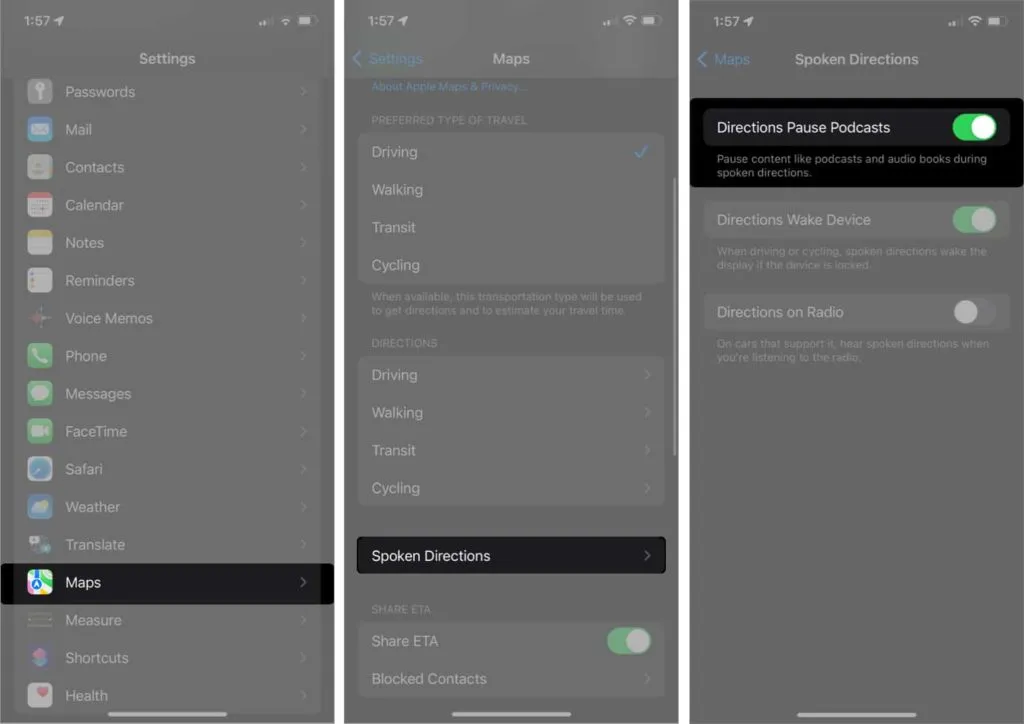
19. Reduce podcast interruptions
Many drivers take the time to listen to podcasts while driving. This makes Siri voice navigation quite annoying. You can set your phone to pause the podcast every time Maps gives you navigation instructions so you don’t miss anything:
- Go to Settings → Maps.
- Tap Talking Routes → turn on Routes, Pause Podcasts.
Completion…
Apple Maps seems like a pretty simple app, but it packs in a lot of useful features. From 3D viewing and AR directions to helping you navigate indoor establishments and plan your next trip, Apple Maps can make travel and navigation smoother.
What is your favorite feature? Are we missing something? Comment them below!
Leave a Reply