macOS Dock Shortcuts: Productivity Tips

The Dock acts as your Mac’s command center. With the Dock, launching, ending, switching between applications, and more is at your fingertips.
If your hands are always on the keyboard—say, you type a lot—keyboard shortcuts let you interact with the Dock without taking your hands off the keyboard to tap the trackpad or reach for the mouse.
I’ve put together a comprehensive list of keyboard shortcuts so you can navigate the Dock and use all the apps in it faster and more efficiently. I’ve also added various ways to customize your Mac’s dock to your liking.
Common Keyboard Shortcuts Applicable to the Dock
The following are common keyboard shortcuts that perform Dock-related actions:
- Command + M – Minimize Front Window to Dock
- Option + Command + D – hide or show dock
- Option + Command + M – Minimize all front application windows.
- Control + Shift + Command + T – Add the selected application from the Finder to the Dock and vice versa
- Control-click anywhere near the delimiter (|) in the dock to open the quick settings menu for the dock.
Shortcuts for Specific Docks
You can access the Dock by pressing Ctrl + F3 or Ctrl + Fn + F3 on a portable keyboard. When the focus is on the Dock, launch any of the following keyboard shortcuts to perform specific actions:
- Left or right arrow keys – Navigate through apps and files in the Dock.
- Up arrow key – open dock menu
- Return – Open the selected application in the Dock.
- Hold Option and use the left and right keys to move the desired application to another location in the Dock.
- The first letter of the application – a quick jump to a specific application
- Option + click on an application with an open window – hide the application window
- Command + click on an app or file to open the location of that app in Finder.
- Control + click on the application – show the context menu of the application’s actions. Hold Option to see Force Exit option
- Option + Control + click on app – Show app menu with force quit option (alternative to above)
- Option + Command + click on an app icon – Switch to an app and hide other apps.
- Control + click → Exit – Exits the open application.
- Command + Option + Return – Hide all windows and applications except the selected application.
- Drag the file to the application icon – open it. For example, to open a document created in Pages, drag the document onto the Pages icon in the Dock.
Add, reorder, or remove items in the Dock
Add apps to the Dock by dragging them to the left of the divider and dragging files and folders to the right.
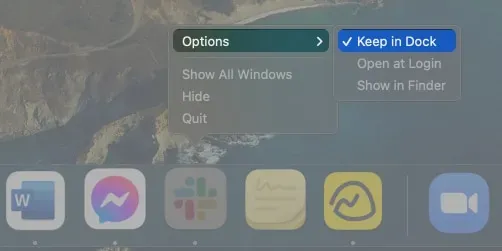
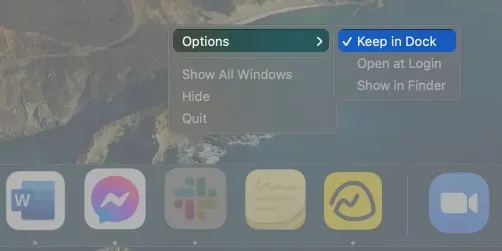
Remove items by dragging them from the dock. Release the app as soon as you see Uninstall. Alternatively, you can also Control-click the application → Options → uncheck Save to Dock.

Note. When you add or remove items from the Dock, only the alias for the item is added or removed. The item remains in its original location on your Mac.
Just hold the icon and drag it to a new location to rearrange the elements.
You can also create easy one-click access to your favorite website by adding a shortcut directly to your Mac Dock.
Your Mac’s Dock has two dividers that divide it into three sections:
- Leftmost section: contains all the applications you have personally selected.
- Middle section: Contains the last three apps you’ve used, including the Handoff icons if you’re using the Handoff feature.
- Rightmost section: Contains the trash, folder or stack of downloads, and minimized windows.

While Apple doesn’t actually let you add another divider for extra organization, you can use the Terminal to add another divider to the Dock.
Different Ways to Customize Your Dock
You can further customize your Dock by changing its look and feel. To get started, go to System Preferences → Dock & Menu Bar. Go to the sidebar and change any of the following:
Consequences
Click the drop-down menu next to Minimize Windows With and choose between a Genie effect and a Zoom effect. The first one adds a nifty genie in a bottle animation whenever you minimize the window.
Size and magnification
Move the slider to adjust the size of the icons in the Dock. Zoom is another great graphic that zooms in on applications in the Dock when they are under your cursor. To turn it on, check the box next to Zoom and move the slider.

Color
If you need more customization, you can also change the color of your dock, but since there’s no way to change it on your Mac, you’ll have to do a little workaround.
Job title
You may be used to seeing the Dock at the bottom of the screen, but you can actually move the Dock on your Mac to the left or right vertically.

Minimize window to application
If you find minimized windows an eyesore, you can minimize them to the application instead. This means that minimized windows will not appear in the Dock, but will be found in the application’s context menu.
Show Recent Apps in Dock
Reviewing the apps you last used can help your workflow, especially if you’re likely to use them again soon. If not, you can choose not to show them in the dock.
Auto hide dock
While the dock is undeniably handy, it can also be a distraction. You have the option to automatically hide your Dock when you’re not actively interacting with it. To show the Dock on a Mac, hover your mouse over its location.
To keep your Dock visible, uncheck “Auto hide and show Dock in Dock & Menu Bar settings”.
Show indicators
You may have noticed tiny dots under some apps in the Dock. These are indicators that tell you that the application is open. You can hide this by unchecking “Show indicators for open applications”.
Completion…
While the Dock can already help you do your job more efficiently, learning how to interact with it with shortcuts and customize it to suit your day-to-day workflow can take your productivity to the next level!
Are you more of a classic clicker or a keyboard shortcut master? Have we covered all the shortcuts for the Dock? If not, let us know in the comments below and we’ll add it to the list!
Leave a Reply